(Deprecated) Custom Segment Setup
This document describes the steps required to incorporate a custom segment into a GT eForm. A custom segment is used when the standard configuration cannot satisfy the form’s requirements. An example of this would be a form that has data deeper than level one (a grid).
The example used in this document is for a form that is used to load data from an external file into a grid, with the grid requiring more than the maximum columns – twenty – available with the Grid Segment.
Create Page-Related Objects
Using a custom component in a form first requires creating page-related objects in the same manner as with traditional components. Each of the following steps is performed in Application Designer.
Create a Custom Subpage
All custom pages live within the form as a custom segment. A custom segment relates directly to a subpage. Therefore, custom page elements must be put within a page of type subpage.

Create Custom Component and Page
The next step is to open up both the component and page that define the GT Form. Make a copy of both, including any PeopleCode programs when prompted. Note there are different GT objects for both Fluid and Traditional displays.
For Fluid, the objects to copy are:
- Component
G3FORM_FL - Page
G3FORM_PAGE_FL
As an example, these are copied to objects reflecting the name of the form:
- Component
G_FORM_ITEM_FL - Page
G_FORM_ITM_PAGE
In the copied component insert the copied page. Note the original pages must be left in the component. The component will look similar to this:

Once the component has been created it must be attached to a menu. For example, the component G_FORM_ITEM_FL was added to the menu G_FORMS. Note the component does not require registering to the portal but it does need to be added to a permission list.
The last step is to place the new subpage within the cloned GT page. For example, the subpage G_FORM_ITEM_SBF is added to G_FORM_ITM_PAGE. The main page already has several custom segments within; these are subpages for comments, navigation, etc. It is recommended the new subpage is placed using the same design pattern as these.

Create or Update Form Application Package
The custom segment is implemented within the application package for the form. Create and register this application package if one does not exist.

Each custom segment is placed within the CustomSegments subpackage. The name of the class is arbitrary. In this example, AddItems is for control of the custom segment discussed above. ItemAttachments is an override driver for the delivered attachments custom segment.

The application class at a minimum must have the following:
- A constructor that instantiates the superclass
G3SEG:Segment - The method GetSubpage which returns the name of the subpage
- A getter for name that returns the name of the segment. This is used when defining the custom segment in the form setup.
Optionally, other segment methods can be overridden, for example:
- Use
JoinToForm()to add custom structures, such as a rowset, to the main form. This makes it possible for custom data to be merged into the main form’s data. - Use
SavePreChangeHook()to copy custom form data to the form’s main rowset. This requires usingJoinToFormso there is a location to copy the data to. - Refer to the Appendix for an example.
Update Form Configuration
Recognizing Custom Segments
Once the application class is created Custom Parts must be loaded for the segment driver classes to be available to the form.
Navigation: Manage GT eForms 3.x > GT Technical Setup > Load Parts (3.50 Standard) > Catalog Custom Parts
After custom parts have been loaded, the custom segment drivers are identified on the form’s configuration. This is done on the Data page within the Custom Segment Settings. New custom segments will appear automatically if the class was properly constructed.
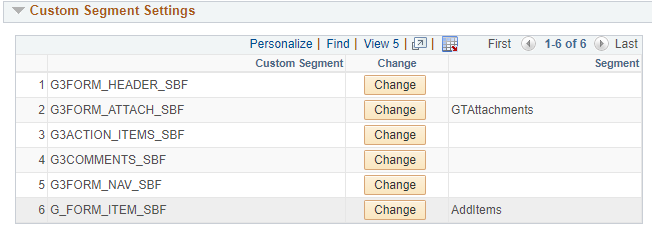
The Change button must be clicked to choose the desired class to use with the segment. For completely new segments, as with G_FORM_ITEM_SBF, there will be only a single choice. However, delivered custom segments can be overridden as is shown above with the G3FORM_ATTACH_SBF segment. This is known as a custom segment override driver.
Segment Configuration
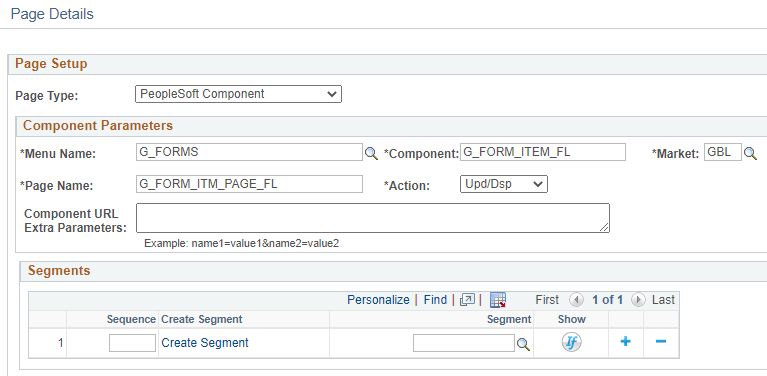
The custom component copied from the delivered GT Form component must be identified in the segment configuration on the Pages tab. The Page Type option is “PeopleSoft Component”. This will open up the component parameters where object information is entered. These parameters reference the custom menu, component, and page created earlier.
Appendix
import G3SEG:Segment;
import G3FORM:Form;
import G_FORM_ITEMS:Utilities:ItemRef;

class AddItems extends G3SEG:Segment
   method AddItems(&_form As g3form:Form);
   method GetSubpage() Returns string;
   method JoinToForm();
   method saveprechangehook();
   property string name get;
end-class;

Component G3FORM:Form &G3FRM;
Component G_FORM_ITEMS:Utilities:ItemRef &itemRef;

method AddItems
   /+ &_form as G3FORM:Form +/
      %Super = create G3SEG:Segment(&_form);
   end-method;

method GetSubpage
   /+ Returns String +/
   /+ Extends/implements G3SEG:Segment.GetSubpage +/
   Return "G_FORM_ITEM_SBF";
end-method;

/* makes the custom rowset a child of mRowset so it can be saved with form data */
method JoinToForm
   /+ Extends/implements G3SEG:Segment.JoinToForm +/
   Local Rowset &rsItems = CreateRowset(Record.G_FORM_ITEM_DVW);
   %This.Form.mRowset = CreateRowset(%This.Form.mRowset, &rsItems);
end-method;

/* saves the custom rowset to the form rowset */
method saveprechangehook
   /+ Extends/implements G3SEG:Segment.SavePreChangeHook +/
   &itemRef.rsItems.CopyTo(%This.Form.mRowset.GetRow(1).GetRowset(Scroll.G_FORM_ITEM_DVW))
end-method;

/* descriptive name shown when overriding the segment on the Data page of form setup */
get name
   /+ Returns String +/
   /+ Extends/implements G3SEG:Segment.name +/
   Return "AddItems";
end-get;