Configurable CI
GT eForms™ form solutions often integrate with PeopleSoft components using component interfaces (CI). A CI allows you to programmatically interact with a component as if it were a manual transaction in a browser, including the logic and code associated with that transaction. Configurable CI facilitates functional development of CI transactions in configuration as opposed to a completely technical development cycle.
Navigation: Manager GT eForms 3.X > GT Functional Setup > eForm Parts Gallery > Configurable CI > Configurable CI Setup
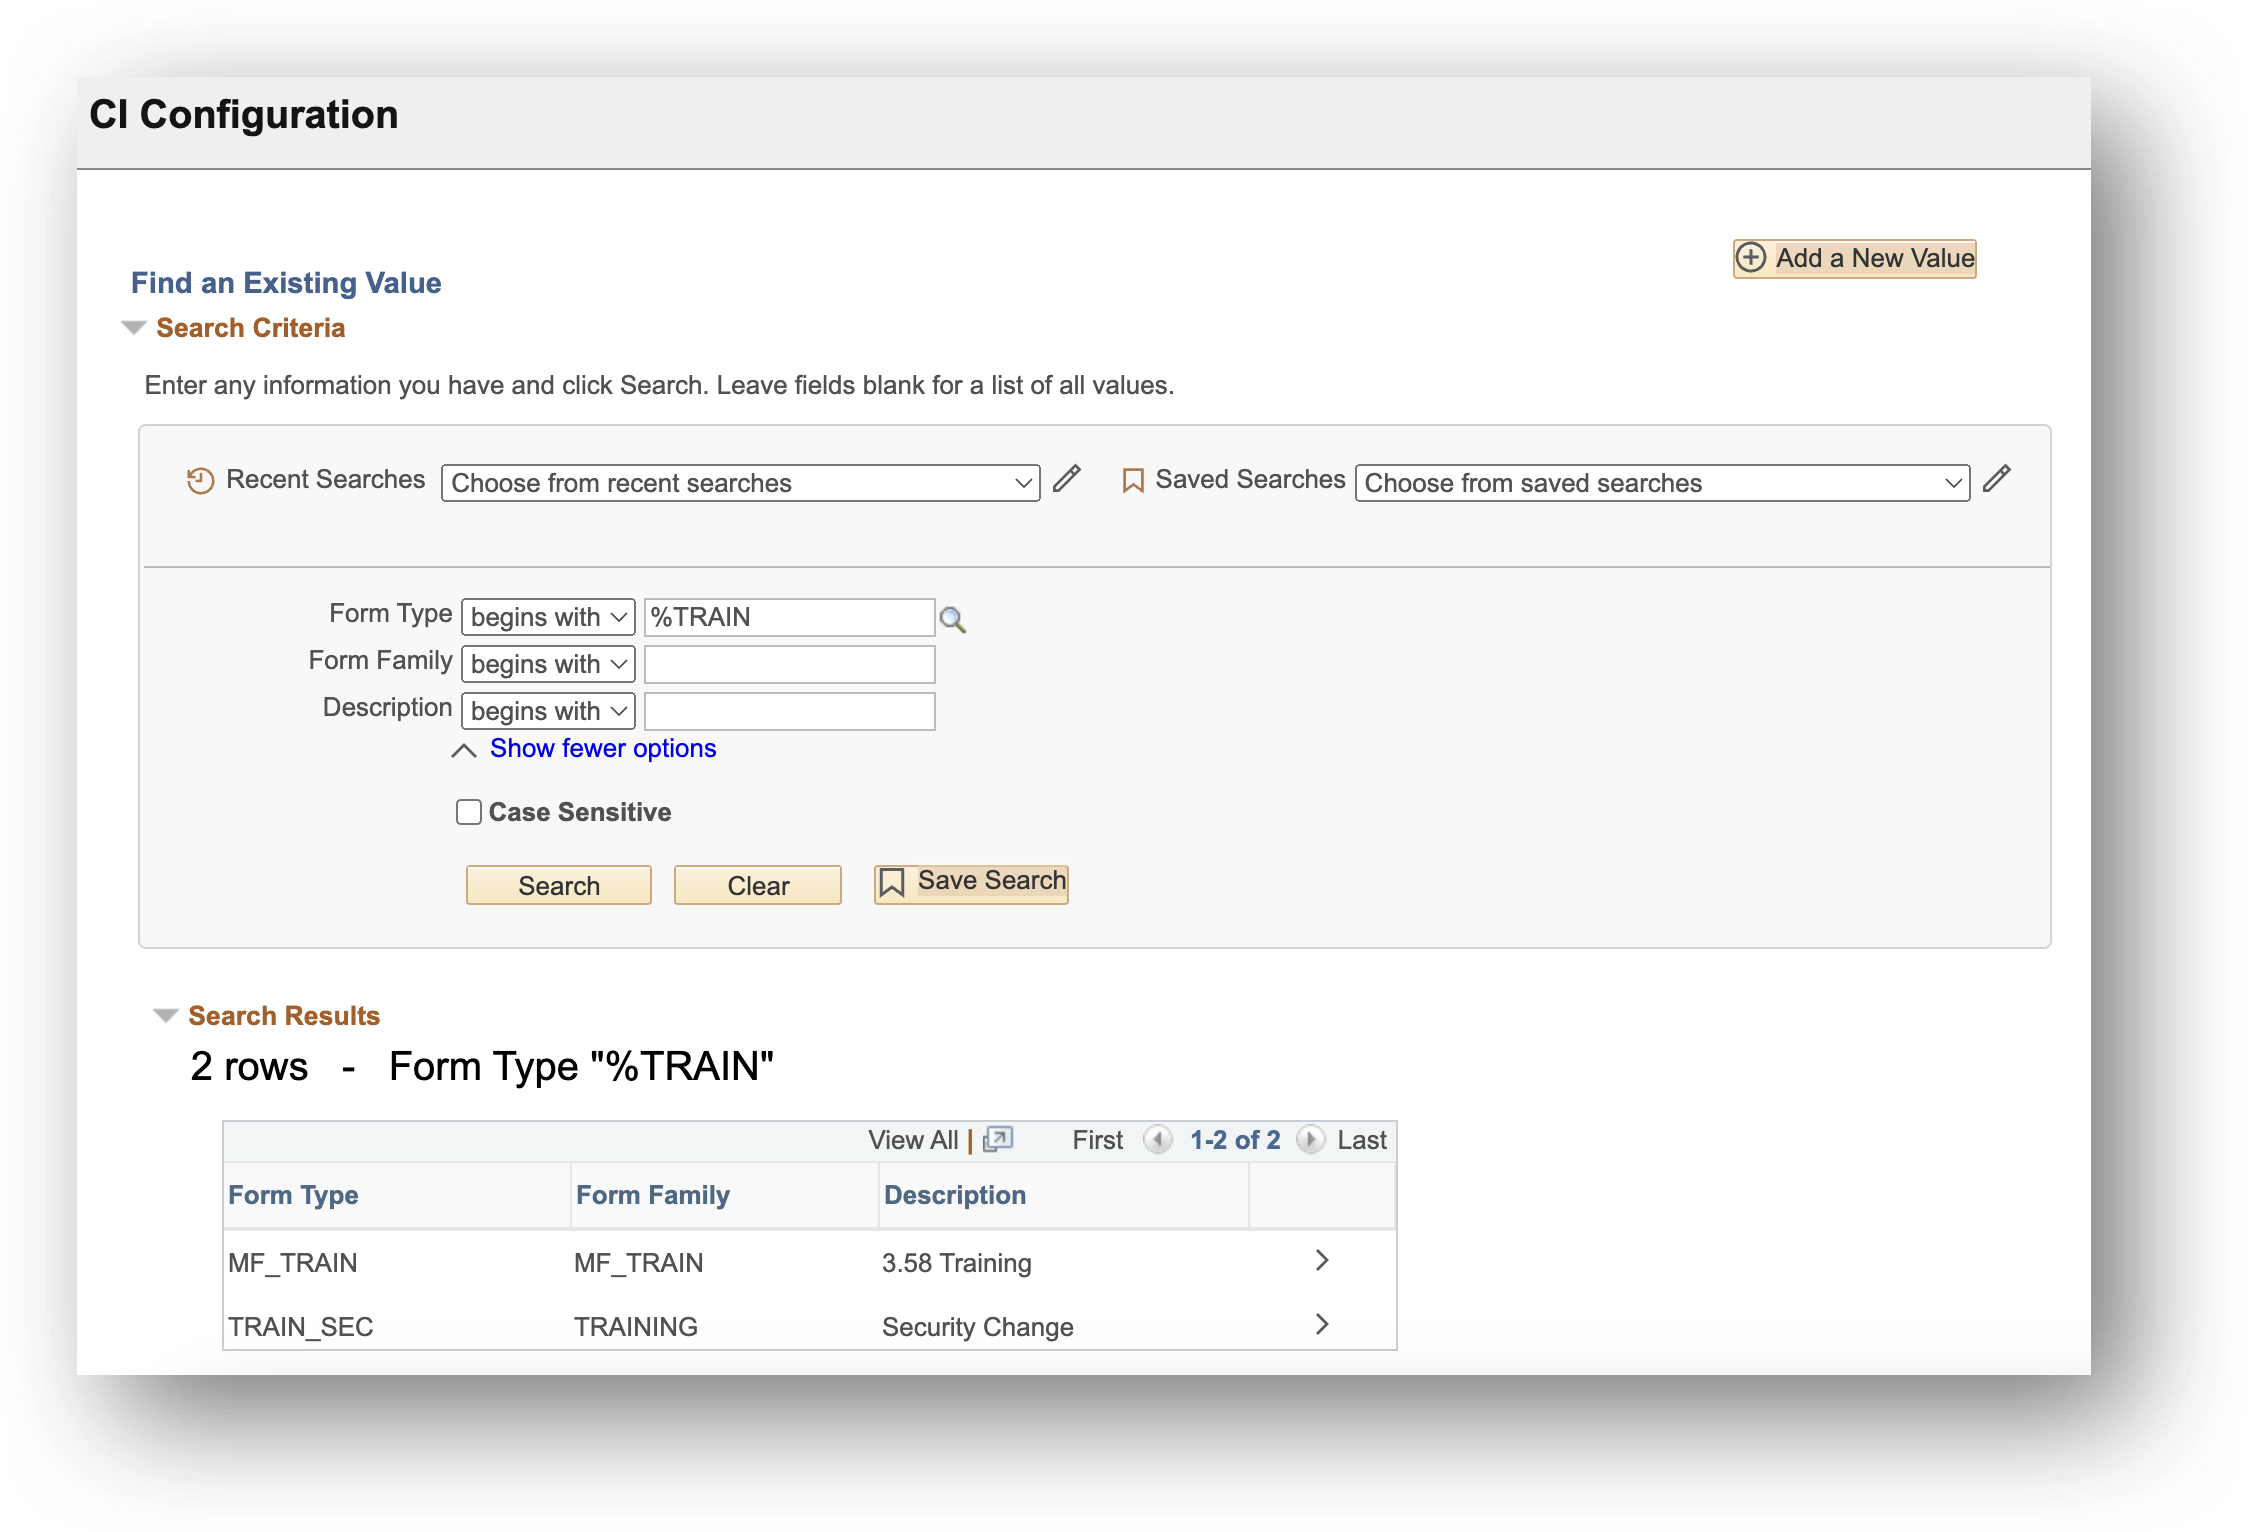
Search Page
The Configurable CI search page allows for you to either:
- Find existing Configurable CI setup by form type (Find an Existing Value search page)
- Create Configurable CI setup for a new form type (Add a New Value search page)
| Field | Value/Use |
|---|---|
| Form Type | Search for an existing form type with a Configurable CI defined. If your form type cannot be found, use the Add a New Value button. Note: Only form types with “Use Helium Performance” checked on Form Setup can be selected to define a configurable CI. |
| Form Family | Search for forms, by the Form Family, that already have a CI configured |
| Description | Search for forms, by the Form Type description, that already have a CI configured |
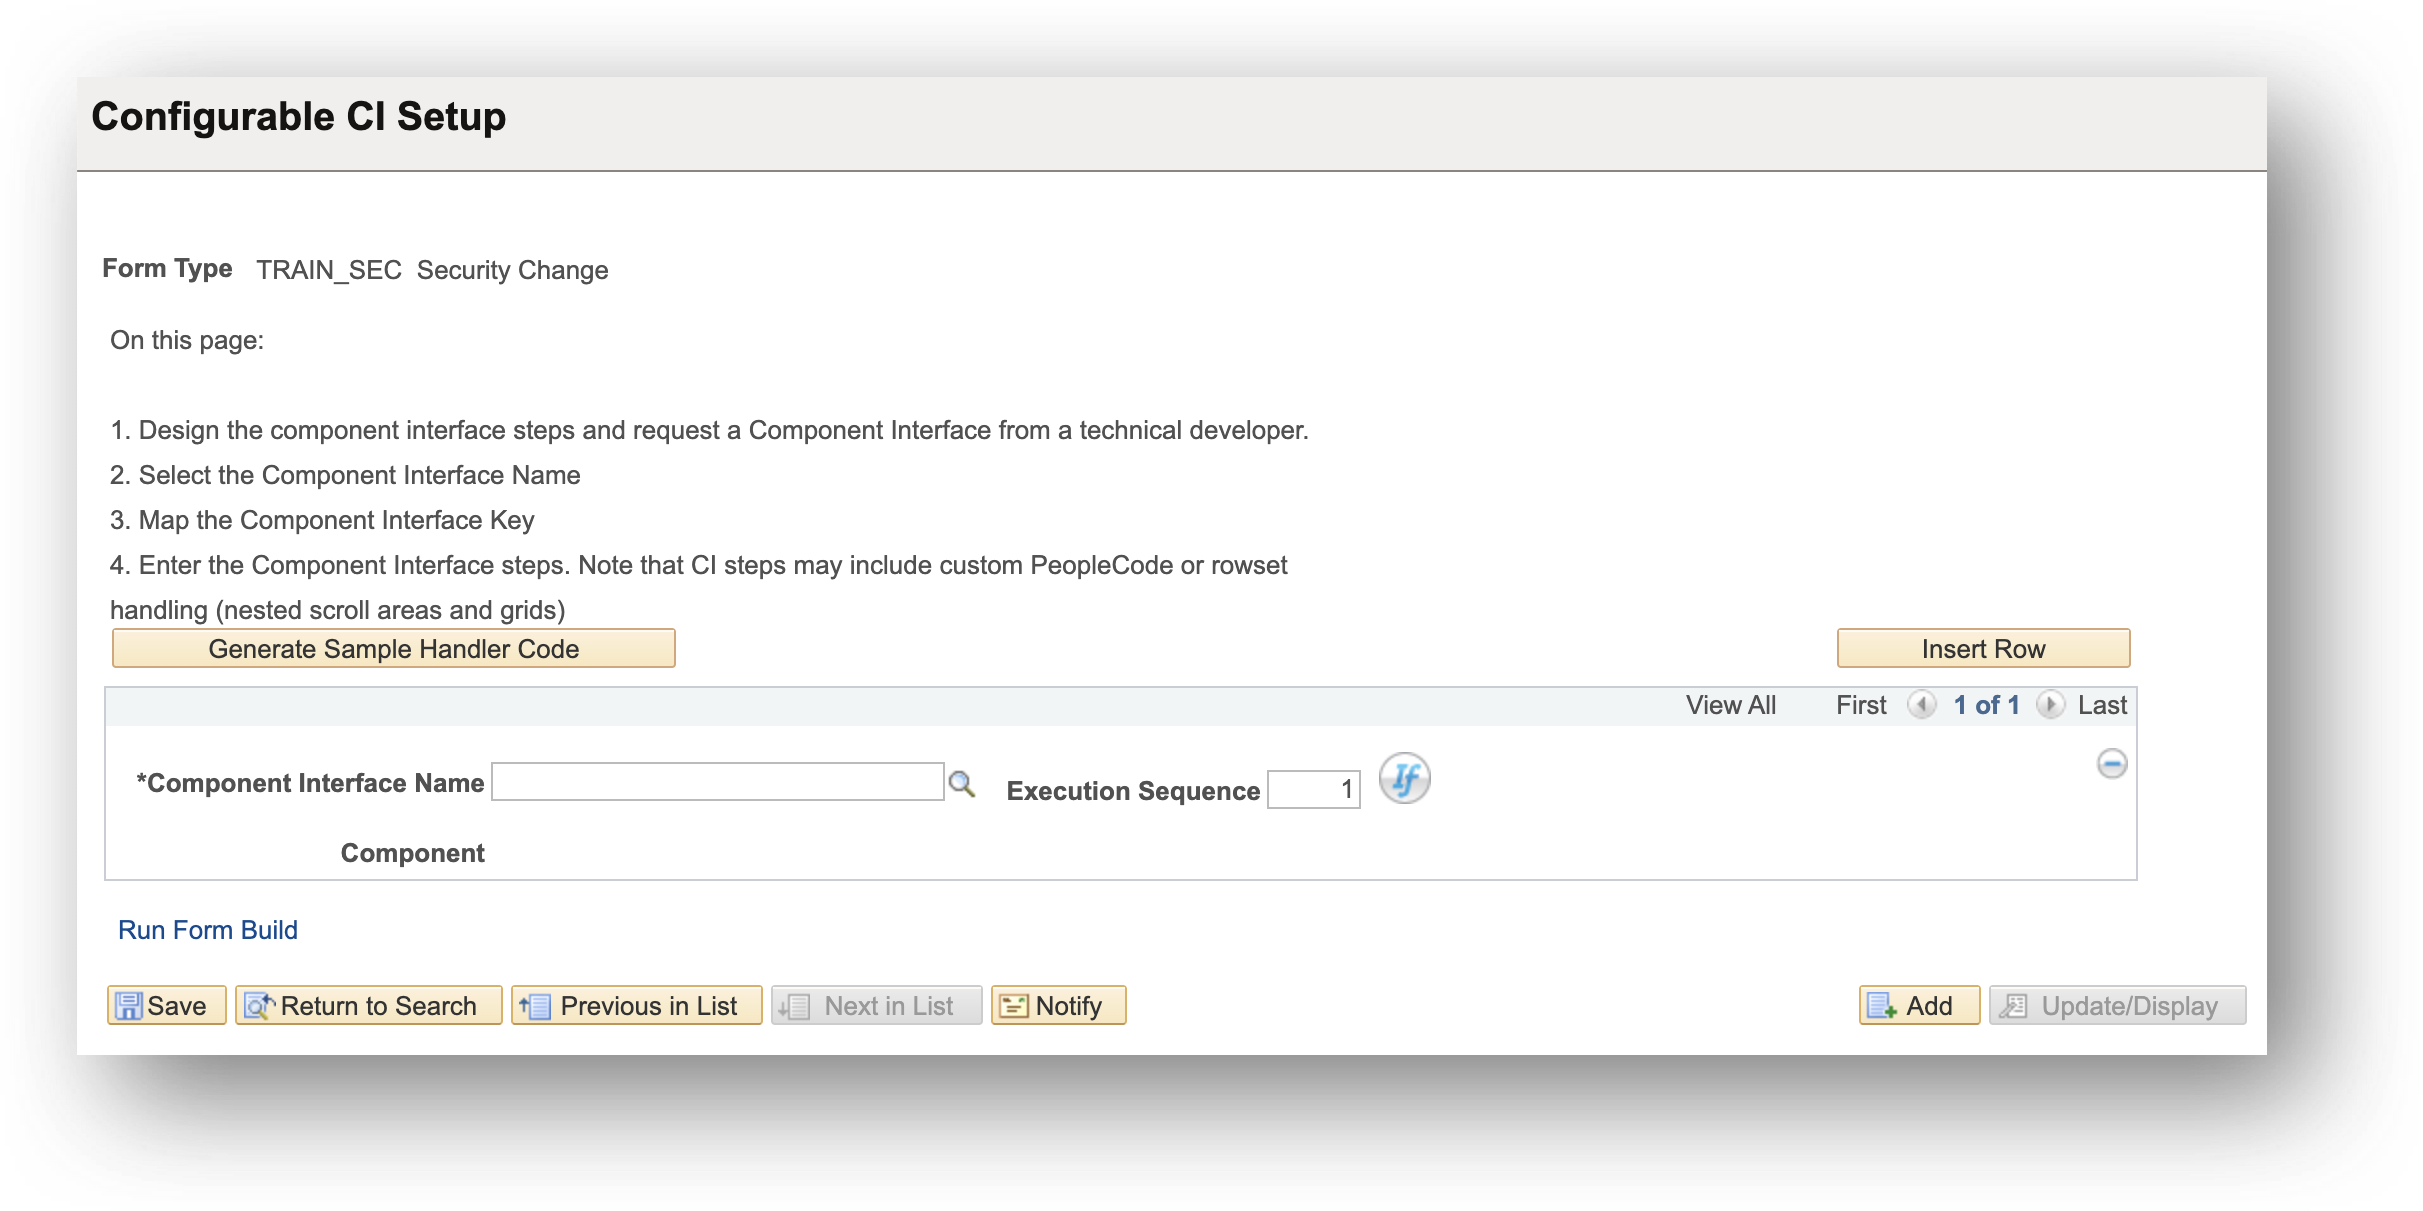
Configurable CI Setup Page
This page includes the configuration that controls how a form's CI transaction(s) will be executed. It includes setup for the following:
- One or more CIs that will be executed for the form type, along with conditional logic to determine when each should be fired
- Defining how each CI should interact with its component search
- Defining the logic for how the actual CI transaction should be executed
Note: All the configuration settings from this page will be moved with the GT Form Transporter when you migrate the specified form type. However, if a component interface is created or updated in app designer, it will need to be migrated with an App Designer Project
Select Component Interface
The first step to configuring a CI transaction is to select a Component Interface name. CI transactions require "component interface definitions" to be defined before the transaction can be configured.
Oracle delivers many component interface definitions that can be leveraged in Configurable CI, but it is possible that your target component does not yet have a CI definition associated. If this is the case, you will need to send your CI design spec to a developer to create the CI definition. Typically, this task does not take long. Your developer will need the name of the component and the step-by-step instructions for the transaction execution. The easiest way to know if there is an existing CI definition is to use the Component Interface Name prompt where you can search by component name.
Note: It is possible that a CI definition exists for your component but does not include all the fields that you need to update as part of your transaction. If this is the case, you will need a developer to create/update a CI definition that includes all required fields.
| Field | Value |
|---|---|
| Generate Sample Handler Code (button) | Opens a window to display the code that should be applied to the Form Type’s Application Package in App Designer, which will call and execute the configured CI. See below for a visual. |
| Insert Row (button) | Adds a new row to configure another Component Interface Name for the Form Type |
| Delete (minus button) | Deletes the entire setup for the visible Component Interface Name |
| Component Interface Name | Enter the name of the component interface object created in App Designer. IMPORTANT: PeopleSoft delivers many component interface objects that may be employed here. However, if the target component does not have a component interface object already built, or if the component interface object is missing records/fields that need to be updated as part of a transaction, a developer must build a custom component interface object in App Designer. This does not usually take a significant amount of time if the functional provides a list of fields that need to be updated/used as part of the transaction. |
| Execution Sequence | Automatically increments as new rows are added, but can be changed to determine the order the CIs should fire for the form |
| Visual If | Click to configure logic that, if true, will run the CI. If the logic is false, that CI will be skipped and will move to the next CI according to the Execution Sequence. |
| Component | Displays the name of the component tied to the Component Interface Name. The value is automatically populated and read-only. |
| Run Form Build (link) | Opens a window to allow the user to build the form’s dependency network. A form build is required any time a visual if is configured, at any level of the CI, in order for that visual if logic to be added to the dependency network. |
Configuring Multiple CIs for a Form Type
Configurable CI supports executing multiple CI transactions for a form type. It’s important to note that if multiple CIs are added it will run ALL CIs where the Visual If logic evaluates to True. This means that if no Visual Ifs are added, then all the CIs would run. Example: If 5 CIs are added and 3 have true conditions, all 3 will run in the defined execution order.
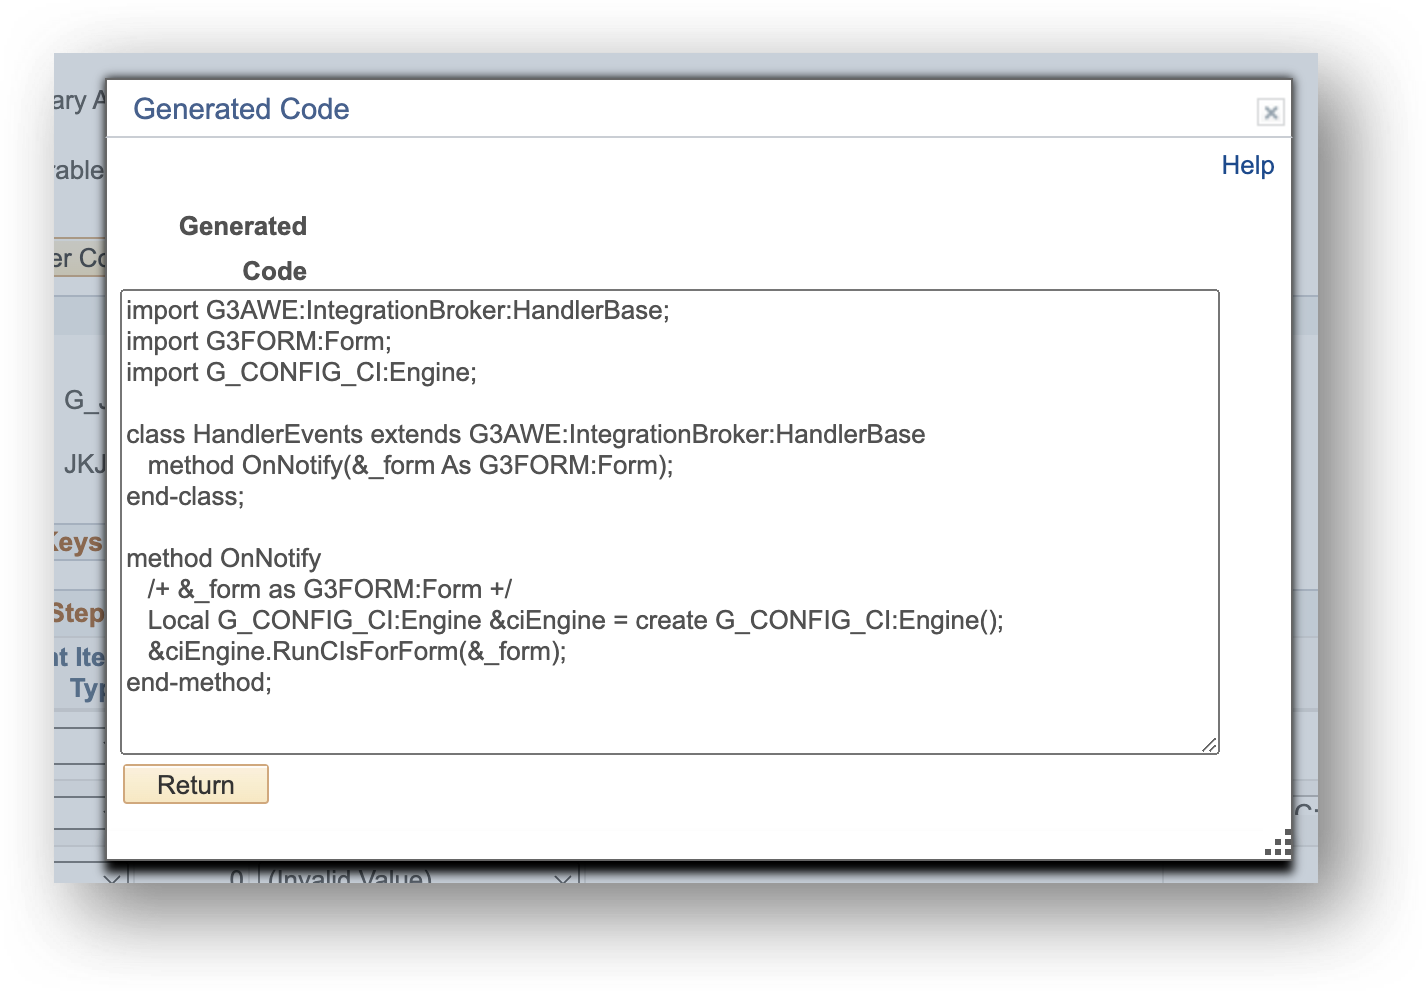
Generate Sample Handler Code
The second step to configuring a CI transaction is to place a small piece of code to the form application package. This is a technical task, though it's very quick. To do so, click the Generate Sample Handler Code button, which will bring up a modal window with code that can be copied and directly pasted into the [form app package]:HandlerEvents class. No edits need to be made to the code for it to work, nor does the code need to be changed as updates/changes are made to the Configurable CI setup.
Please note that this code will execute configured CIs only after the form undergoes all approvals and goes to the Authorized status. If a CI needs to be triggered at a different point in the form flow, such as on a button click or during page navigation, the Configurable CI can still be utilized; however, the code will need to be placed in a location other than the HandlerEvents class in the form application package. It is also possible that additional code will be required to make this work sucessfully depending on the business process needs.
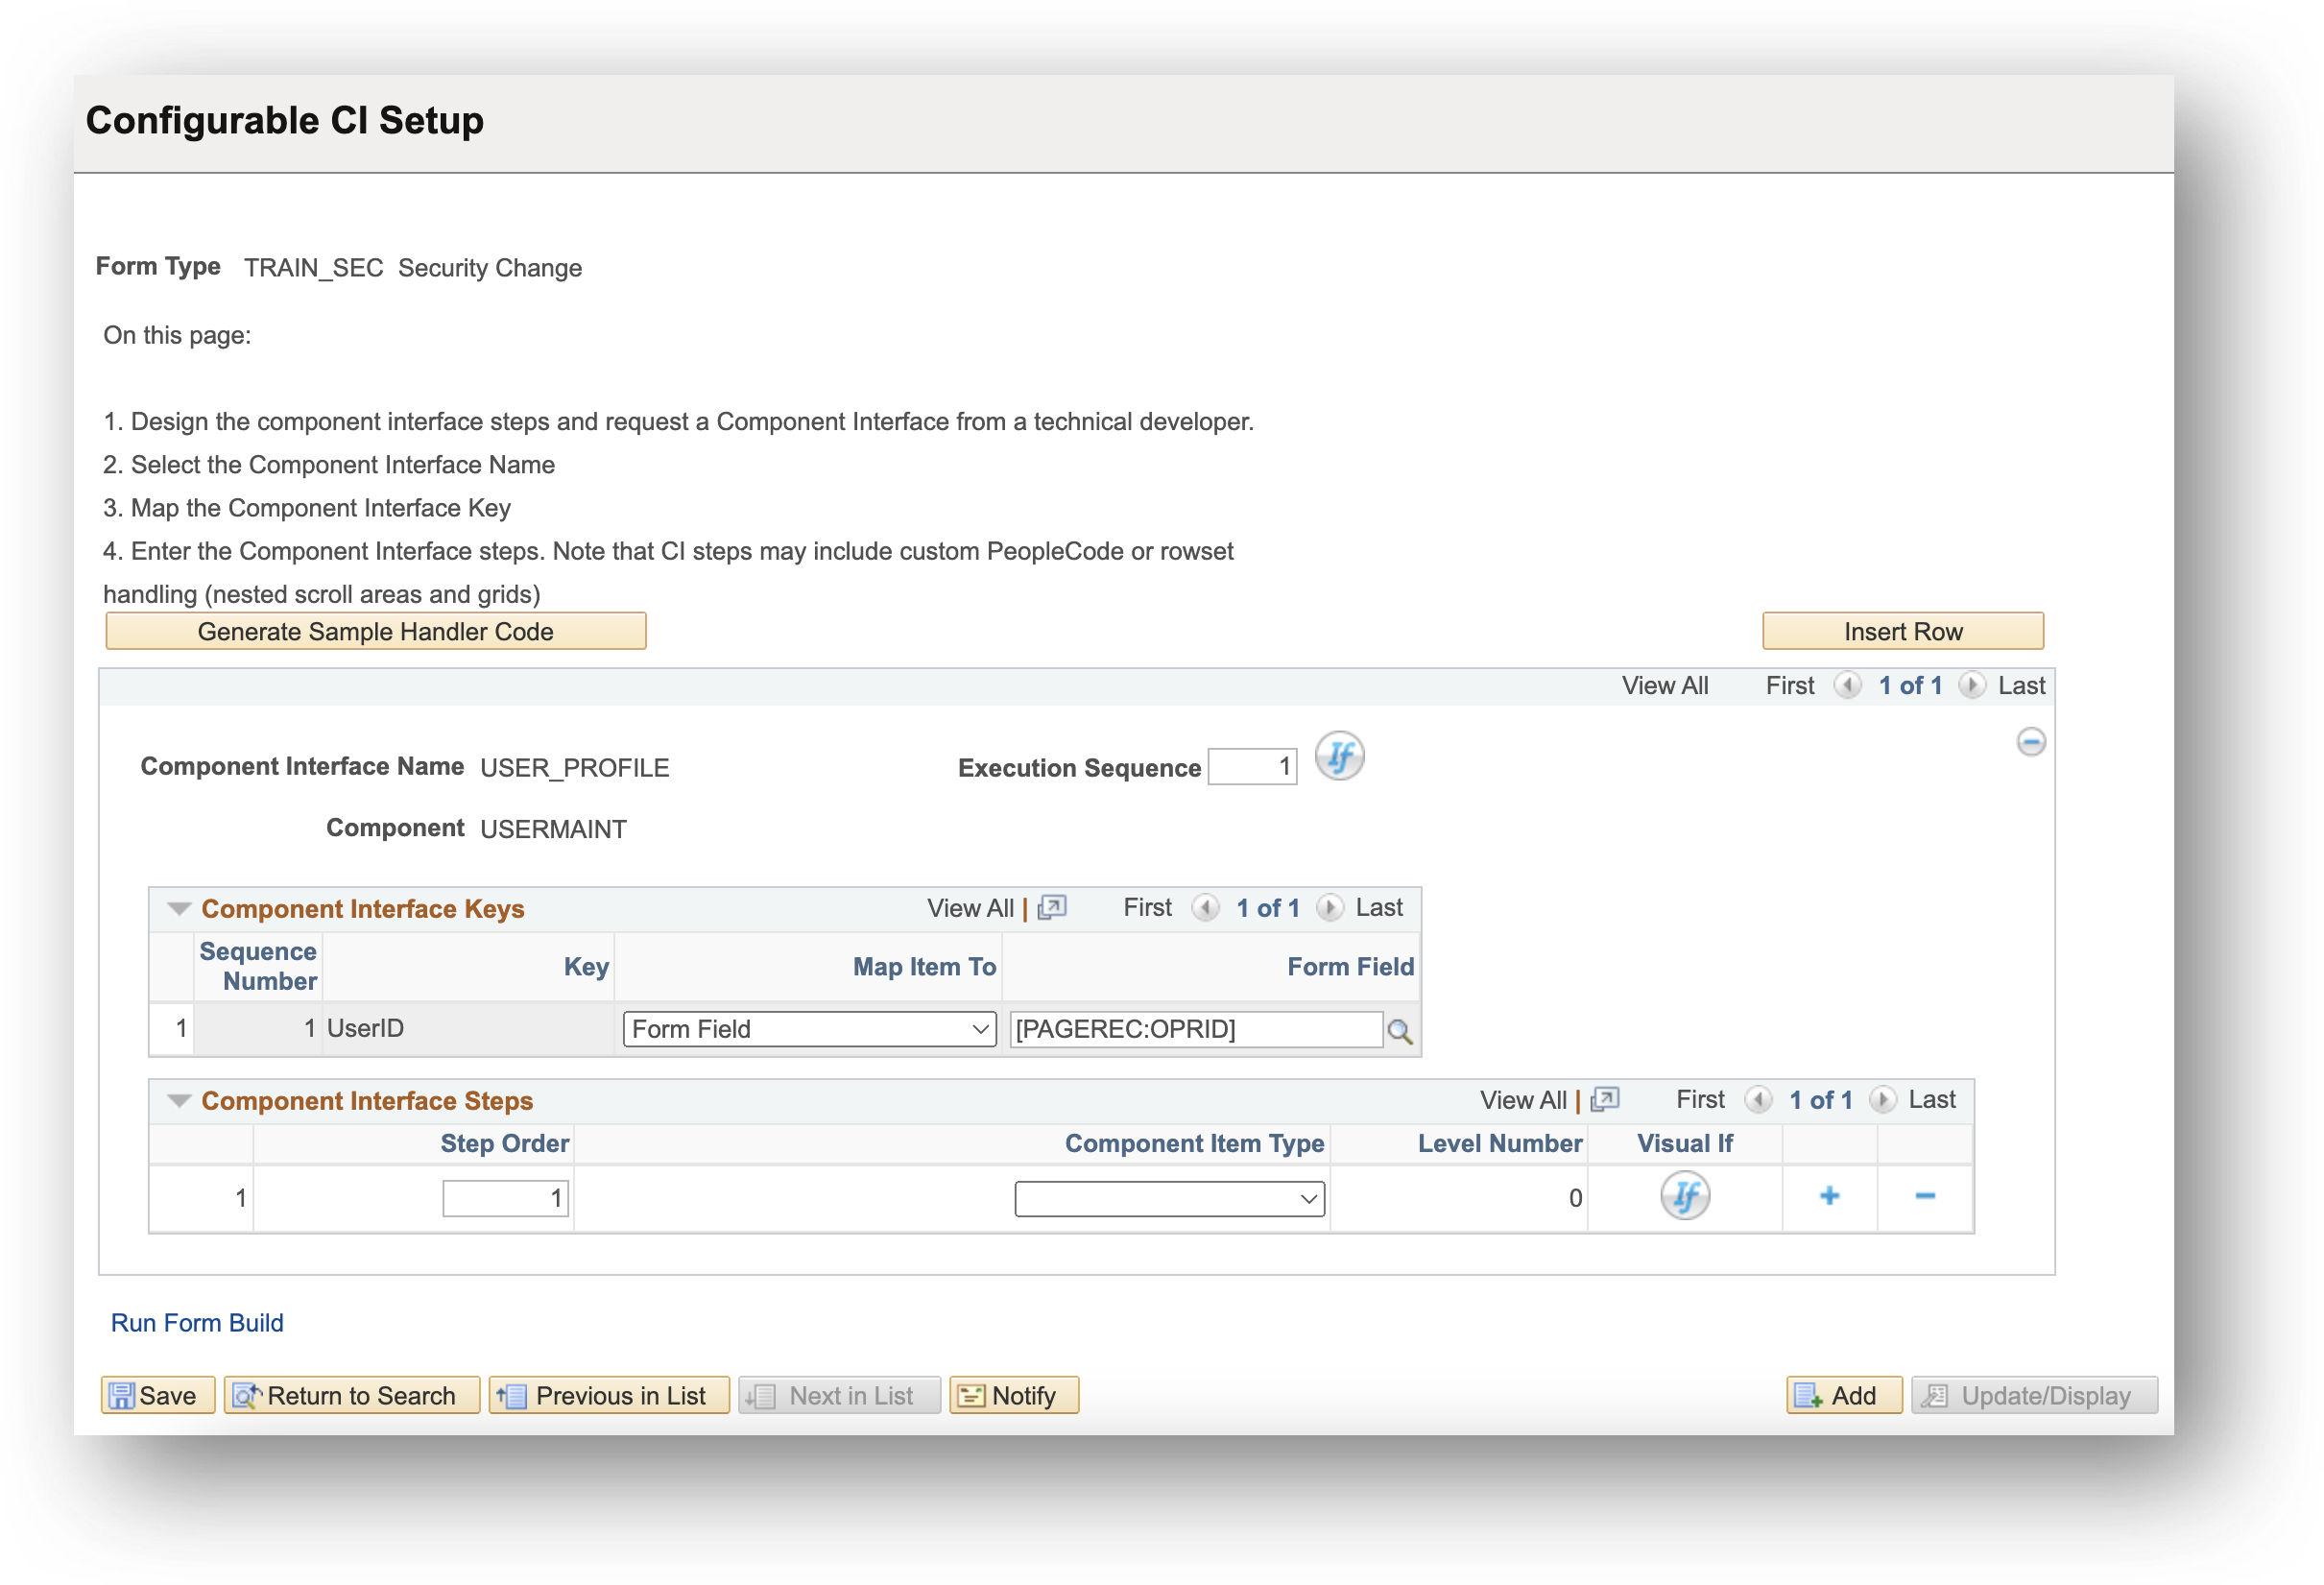
Define Mapping for Component Interface Keys
Once a Component Interface Name is selected, the Component Interface Keys section will appear. This section is used to define how to interact with the search page before getting into the component. It will default to the search keys on the component's search. For each field listed, a user can define where to get the value (either a constant or a form field) which will be used in the search to find a result.
Configurable CI will try to find an existing transaction in the search initially. This is the equivalent of an end user searching for an existing transaction on the Find an Existing Value search page. If a matching, existing transaction is found, Configurable CI will act on it. If no matching transaction is found, it will automatically run it as a new transaction, which is the equivalent of an end user using the Add a New Value search page.
Note: After you have selected a Component Interface Name and saved, any time you return to the Configurable CI page, the Component Interface Keys section will be collapsed by default.
| Field | Value |
|---|---|
| Key | Displays the key field name for the component |
| Map Item To | Select either Constant or Form Field to define where the value for that key should come from |
| Constant Value | If Constant is selected, enter the desired constant value. Limited to 30 characters, and the format must match how the field is saved in the component. Recommend using Query Manager or SQL to verify the field data format if unknown. |
| Form Field | If Form Field is selected, use the prompt to see a list of fields for the given Form Type and select the desired field. |
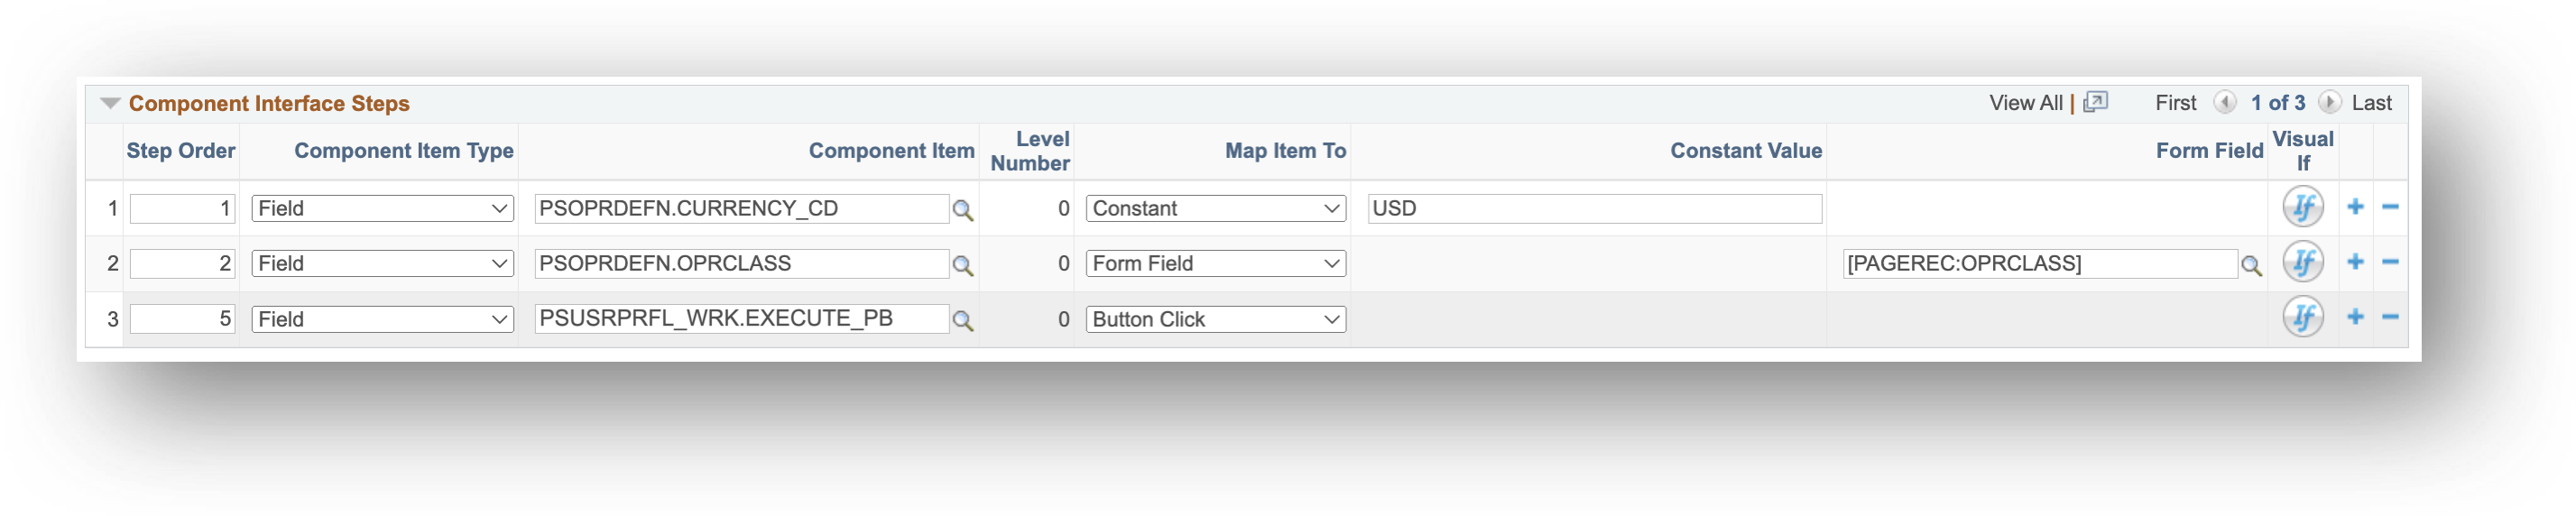
Define Mapping for Component Interface Steps
The Component Interface Steps grid is the "brains" of the component interface transaction. This is where you configure the steps to say how the target component should be updated with data from the form. For each step, you will need to first select the Component Item Type. The options include:
- Field for setting a component field at the current level
- Rowset for configuring the steps on a grid/scroll area at a lower level
- Custom/PeopleCode for extending Configurable CI with code as needed
The remaining fields to update for each step will depend on which item type was chosen. How to use each option is outlined below.
Field Component Item Type
| Field | Value |
|---|---|
| Step Order | Use to define the step order to ensure the component is updated in the required sequence |
| Component Item Type | Use the dropdown to select either Field, Rowset, or Custom/PeopleCode. Note: Rowset is only allowed at Level 0 or Level 1, and Custom/PeopleCode is only allowed at Level 0. |
| Component Item | Use the prompt to select from a list of fields defined in the Component Interface Name, shown as Record.Field |
| Level Number | Displays the level of the component item selected and will display either 0, 1, or 2. Note: The parent-level fields will be 0, child-level records/fields will be 1, and grandchild-level records/fields will be 2. |
| Map Item To | Shows if the row has Field selected for Component Item Type. Use the dropdown to select one of the following: Constant: Select Constant if you want a static value to be passed into the field in the component. Form Field: Select Form Field if you want a dynamic value, based on a field on the form, to be passed into the field in the component. Button Click: If the process involves interacting with a button on a component, like a Calculate button, select the component’s field that represents the button. Then, use the Button Click for the Map Item To field. The CI will automatically trigger the button’s downstream logic. If Button Click is mapped to a field that’s not a button, the CI may not execute as expected. ** IMPORTANT: Please note that using button clicks has limitations for both configured and coded CIs. Sometimes, buttons open other components or modals, which can cause issues with any CI. Therefore, it’s essential to thoroughly test steps using button clicks and consider using Custom/PeopleCode actions if problems arise. ** Note: Given the quantity of components which require button clicks that execute COBOL, especially in Campus Solutions, GT has delivered a handful of PPC actions that can be leveraged to fire COBOL for many component transactions without requiring custom PPC. |
| Constant Value | If Constant is selected, enter the desired constant value to be passed into the field in the component. It is limited to 30 characters and the format must match how the field is saved in the component. GT recommends using Query Manager or SQL to verify the field data format if unknown. |
| Form Field | If Form Field is selected, use the prompt to see a list of fields for the given Form Type and select the desired field whose value will be passed to the component field. |
| Visual If | Click to configure logic that, if true, will include this step in the CI. If the logic is false, this step will be skipped. |
Rowset Component Item Type

| Field | Value |
|---|---|
| Step Order | Use to define the step order to ensure the component is updated in the required sequence |
| Component Item Type | Use the dropdown to select either Field, Rowset, or Custom/PeopleCode. If the field needed is within a scroll area or grid, select Rowset. Note: Rowset is only allowed at Level 0 or Level 1, and Custom/PeopleCode is only allowed at Level 0. |
| Component Item | Use the prompt to select from a list of rowsets defined in the Component Interface Name, shown as just the record name |
| Level Number | Displays the level of the component item selected and will display either 0, 1, or 2. The parent-level fields will be 0, child-level records/fields will be 1, and grandchild-level records/fields will be 2. To configure fields on a child or grandchild record, select the child record (rowset) to display a Details button. Click the Details button to view the list of fields on the child record or the list of grandchild records. To access the list of grandchild record fields, repeat the process and select the grandchild record, which will display another Details button. Please note that the Configurable CI supports only Level 0, 1, and 2 records. For Level 3 records and beyond, you must add a step set to Custom/PeopleCode to handle the additional logic. |
| Details | Opens a window (see below) to configure fields within that rowset |
| Visual If | Click to configure logic that, if true, will include this step in the CI. If the logic is false, this step will be skipped. |
Rowset Component Details Window (Level 1 & 2)
The Configurable CI (L1 and L2) page is used to define how Configurable CI should interact with grids/scroll areas in the component.
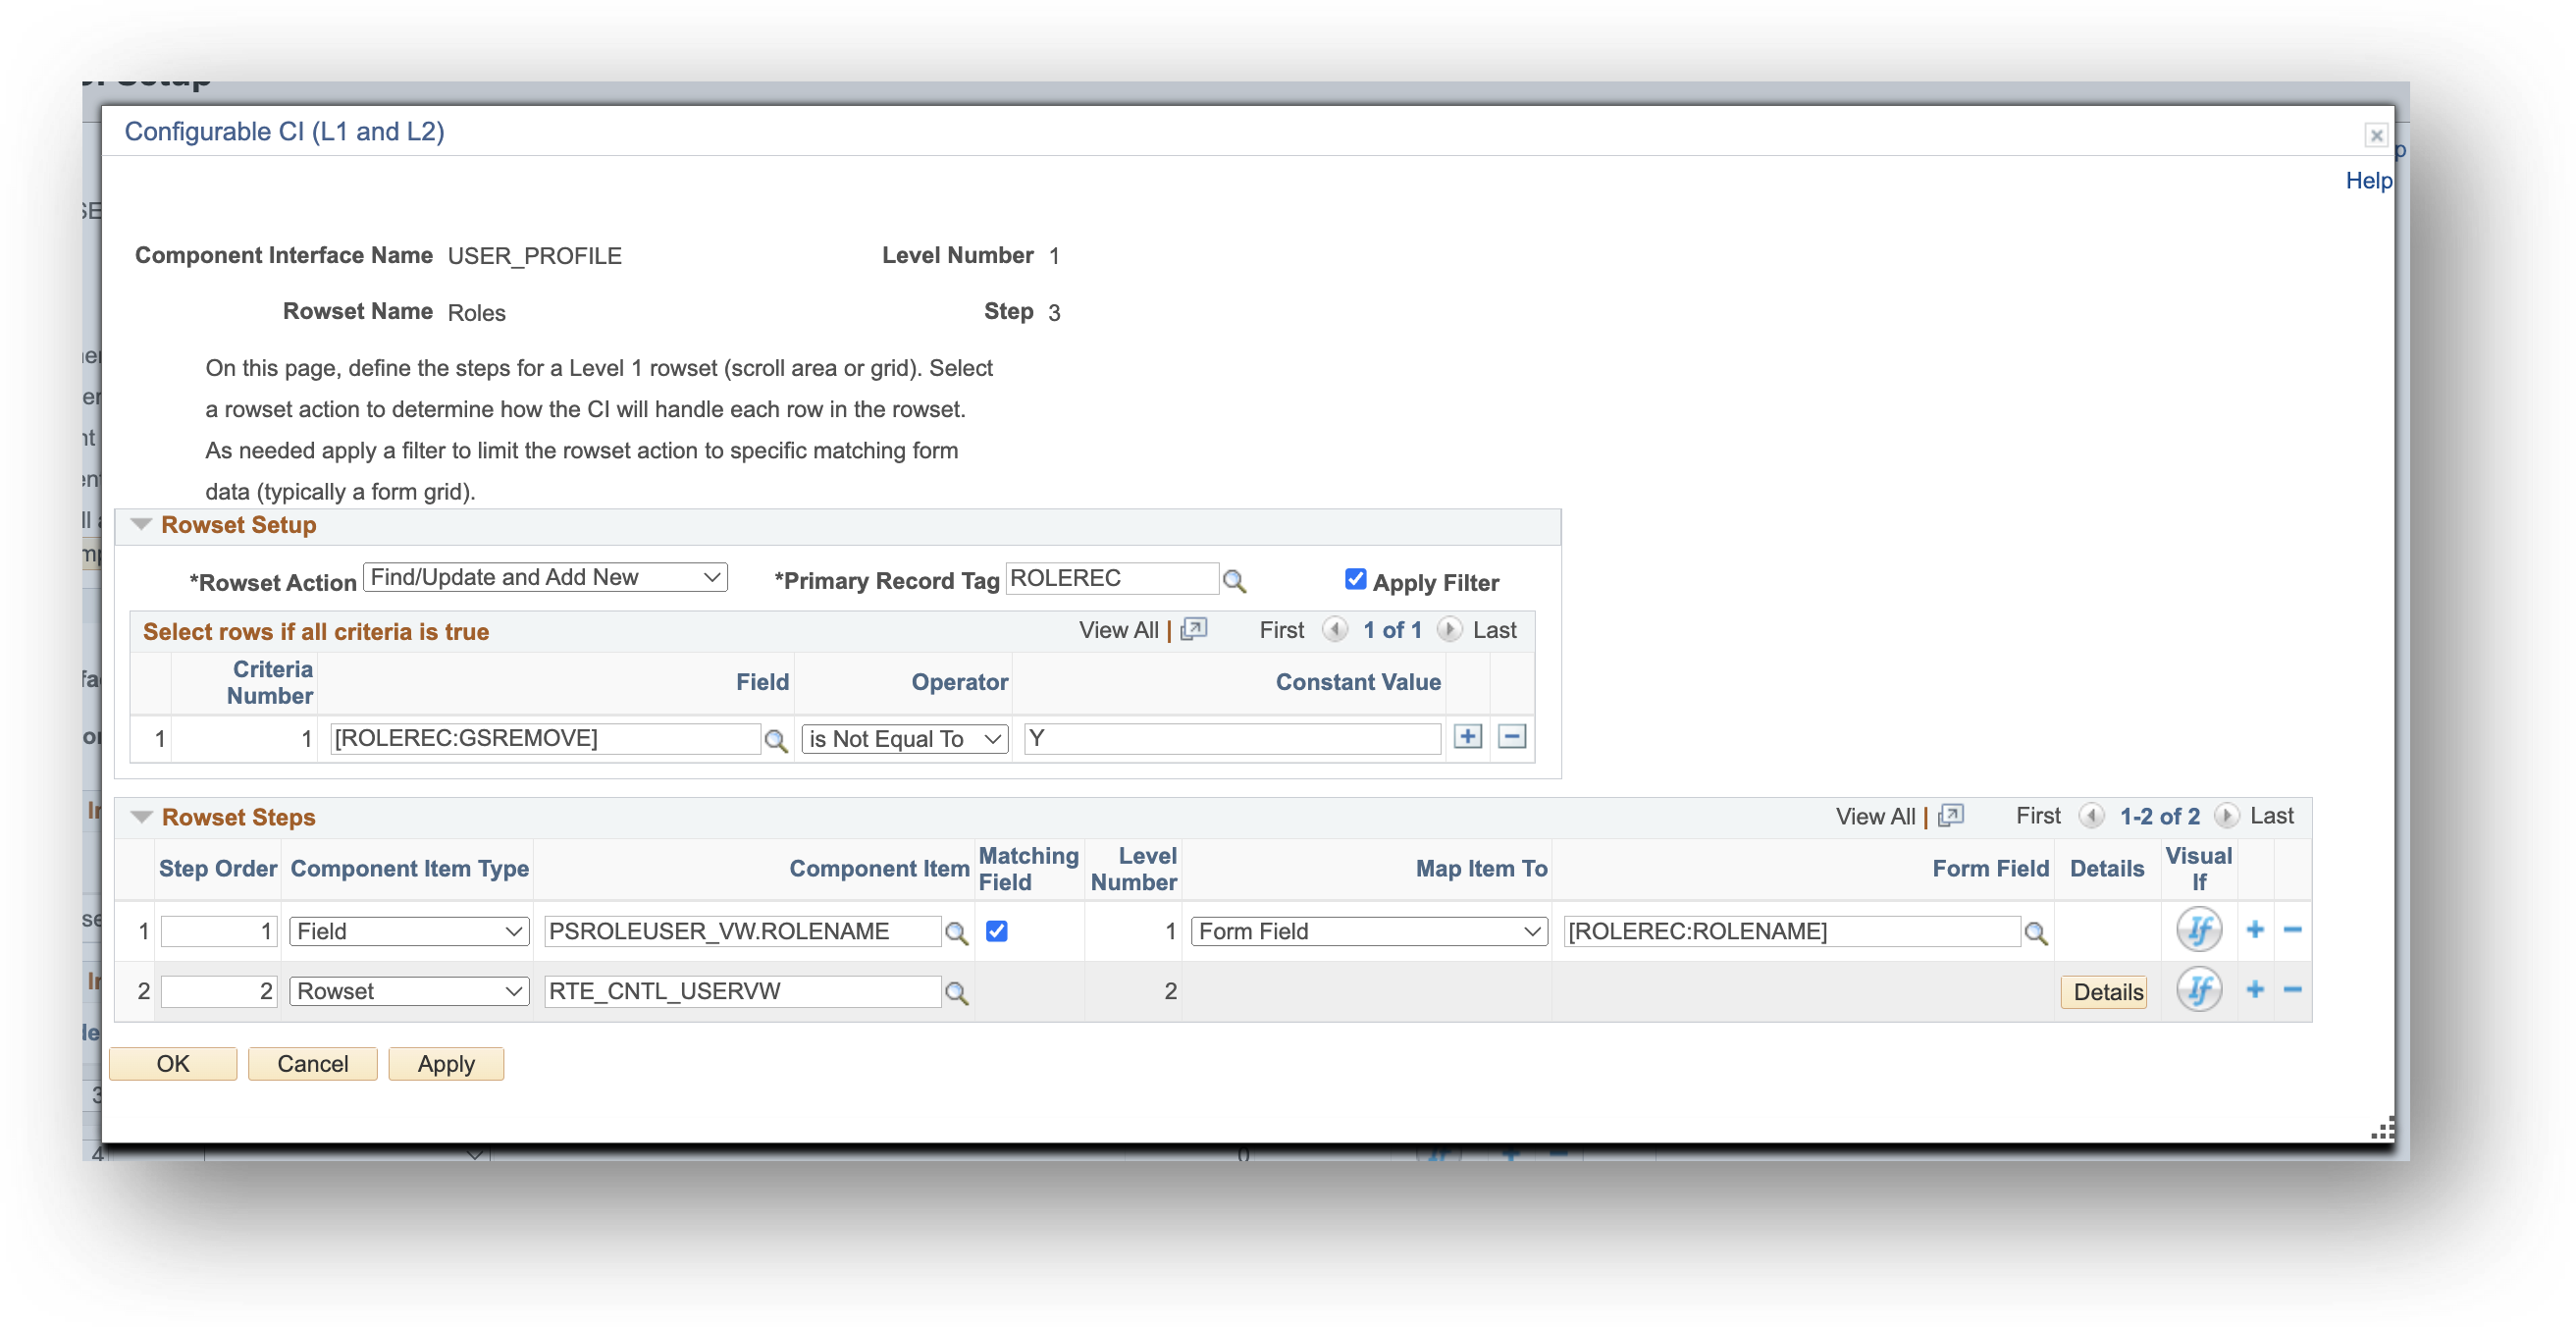
Rowset Setup
| Field | Value |
|---|---|
| Rowset Action | Use the dropdown to select how the CI should handle existing and new data in the component. Details for each option can be found below IMPORTANT: If the component contains effective-dated data, historical rows (rows with past dates) won’t be affected because “Correct History” mode is disabled. The CI will only execute the Rowset Action on current and future-dated rows. If the component doesn’t use effective dating, the CI will directly modify existing data without considering historical or future states. |
| Primary Record Tag | Use the prompt to select from a list of all record tags on the form. When choosing a record tag, keep in mind this field serves 2 functions. This field is required because the record tag you choose determines the number of rows looped through to be processed. If you select a PAGEREC record, the Rowset Steps will execute only once, using only the first row from any grid field. If you select a grid record tag, the CI will determine the number of rows based on the grid’s row count, processing that many rows, including blank ones. If your form includes multiple grids, this field is only used to define the primary grid for row counting. However, you can still reference other grids in the Rowset Steps as needed. If applying a filter, select a record tag that contains the fields that will be used for that criterion. See the next field for more information. |
| Apply Filter | Check this field if the CI should select only certain rows from the form to go through the Rowset Steps when executing the Rowset Action. When checked, a new section “Select Rows if All Criteria is True” will appear below, allowing you to define criteria for selecting which rows on the form to process. For instance, a grid on the form may require the CI to update an existing row, add a new row, and remove an entire row without reinserting it. But to accomplish this, both the “Find/Delete” and “Find/Update and Add New” option would need to be selected for Rowset Actions. If you need to perform different Rowset Actions on the same grid, you can add the same Rowset as multiple steps at the parent-level (Level 0) of the Configurable CI. Then, apply a different filter on each rowset to dynamically control it. In this scenario, one rowset would have a filter that identifies only the new or existing rows and use the “Find/Update and Add New” action. The other rowset would identify and filter out just the rows to be deleted and use the “Find/Delete” action. Note: If you check this box but do not have anything configured in the “Select Rows if All Criteria is True” section, then it will behave as if no filter is being used and will process all rows. |
Rowset Action Options
| Field | Value |
|---|---|
| Delete All Rows | All rows in the specified rowset will be deleted. For components that are not effective-dated, this action will clear all data in the rowset, leaving it empty. |
| Delete All Rows, then Add | The same action as “Delete All Rows” is performed, except after all the rows are deleted, data from the form, as outlined in the Rowset Steps below, is added to the rowset. |
| Find/Delete | Instead of deleting all rows, the CI will identify and delete only specific rows. To determine which fields should be compared between the component and the form, check the “Matching Field” checkbox in the Rowset Steps section below for each field that will be used to identify a matching row. If no matching rows are found, no changes will be made to the component for this Rowset. |
| Find/Delete, then Add | This option functions similarly to “Find/Delete,” but it also adds new data after deletion. For rows where the Matching Field(s) don’t match existing data, a new row is added without deleting anything. In simpler terms, all rows from your form will be added to the component, but for any existing rows that have a match, it will first clear the component’s data for that row before adding data from the form. |
| Find/Update and Add New | This option functions similarly to “Find/Delete, then Add,” but it never deletes data. It still adds a new row for rows where the Matching Field(s) don’t match any existing data. For rows where a match is found, only the fields specified in the Rowset Steps will be updated; no other existing data will be removed. In simpler terms, this option updates existing records when a match is found and adds new rows when no match exists, without ever deleting anything. |
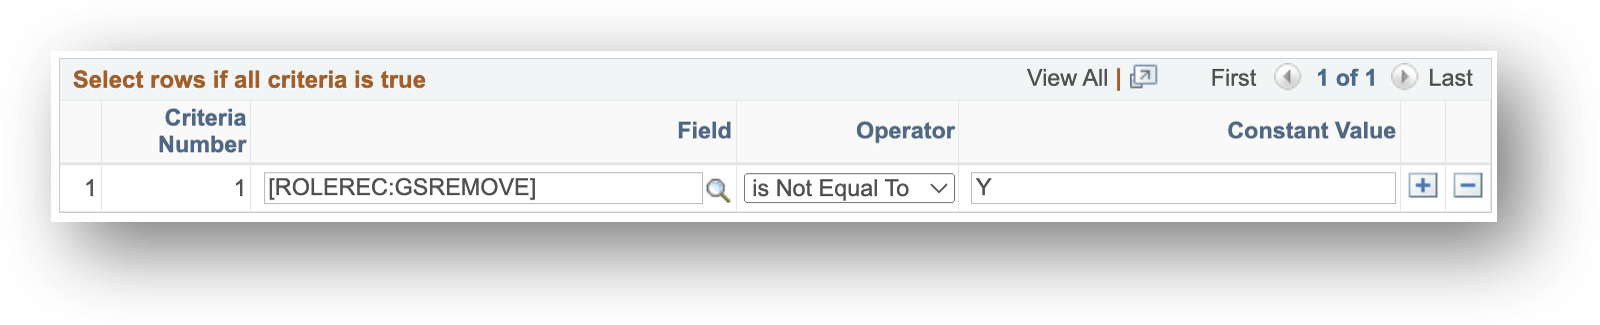
Select Rows if All Criteria is True
| Field | Value |
|---|---|
| Field | Use the prompt to select from a list of fields on the selected Primary Record Tag that will be used in the criteria to determine if a row should be included and passed into the component |
| Operator | Select an operator from the dropdown list to define the criteria. Options are Contains, Ends With, Starts With, is Empty, is Equal To, is Greater Than, is Less Than, is Not Empty, and is Not Equal To. |
| Constant Value | Enter the desired constant value. Limited to 30 characters, and the format must match how the field is saved on the form, not the component. Recommend using Query Manager or SQL to look up the form’s Query Records to verify the field data format if unknown. |
| Plus (button) | Adds an additional row to evaluate multiple criteria for the filter. Note: Every row added will be treated as an “AND” statement, meaning that all rows must be true for a row on the form to be selected for processing. |
| Minus (button) | Removes the row from the filter |
Rowset Steps

Once the Configurable CI has found every row in the form grid that matches the filter criteria, it will then loop based on the number of rows on the Primary Record Tag and will execute the steps defined below. The configuration process will be similar to the process for fields at Level 0 from above, but please note the key handling information below.
Key Handling
If a child or grandchild rowset shares the same key(s) as a higher-level record (either Level 0 or Level 1), the CI will automatically propagate only the rows that match the higher-level keys.
When a grid includes both parent rows and related child rows, the system groups the data by the parent keys first. Each parent row is processed only one time, even if it appears multiple times in the grid because of related child rows. Then, all child rows that belong to that parent are processed underneath it.
In simple terms: the system first finds each unique parent, processes that parent once, and then processes all matching child rows tied to it.
Consider this example form grid in which departments exist multiple times and each row needs to be added to a component. Configurable CI automatically groups grid rows so that it first adds the three rows for DEPTID 10000, then the single row for 20000, then the two rows for 30000.
DEPTID EMPLID EMPL_RCD 10000 22222 0 10000 33333 0 10000 33333 1 20000 44444 0 30000 55555 0 30000 66666 0
Fields
| Field | Value |
|---|---|
| Step Order | Use to define the step order to ensure the component is updated in the required sequence |
| Component Item Type | Select either Field or Rowset from the dropdown. Note: Rowset is only allowed at Level 0 or Level 1, and Custom/PeopleCode is only allowed at Level 0. |
| Component Item | Use the prompt to select the desired item |
| Matching Field | Visible when the Rowset Action is set to “Find/Delete”, “Find/Delete, then Add”, or “Find/Update and Add New”. When the CI runs, it will check any fields that are marked as matching fields to determine whether a row on the form matches an existing row in the component and do the following accordingly: Find/Delete – Delete all rows where matches are found. If no match is found, nothing happens. Find/Delete, then Add – Delete all rows where matches are found, then add all unique rows to the rowset, including those that were deleted and all completely new rows. Find/Update and Add New – Update all rows where matches are found; add new rows for all unmatched rows. |
| Level Number | Displays the level of the component item selected |
| Map Item To | Shows if the row has Field selected for Component Item Type. Use the dropdown to select one of the following: |
| Constant | Select Constant if you want a static value to be passed into the field in the component. |
| Form Field | Select Form Field if you want a dynamic value, based on a field on the form, to be passed into the field in the component. |
| Button Click | If the process involves interacting with a button on a component, like a Calculate button, select the component’s field that represents the button. Then, use the Button Click for the Map Item To field. The CI will automatically trigger the button’s downstream logic. If Button Click is mapped to a field that’s not a button, the CI may not execute as expected. ** IMPORTANT: Please note that using button clicks has limitations for both configured and coded CIs. Sometimes, buttons open other components or modals, which can cause issues with any CI. Therefore, it’s essential to thoroughly test steps using button clicks and consider using Custom/PeopleCode actions if problems arise. ** Note: Given the quantity of components which require button clicks that execute COBOL, especially in Campus Solutions, GT has delivered a handful of PPC actions that can be leveraged to fire COBOL for many component transactions without requiring custom PPC. |
| Constant Value | If Constant is selected, enter the desired constant value to be passed into the field in the component. Limited to 30 characters, and the format must match how the field is saved in the component. Recommend using Query Manager or SQL to verify the field data format if unknown. |
| Form Field | If Form Field is selected, use the prompt to see a list of fields for the given Form Type and select the desired field whose value will be passed into the field in the component. |
| Details | Shows if the row has Rowset selected for Component Item Type. Opens to another Details window to define the Level 2 fields, this window will have the same options presented in this table. |
| Visual If | Click to configure logic that, if true, will include this step in the CI. If the logic is false, this step will be skipped. |
Custom/PeopleCode Component Item Type
Configurable CI has been designed with the greater GT eForms philosophy in mind -- empower functionals as much as possible and provide the option for technical extension when necessary. To that end, Configurable CI supports the ability for developers to write code snippets that can be used to extend configuration capabilities when needed. To do so, the following is required:
- Developer develops the PeopleCode Action in an app class method
- The PeopleCode Action is registered in the Configurable CI PeopleCode setup. The documenation for the Configurable CI PeopleCode setup can be found here.
- The PeopleCode Action is configured for use here.
The following are known cases where technical extension is required, though it is possible to encounter such cases not enumerated here:
- Components that include level 3 grids/scroll areas
- COBOL execution (though GT delivers a series of PPC actions that can be used for many COBOL executions)

| Field | Value |
|---|---|
| Step Order | Use to define the step order to ensure the component is updated in the required sequence |
| Component Item Type | Select either Field, Rowset, or Custom/PeopleCode from the dropdown Note: Rowset is only allowed at Level 0 or Level 1, and Custom/PeopleCode is only allowed at Level 0. |
| Level Number | Displays the level of the component item selected. For the Custom/PeopleCode option, the level number will always be 0. |
| PeopleCode Action | If any custom logic needs to occur that is not tied to a specific field or rowset on the component, use the Config CI PeopleCode page to define it (see setup here), then select the name of it here. |
| Visual If | Click to configure logic that, if true, will include this step in the CI. If the logic is false, this step will be skipped. |