3.5X Helium Functional Reference
GT eForms *3.58.x includes both the Standard and Helium form engines. The Standard engine is what was used in or before GT eForms 3.30.04 and will support forms developed and working in *3.30.x without any changes. The Helium engine (Helium Performance) was introduced in 3.50.00 and provides significantly improved capabilities and performance. This document outlines the required and recommended configuration patterns for forms using Helium Performance. This will be a living document that we will continue to update as more clients adopt Helium Performance and we develop more patterns.
For information regarding development patterns specific to Helium Performance, read the 3.5X Helium Tech Reference document. We also recommend reviewing the release notes for 3.50.00 and subsequent versions, as these include information about new features and issue fixes.
* An ‘x’ after a version number is a placeholder that indicates subsequent releases within that main version. For example, 3.58.x includes 3.58.00, 3.58.01, 3.58.02, and 3.58.03.
DEFINITIONS
Helium Form Engine
A form engine introduced in the 3.50.00 release of GT eForms. Used by Helium Form Types to process Helium Form Transactions. Introduces significantly improved capabilities and performance compared to the Standard Form Engine.
Standard Form Engine
The original GT eForms form engine used in all versions prior to 3.50.00. This is the form engine used by any Form Types that do not use Helium Performance to process Form Transactions.
Helium Performance
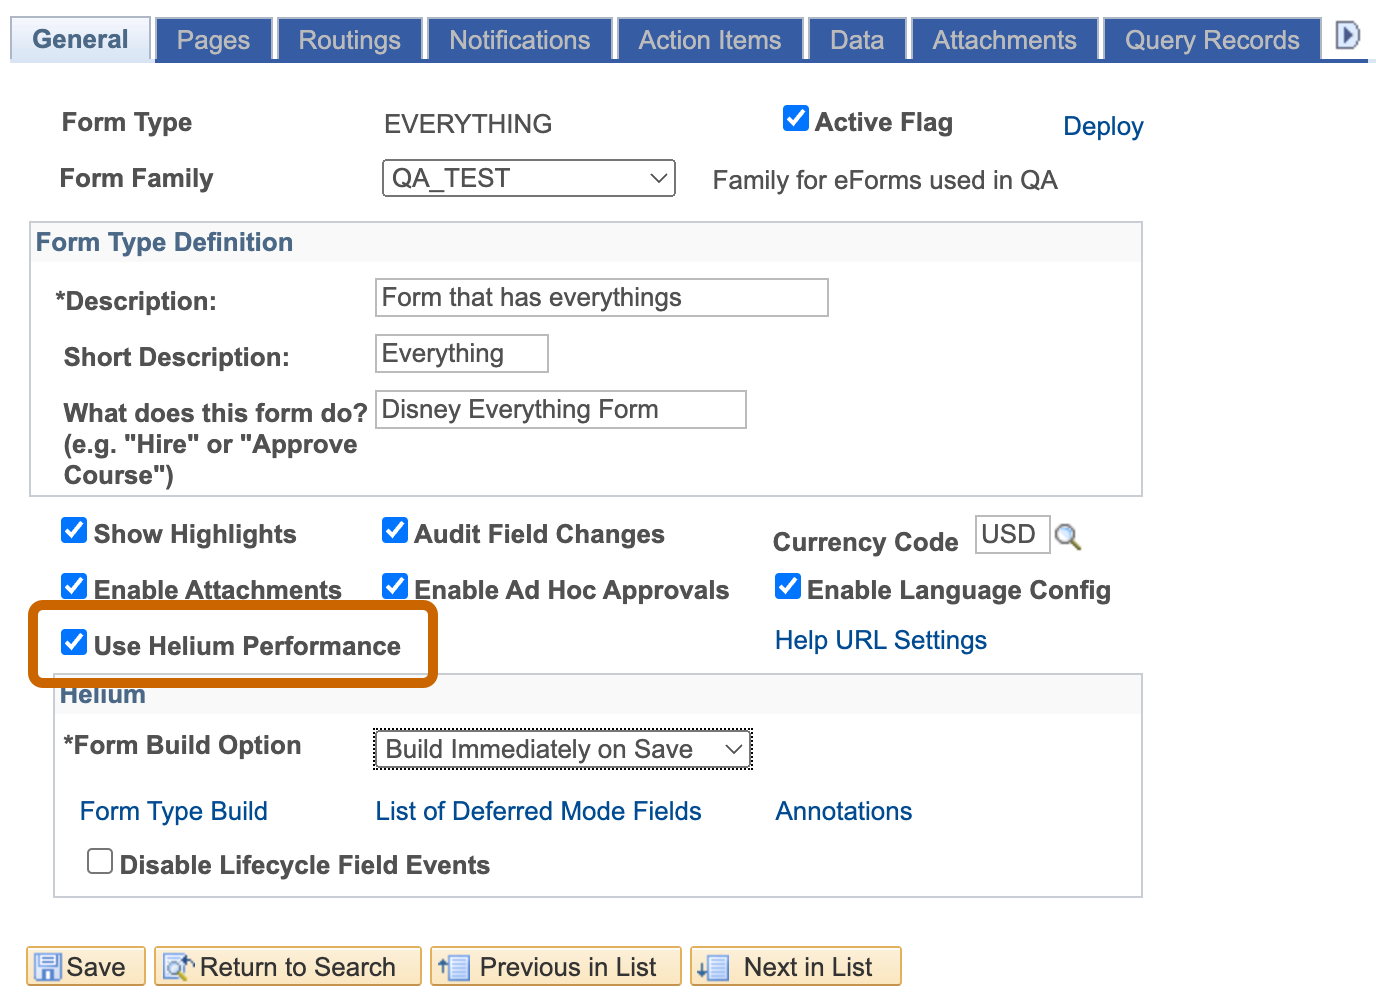
This refers to the improved capabilities and performance made possible by the introduction of the Helium form engine in the 3.50.00 release of GT eForms. A Form Type uses Helium Performance if the “Use Helium Performance” checkbox is checked in the Form Setup of a Form Type.
Helium Form Type
A Form Type that uses the Helium form engine and stores transactions in JSON format. Helium Form Types have the Use Helium Performance checkbox checked on the General tab of Form Setup.
Helium Form Transaction
A single eForm submission with a unique Form ID that belonged to a Form Type using Helium Performance at the time of submission. Form data for this transaction is stored in JSON format.
Standard Form Type
A Form Type that uses the Standard form engine and stores transactions in XML format. Standard Form Types have the Use Helium Performance checkbox unchecked on the General tab of Form Setup.
Standard Form Transaction
A single eForm submission with a unique Form ID that belonged to a Form Type using Standard Performance at the time of submission. Form data for this transaction is stored in XML format.
Helium vs Standard
As you are ready to evaluate, test, and refactor a form to work with Helium Performance, you can toggle a checkbox on Form Setup to have the eForm use the 3.5 Helium form engine.
If you plan to convert any form types from Standard to Helium, we recommend that you first upgrade to 3.58.04 and make a plan to convert any existing form transactions to Helium as well using the Standard Form Data Converter Utility. Read the documentation to learn more about this tool.
Please note Helium Performance is not compatible with classic forms. If your form has the Form Style of “Classic,” even though you can check “Use Helium Performance,” it is not supported.
We recommend that you begin to make plans for how and when you will refactor all your forms to use Helium Performance. We will continue to support clients with forms using Standard Performance through the next feature release. However, the Standard form engine will not be supported beyond the next feature release from GT.
Helium Form Engine
The Helium form engine uses dependency management to only run what needs to run as a user interacts with an eForm. This requires building a network with elements of an eForm and the dependencies between those elements. The elements come from the configuration and the code in an eForm solution. As your configuration or code changes that impacts form behavior and layout, the form will need to be rebuilt.
Form Build Options
A form builder (users with either the G3FORMFUNC or G3FORMTECH) can access the Form Type Build page. For convenience, form builds can choose how and when this Form Build Process is run via the General tab of Form Setup.
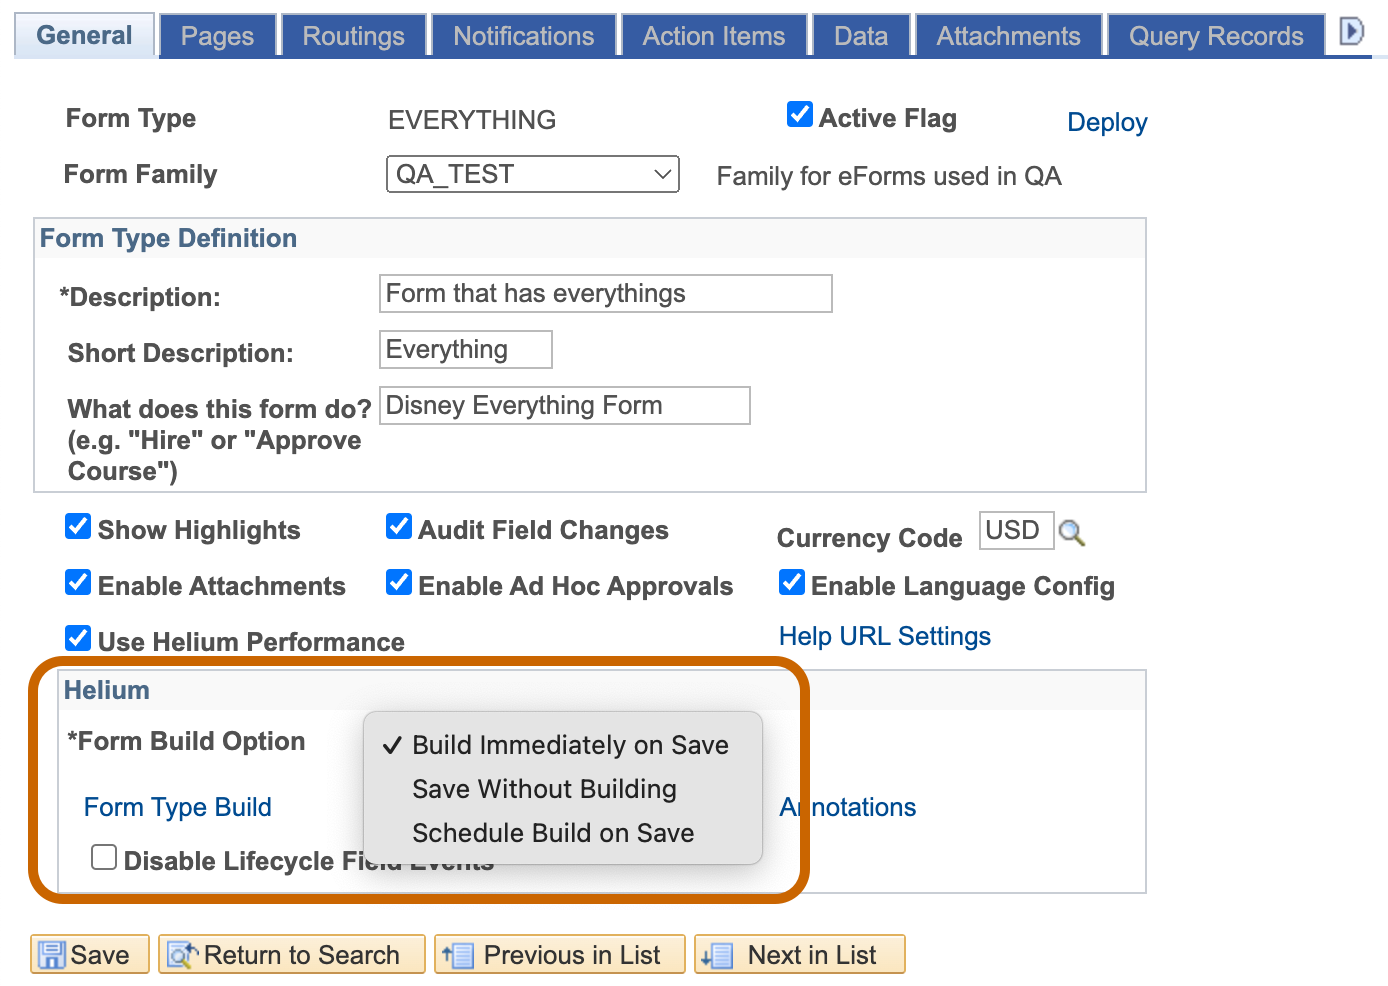
Build Immediately on Save
The default for new forms will be “Build Immediately on Save.” This option means that every time the Form Type Setup is saved, a Form Build will start and finish before indicating the Form Setup has been saved. The status of the Form Build will appear in a message box after it is completed, indicating if the build was successful or failed due to errors. If the build is successful, no further action is needed, and the form is ready to test. If the build fails, you can click a link on the General tab to open the Form Type Build page in a new tab to review the error and warning messages.
Save Without Building
If you are in the initial stages of configuring your form and do not wish to run the form build each time you save, you can change the Form Build Option to “Save Without Building”. This will prevent the form build process from running automatically. When this option is selected, a “Run Form Build” link will appear above the Save button on Form Setup to remind you to kick off the build when you are ready. Clicking that link will open the Form Type Build setup page in a modal window where you can choose to run the form build process in your user session or via the Process Scheduler. Here, you will also have the option to review warnings and errors that have occurred during a form build. If you forget to run the Form Build and go to test your form, you may encounter errors when opening or the form may not behave as expected. Therefore, it is best to only choose this option when the form build process is taking too much time during rapid development.
Schedule Build on Save
If you do not want to wait for your form to finish building in your user session but still would like the Form Build Process to run each time you save, you can change the Form Build Option to “Schedule Build on Save.” When this option is selected, saving the Form Setup will begin the build process via the Process Scheduler. A “Build Details” link that opens the Form Type Build menu in a modal window will appear above the save button. This menu contains a link to the Process Monitor where users can check the status of the form build. The Form Build Status will either show “Success” or “In error” and users may follow the same process mentioned previously to review warnings and errors.
Form Build Work
The Form Build does the following:
- Processes all the custom code for a Form Type
- Note: This replaces the Load Custom Parts process. That process is deprecated and does not apply to forms using Helium Performance.
- Builds the Form Type Dependency Network using the code and configuration for a Form Type
- The Dependency Network enables the Helium form engine to prioritize essential processes for greater efficiency as a user completes a form.
Helium Form Data Format
Turning on Helium Performance changes a form’s data format. Helium form data is stored as JSON. Standard form data is stored as XML. The JSON format is simpler to read and update. In addition to changing the data storage format, we also changed the structure of the data to reference record and rowset tags instead of segments. This means a field that is in multiple segments will show up once in the JSON instead of being replicated for each segment.
You are still able to view and update the form data JSON just like you did with XML via the Form Data tab of the Form Admin Tool.
| XML Form Data | JSON Form Data |
|---|---|
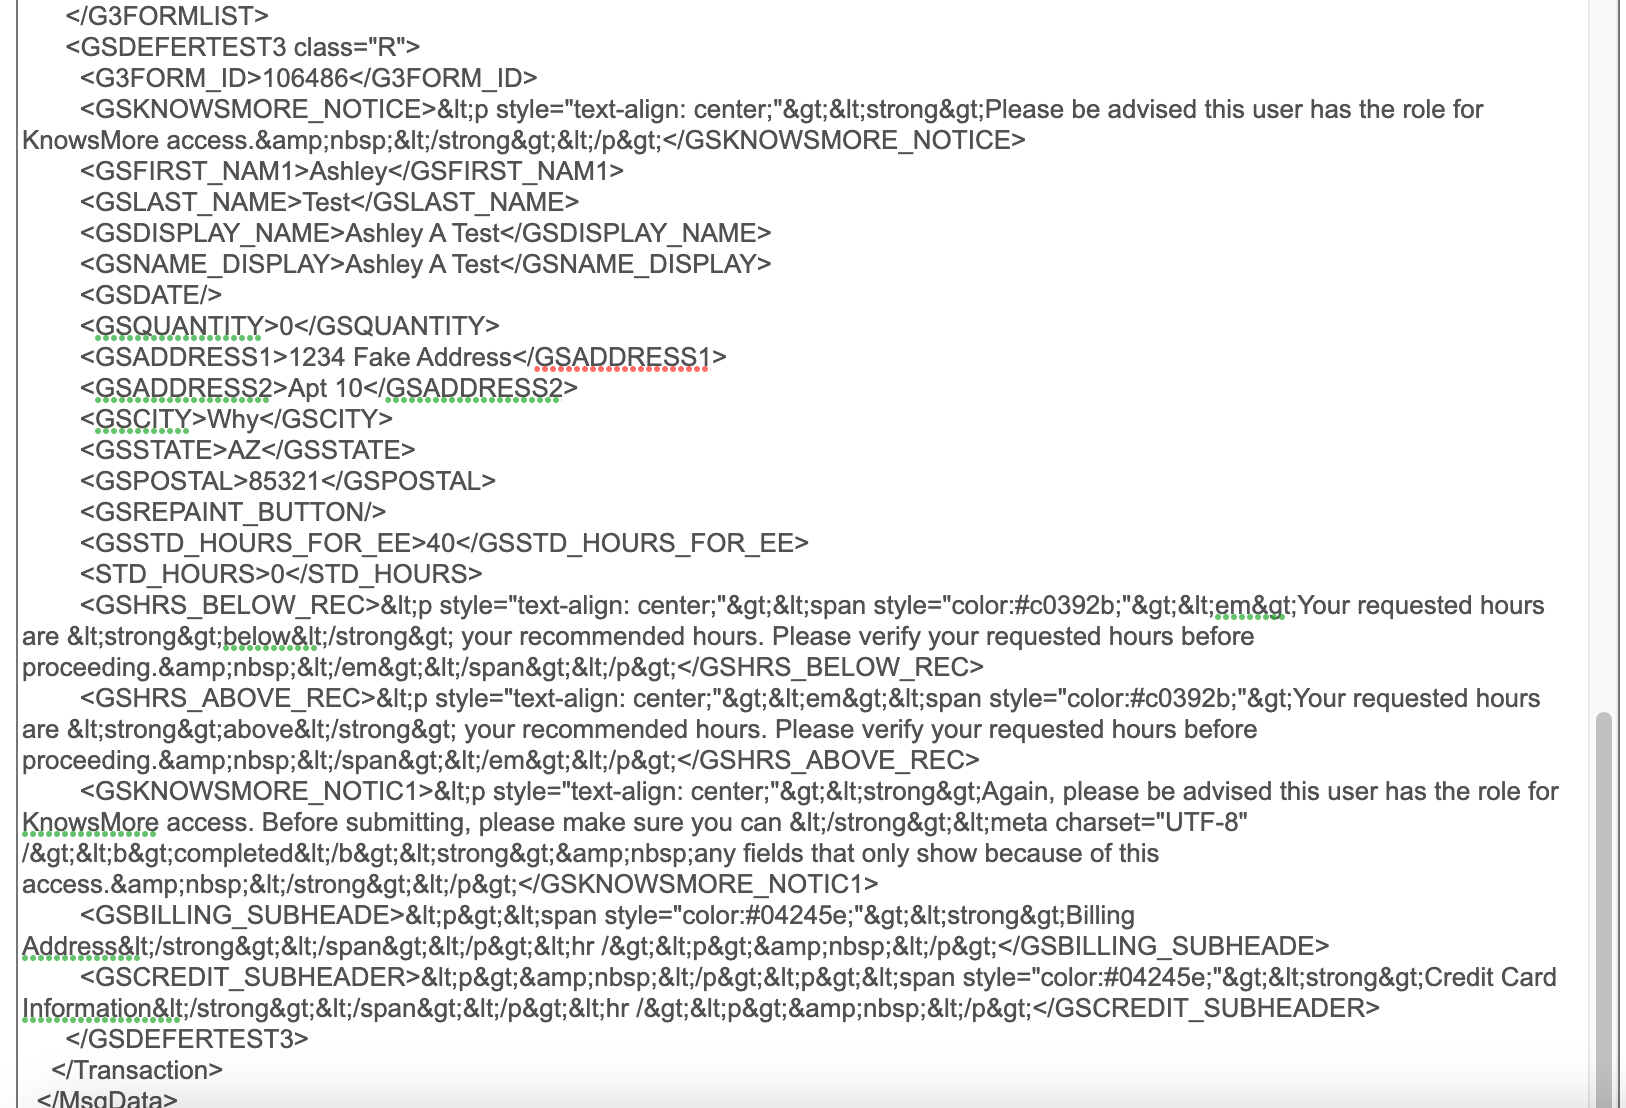 | 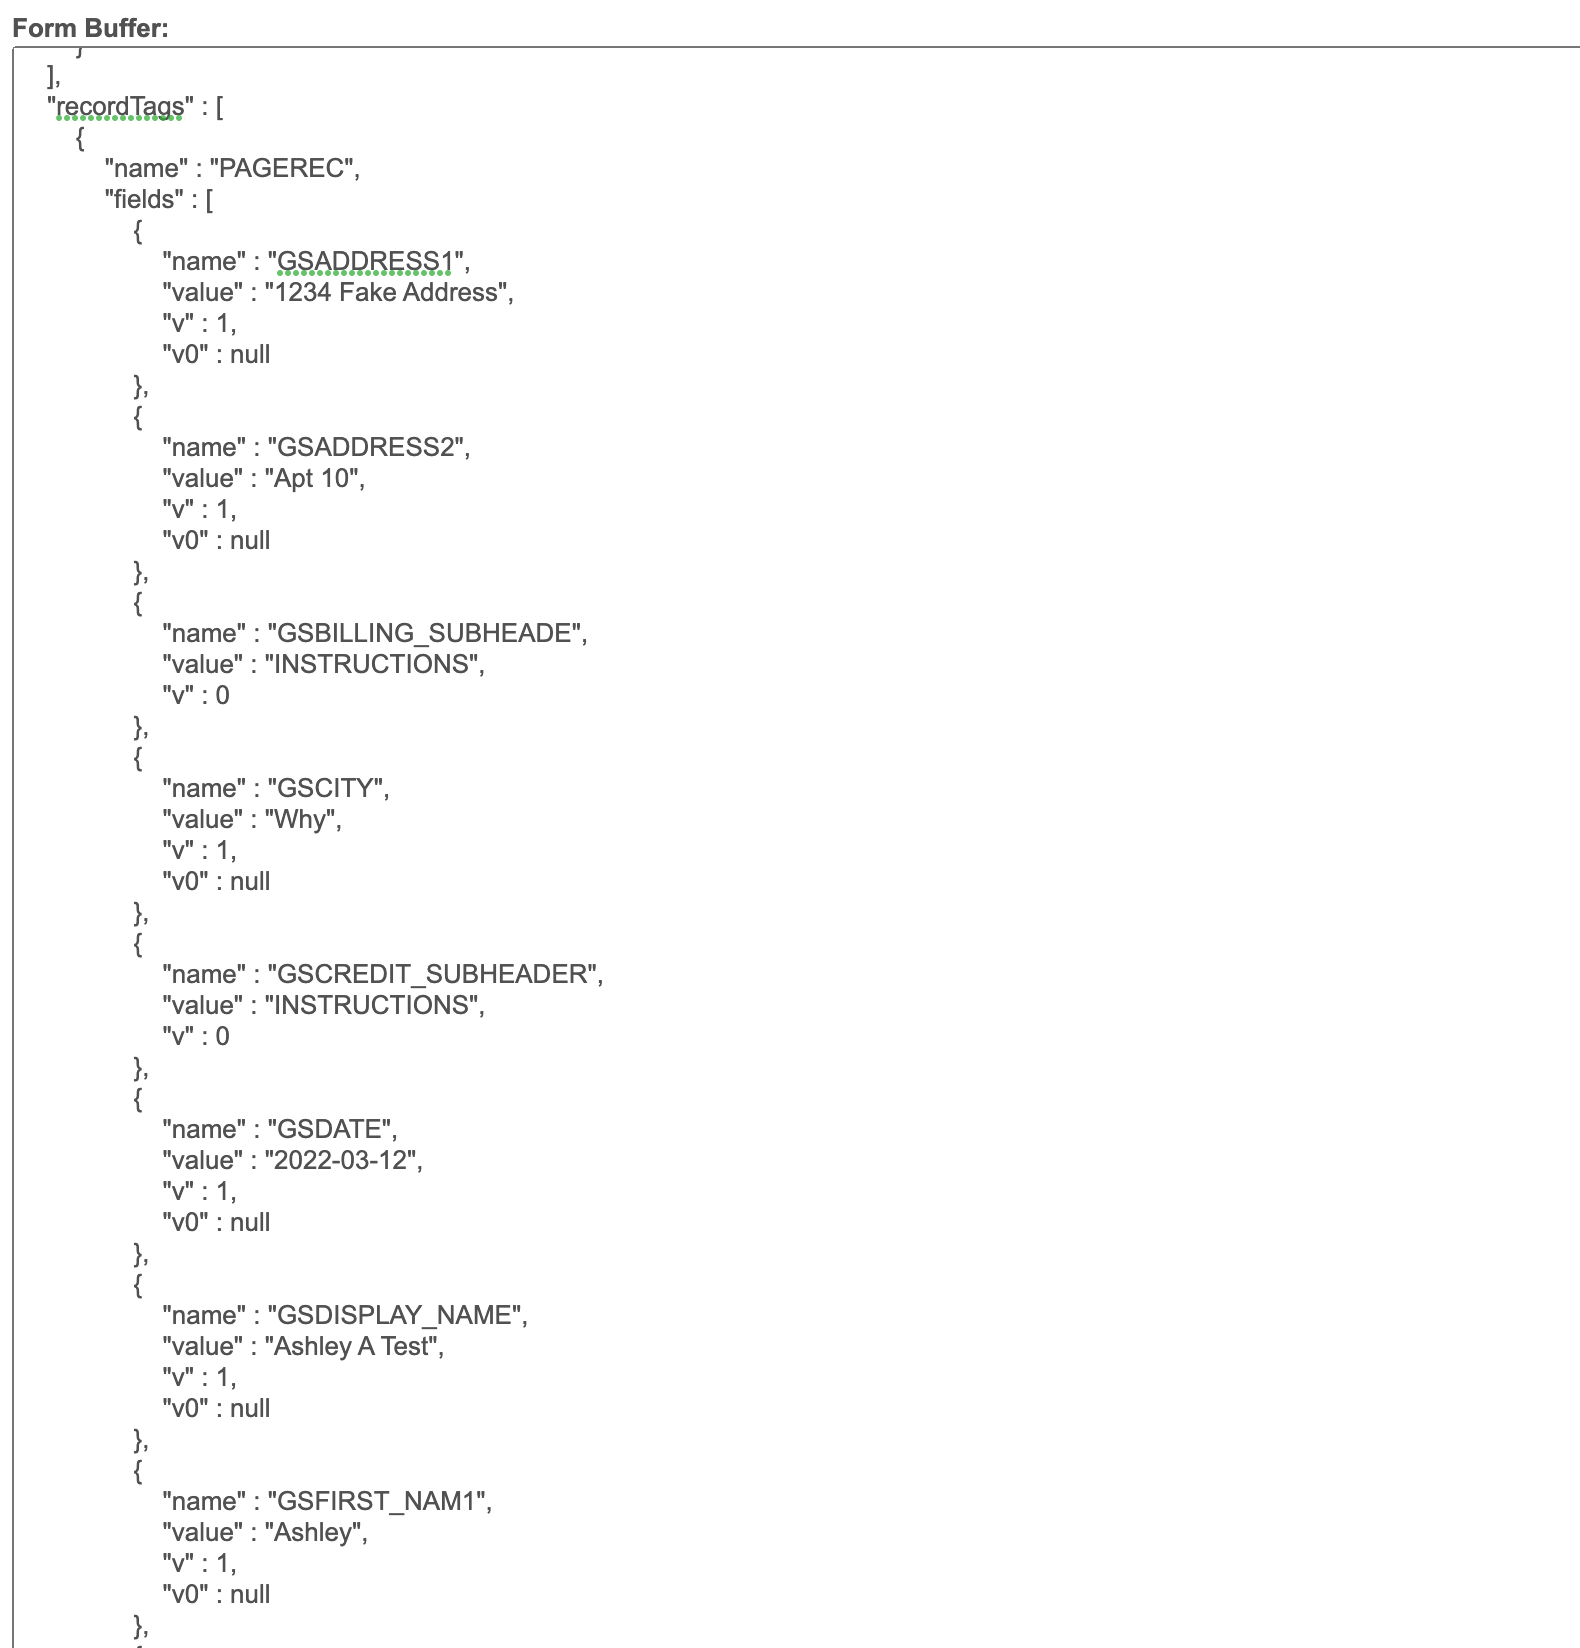 |
Implications for Pre-Upgrade eForm Transactions
eForms that were submitted prior to turning on Helium Performance for the form type can still be processed and viewed after turning on Helium Performance. The eForm data is converted from the XML format to the new JSON format when the eForm is opened. When the eForm is processed (resubmitted, approved, etc.) the JSON form data is saved.
CAUTION – While you can open Standard form transactions with Helium Performance turned on, you CANNOT open Helium form transactions with Helium Performance turned off. This means you should only test toggling Helium Performance on and off in a development environment. Toggling Helium Performance on and off in a Production environment will prevent users from viewing form data and processing forms.
For that reason, we do not recommend rushing to upgrade all forms to Helium Performance and moving to Production. You should carefully test a Form Type after turning on Helium Performance in lower environments to ensure that you are ready for the form to use Helium Performance in Production.
Helium Form Performance
Deferred Mode
We have incorporated PeopleSoft’s Deferred Processing Mode into GT eForms. You can read more about Deferred Processing Mode in PeopleSoft’s documentation here.
GT Deferred Mode
The Helium form engine checks whether anything in the form is dependent on a field and if there is, that field will have the deferred mode turned off. As a user leaves the field after entering a value, the engine will trigger a trip to the server to fire the dependent logic changes. The indicator a trip is happening is the spinner that pops up on the page. If there is nothing dependent on that field, the field will have deferred mode turned on. As a user leaves the field after entering a value, there will be no trip or spinner. This drastically improves usability and rapid data entry in an eForm.
GT Deferred Mode Override
We also give functional form builders the power to override the deferred behavior for a field using a new “Deferred” option on the Field Details page (see image below). All fields have Deferred Mode set to “Calculated” initially, meaning the framework will analyze dependencies to determine if deferred mode should be on or off. However, a form builder can choose to override the calculated deferred behavior by setting Deferred to “On” or “Off” manually.
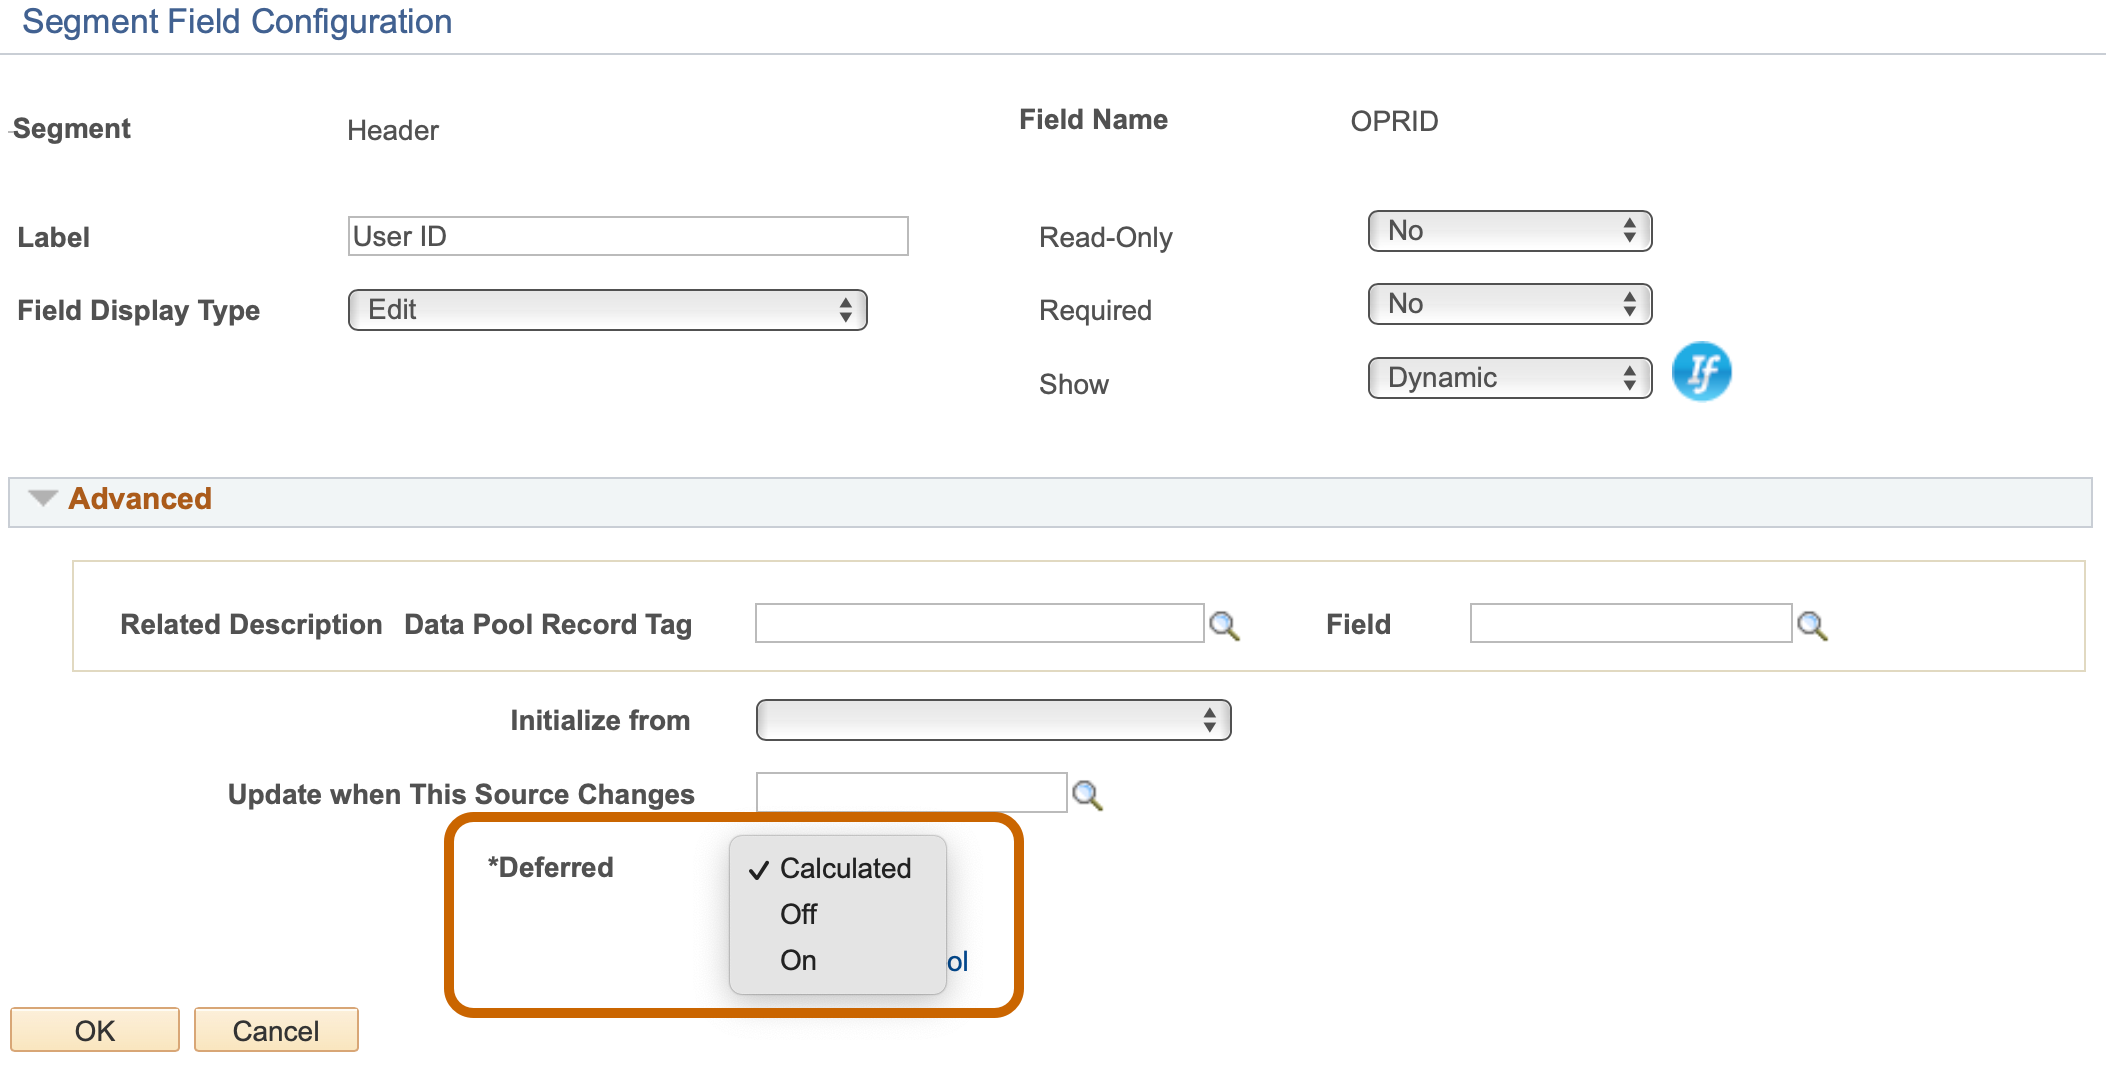
For example, let’s say your form has a date field, nothing is dependent on it, and you want it to always reformat to “04/01/2022” after a user enters “4/1/22” and leaves the field. A form builder would set Deferred to “Off” on that field, so end-users benefit from seeing the formatting change happen right after leaving the field instead of putting it off until another action triggers a trip. This matches the behavior of a deferred date field on a standard PeopleSoft page.
On a standard PeopleSoft page, a developer would have to use App Designer to mark a field as deferred or not deferred. GT eForms calculates whether the field should be deferred and allows form builders to override the calculated behavior using configuration instead of App Designer.
GT Deferred Mode Override Page
Manage GT eForms 3.x > GT Functional Setup > eForm Parts Gallery > Deferred Mode
We envision Deferred Mode to be a powerful feature that a form builder can use to meticulously craft the end-user flow of filling out an eForm. We knew it would be tedious to drill into Field Details for each field, so we created a new setup table that lists all the fields on a form and allows you to quickly make changes to each field’s Deferred Mode. This table updates Field Details on the Form Setup but is a more *SEEFul way to see and update all the fields at once.
*S.E.E.F stands for Simple, Effective, Efficient, and Flexible
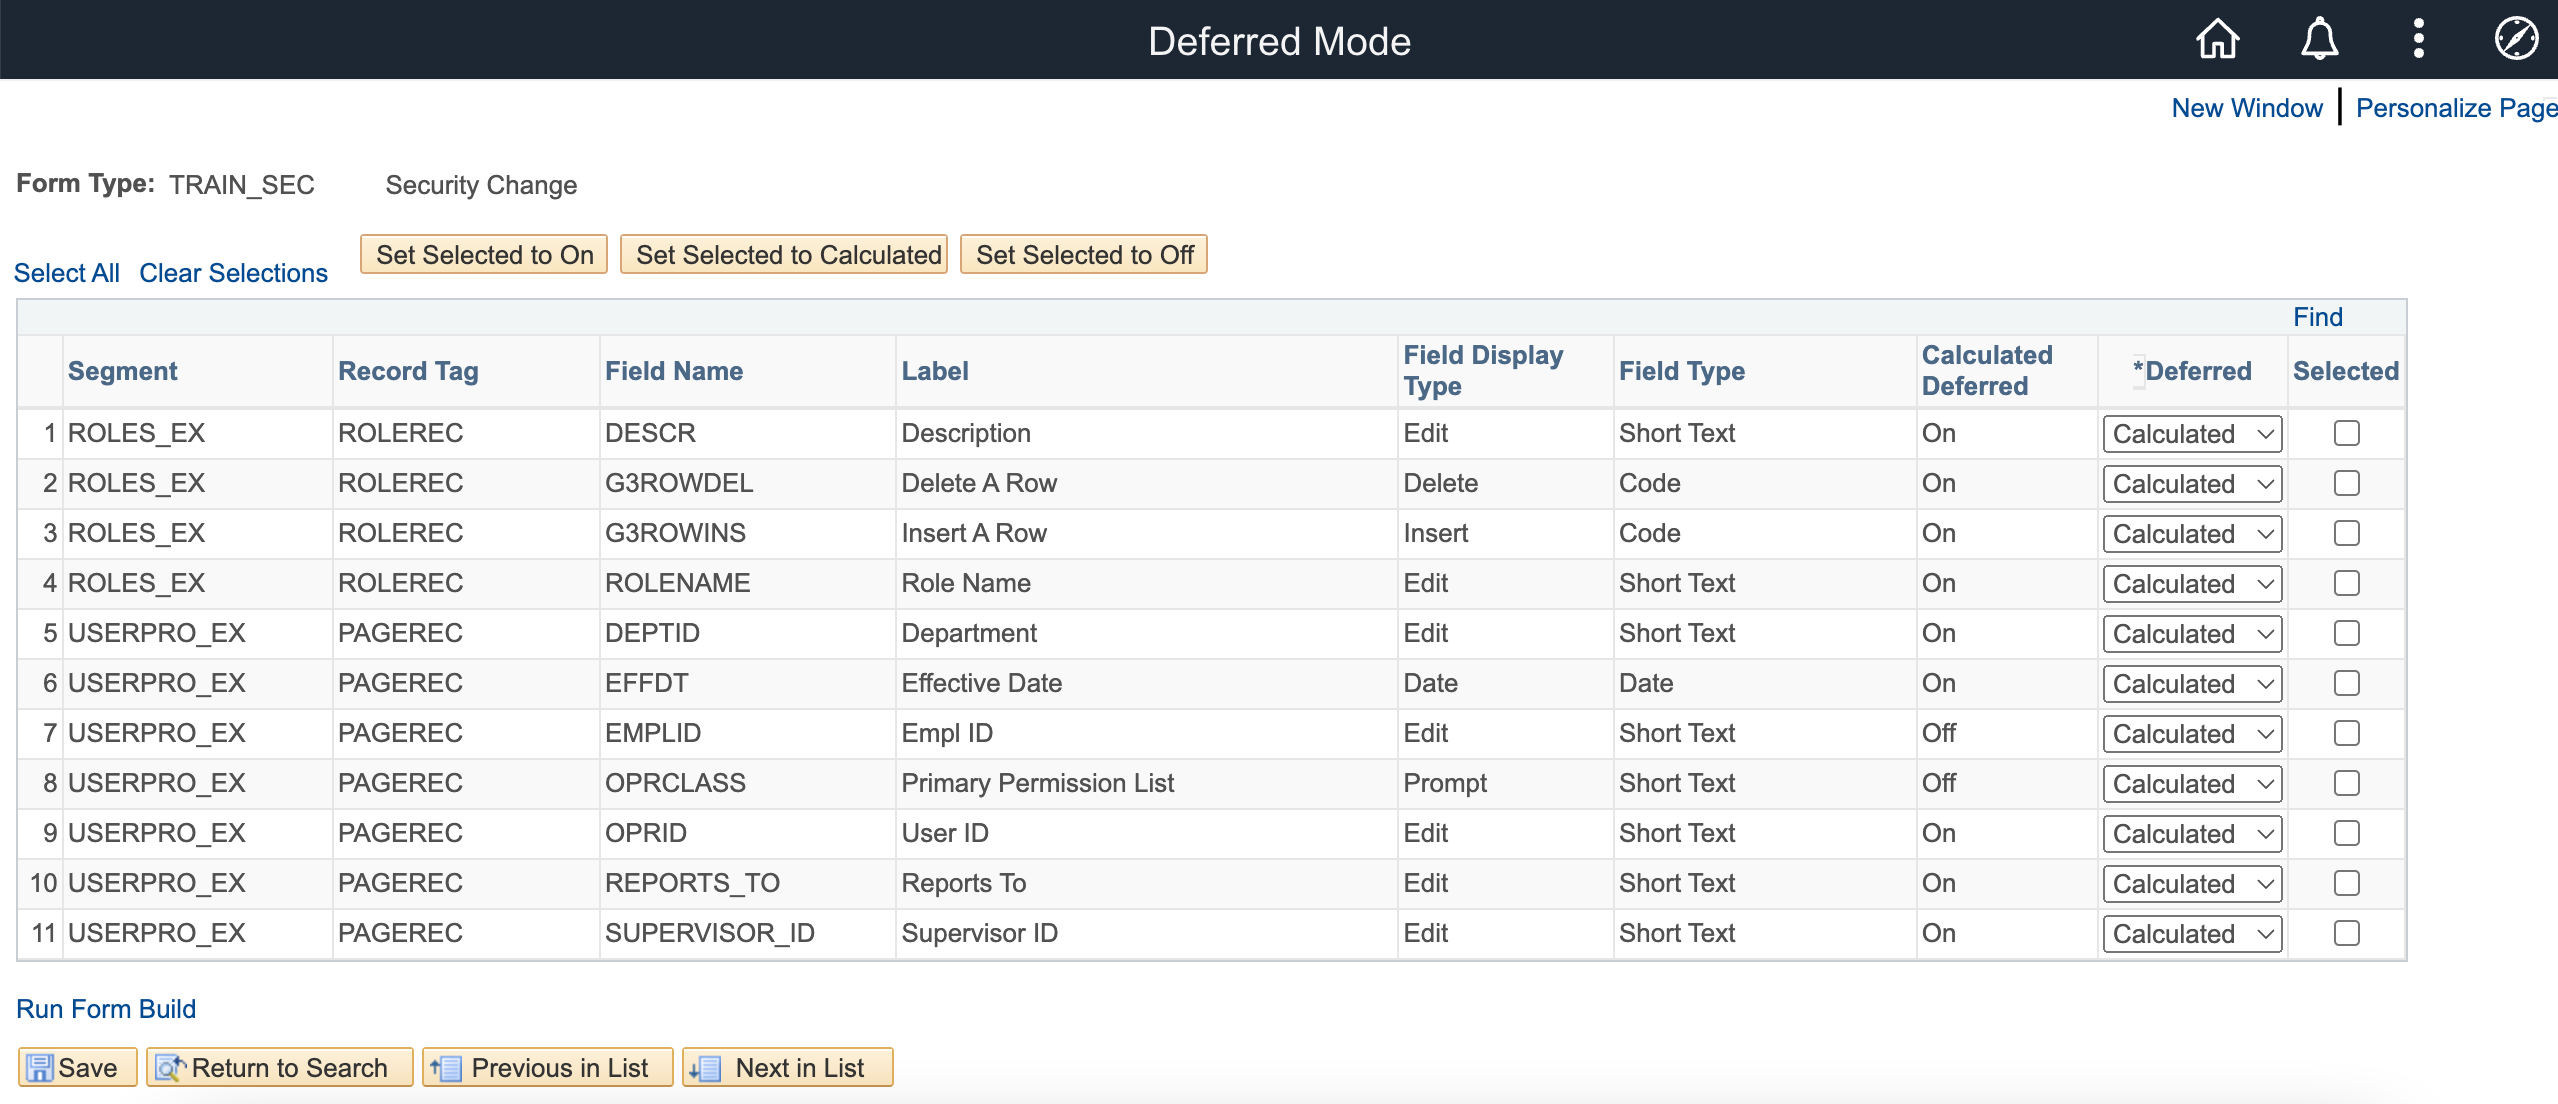
Please note: if a field appears on multiple pages, it will calculate Deferred to On but the field value will appear in sync as you move between pages. However, if you have the same field appearing in two segments (with the same segment record tag) on the same page, Deferred will be calculated to On and you will not see the field values sync until something else triggers a page trip. For example, if you have an EMPLID field in a header segment, but also have the EMPLID field appear in a segment at the bottom of the page, changing the top EMPLID field will not trigger a spin to update the bottom EMPLID field, but once a spin is triggered, the bottom EMPLID will match the top. You can set the field’s Deferred option to “Off” to resolve this, if needed.
Helium Form Configuration Considerations
The purpose of this section is to advise you of issues encountered at clients and resolutions taken to address said issues.
New Error and Warning Messages When Saving Configuration Segments
Part of the benefit of a dependency network is we can start to have visibility into your setup and guide you when building. We have a lot we want to add, but for now, you will see this as a new warning message and error message in certain situations when trying to save your configuration segment.
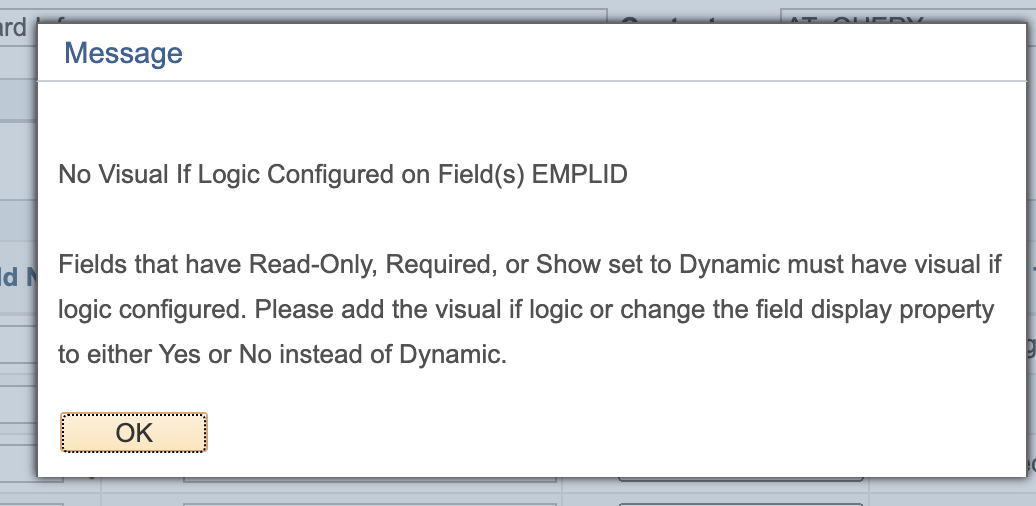
Error Message
If you try to save a segment with Read-Only, Required, or Show set to dynamic, but do not add visual if logic, you will see the following error that does not allow you to save.
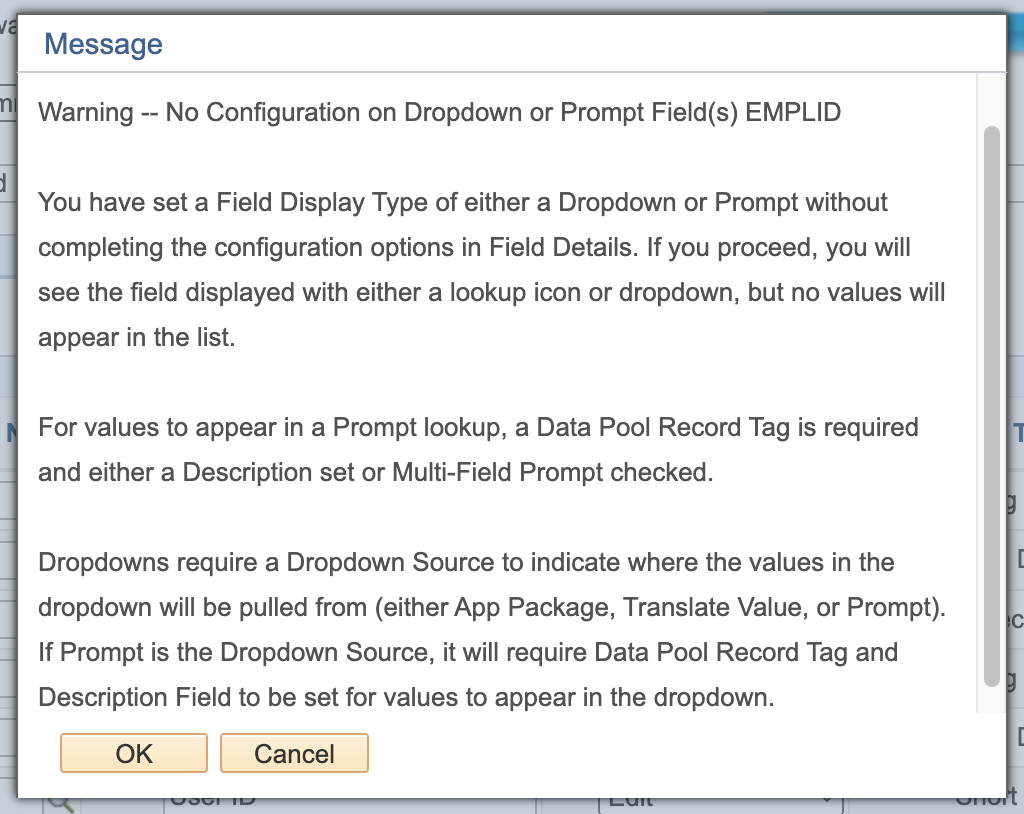
Warning Message
Additionally, if you configure a field as a dropdown or a prompt but you do not configure prompt settings, you will get the following warning message when you try to save. This is just a warning and you will still be able to test your form.
New Error Messages When Data Pool Record Tag Matches Segment Record Tag
These error messages do NOT fire in versions of GT eForms after 3.58.03.
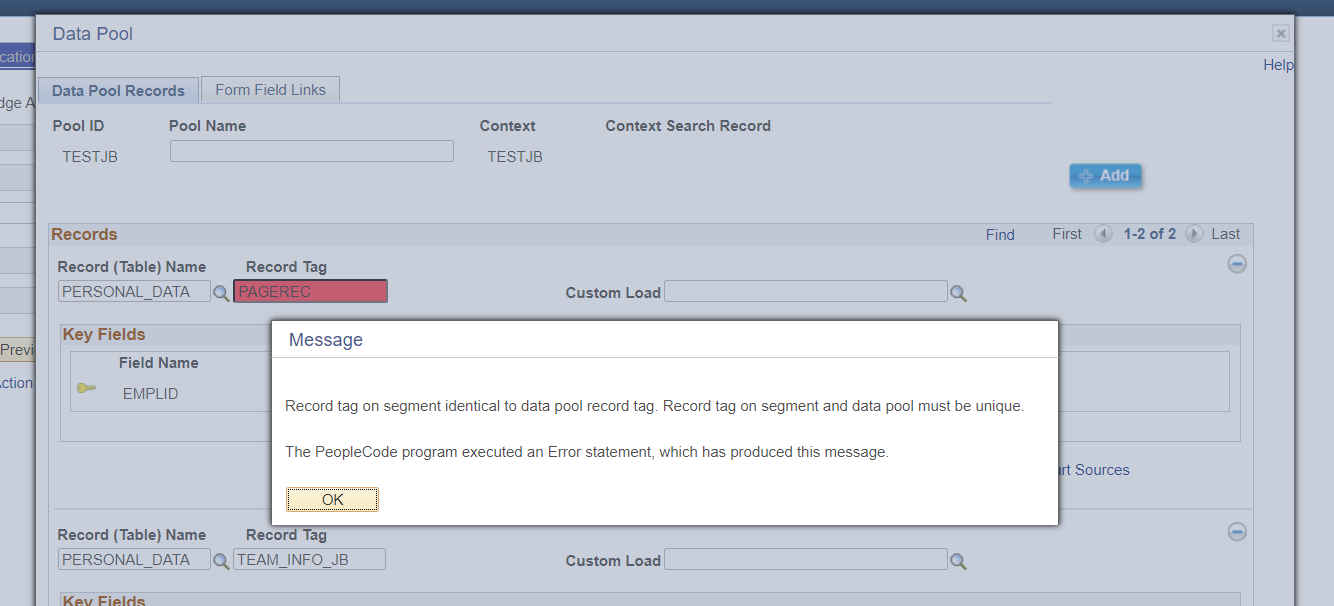
Record tags are the backbone of configuration smart sources, so unique record tags clarify where the smart source can be found, especially when differentiating between a segment and a data pool. Regardless of the form engine, in GT eForms 3.5, we will now validate the segment and data pool records tag and ensure they are unique and do not duplicate each other. If you enter a record tag that will cause a duplicate, the following error messages will appear, and you will not be allowed to save.
Segment
Data Pool

New Warning Messages When Changing Record Tag
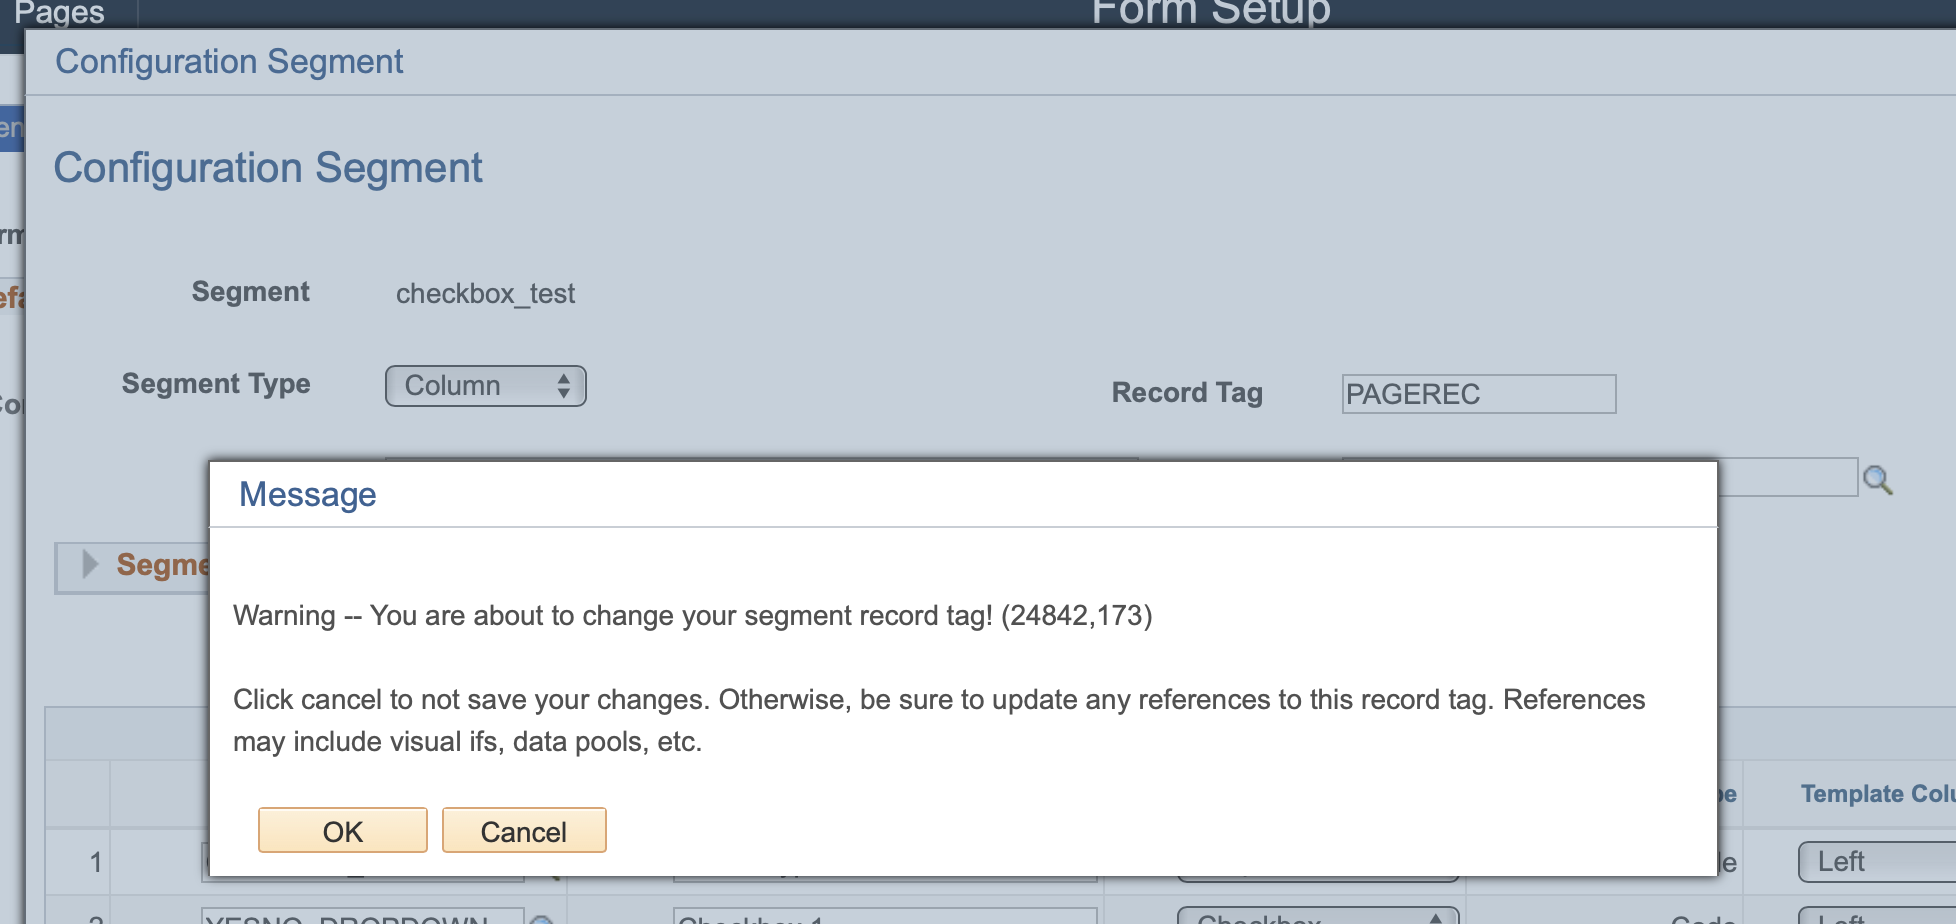
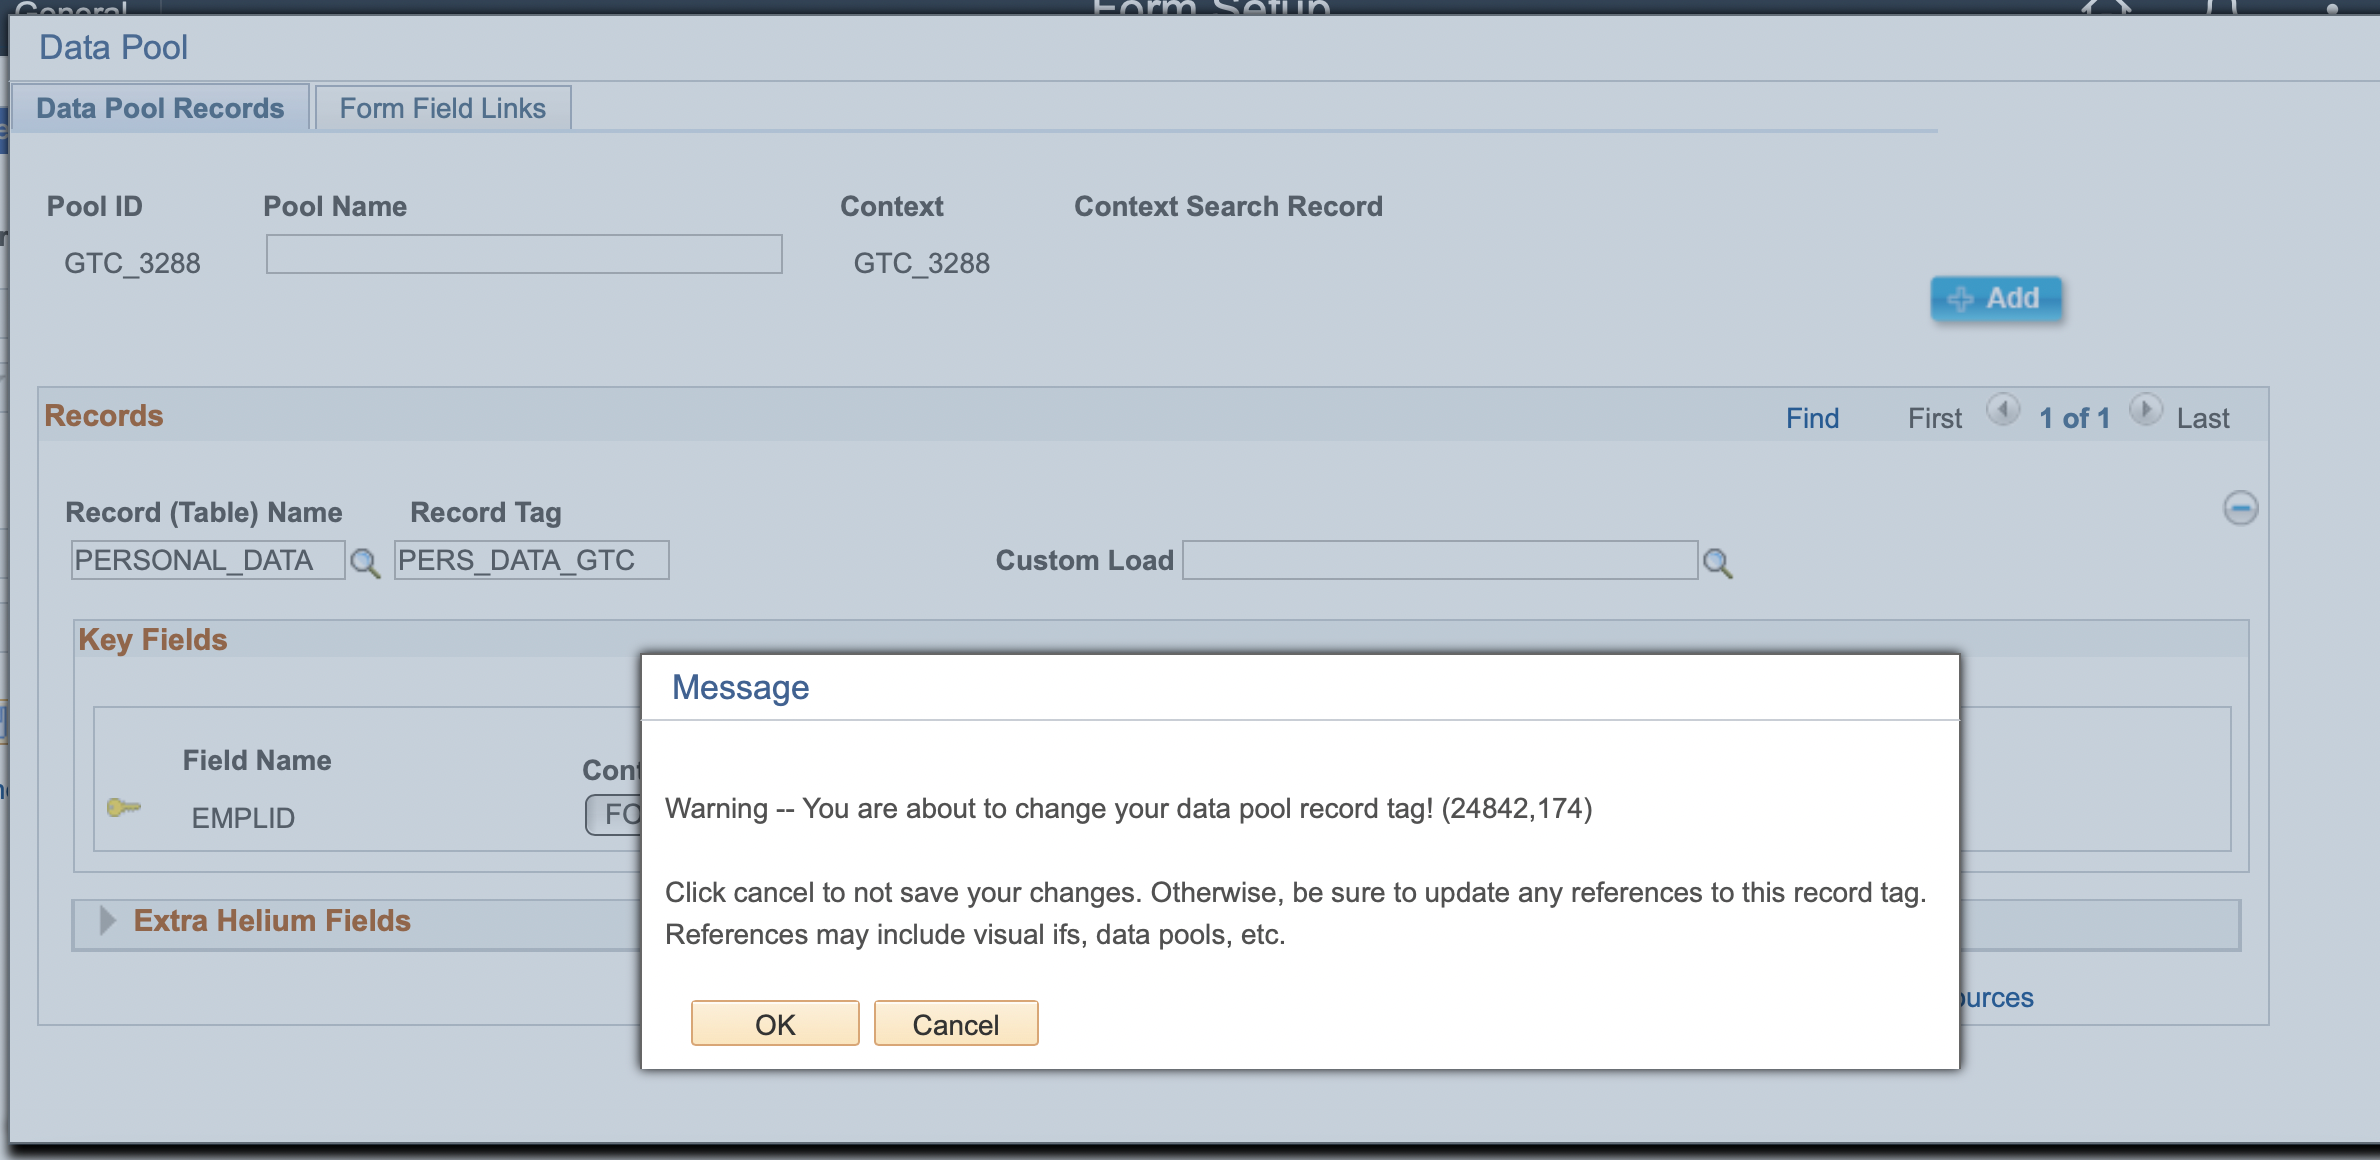
If you are experienced with eForms, you know what a headache it can be when you change record tags and already have logic configured. For new form builders, we have now added a warning message that serves as a caution to make sure you really want to change your record tag (both segment and data pool tags) and, if so, reminds you to update any references to that tag.
Segment Warning
Data Pool Warning
Custom Error and Warning Messages on the Form
Some people loved it, some people didn’t, so we made a change that at least helps those that didn’t. Custom error and warning messages that displayed to end-users will no longer have the text Peoplesoft enforced that include either “Error” or “Warning” in the message. Just the text you specify will appear, meaning you can choose to include the terms “Error” or Warning’ if you would like.
Duplicate Fields with Same Record Tags
When converting your form to 3.5 Helium you need to make sure duplicate fields have identical configuration. For example, before you could you have two segments with a record tag of PAGEREC and in one segment use EMPLID as a prompt for the end users and other segment could use EMPLID as an edit field for your CI. This will need to be reconfigured for the dependency network so all references to the field are configured the same. This is because the dependency network cannot distinguish between two fields with the same name and record tag.
Fields Dependent on Themselves
It is rare, but we found during testing a field had the requirement to become read-only after a certain value was entered in that same field. In 3.5 Helium, the framework does not recognize when a field depends on itself. Therefore, that field may be calculated as deferred, which will cause your field not to be set to read-only until another page paint is triggered. If you need the page paint to occur after exiting the field, manually change the field’s Deferred Mode to “Off.”
Related Display Behavior with Deferred On
In our previous version, if a field had a related display, the value would be updated regardless of the “Disable Page Refresh” setting under the Advanced section of Field Details. Now on with Helium Performance forms, related displays work like any other dependency. That means if a user enters a value in a field, the related display will not appear if Deferred Mode is activated for the field.
Changes to Query Record JSON Structure for Forms with Conditions
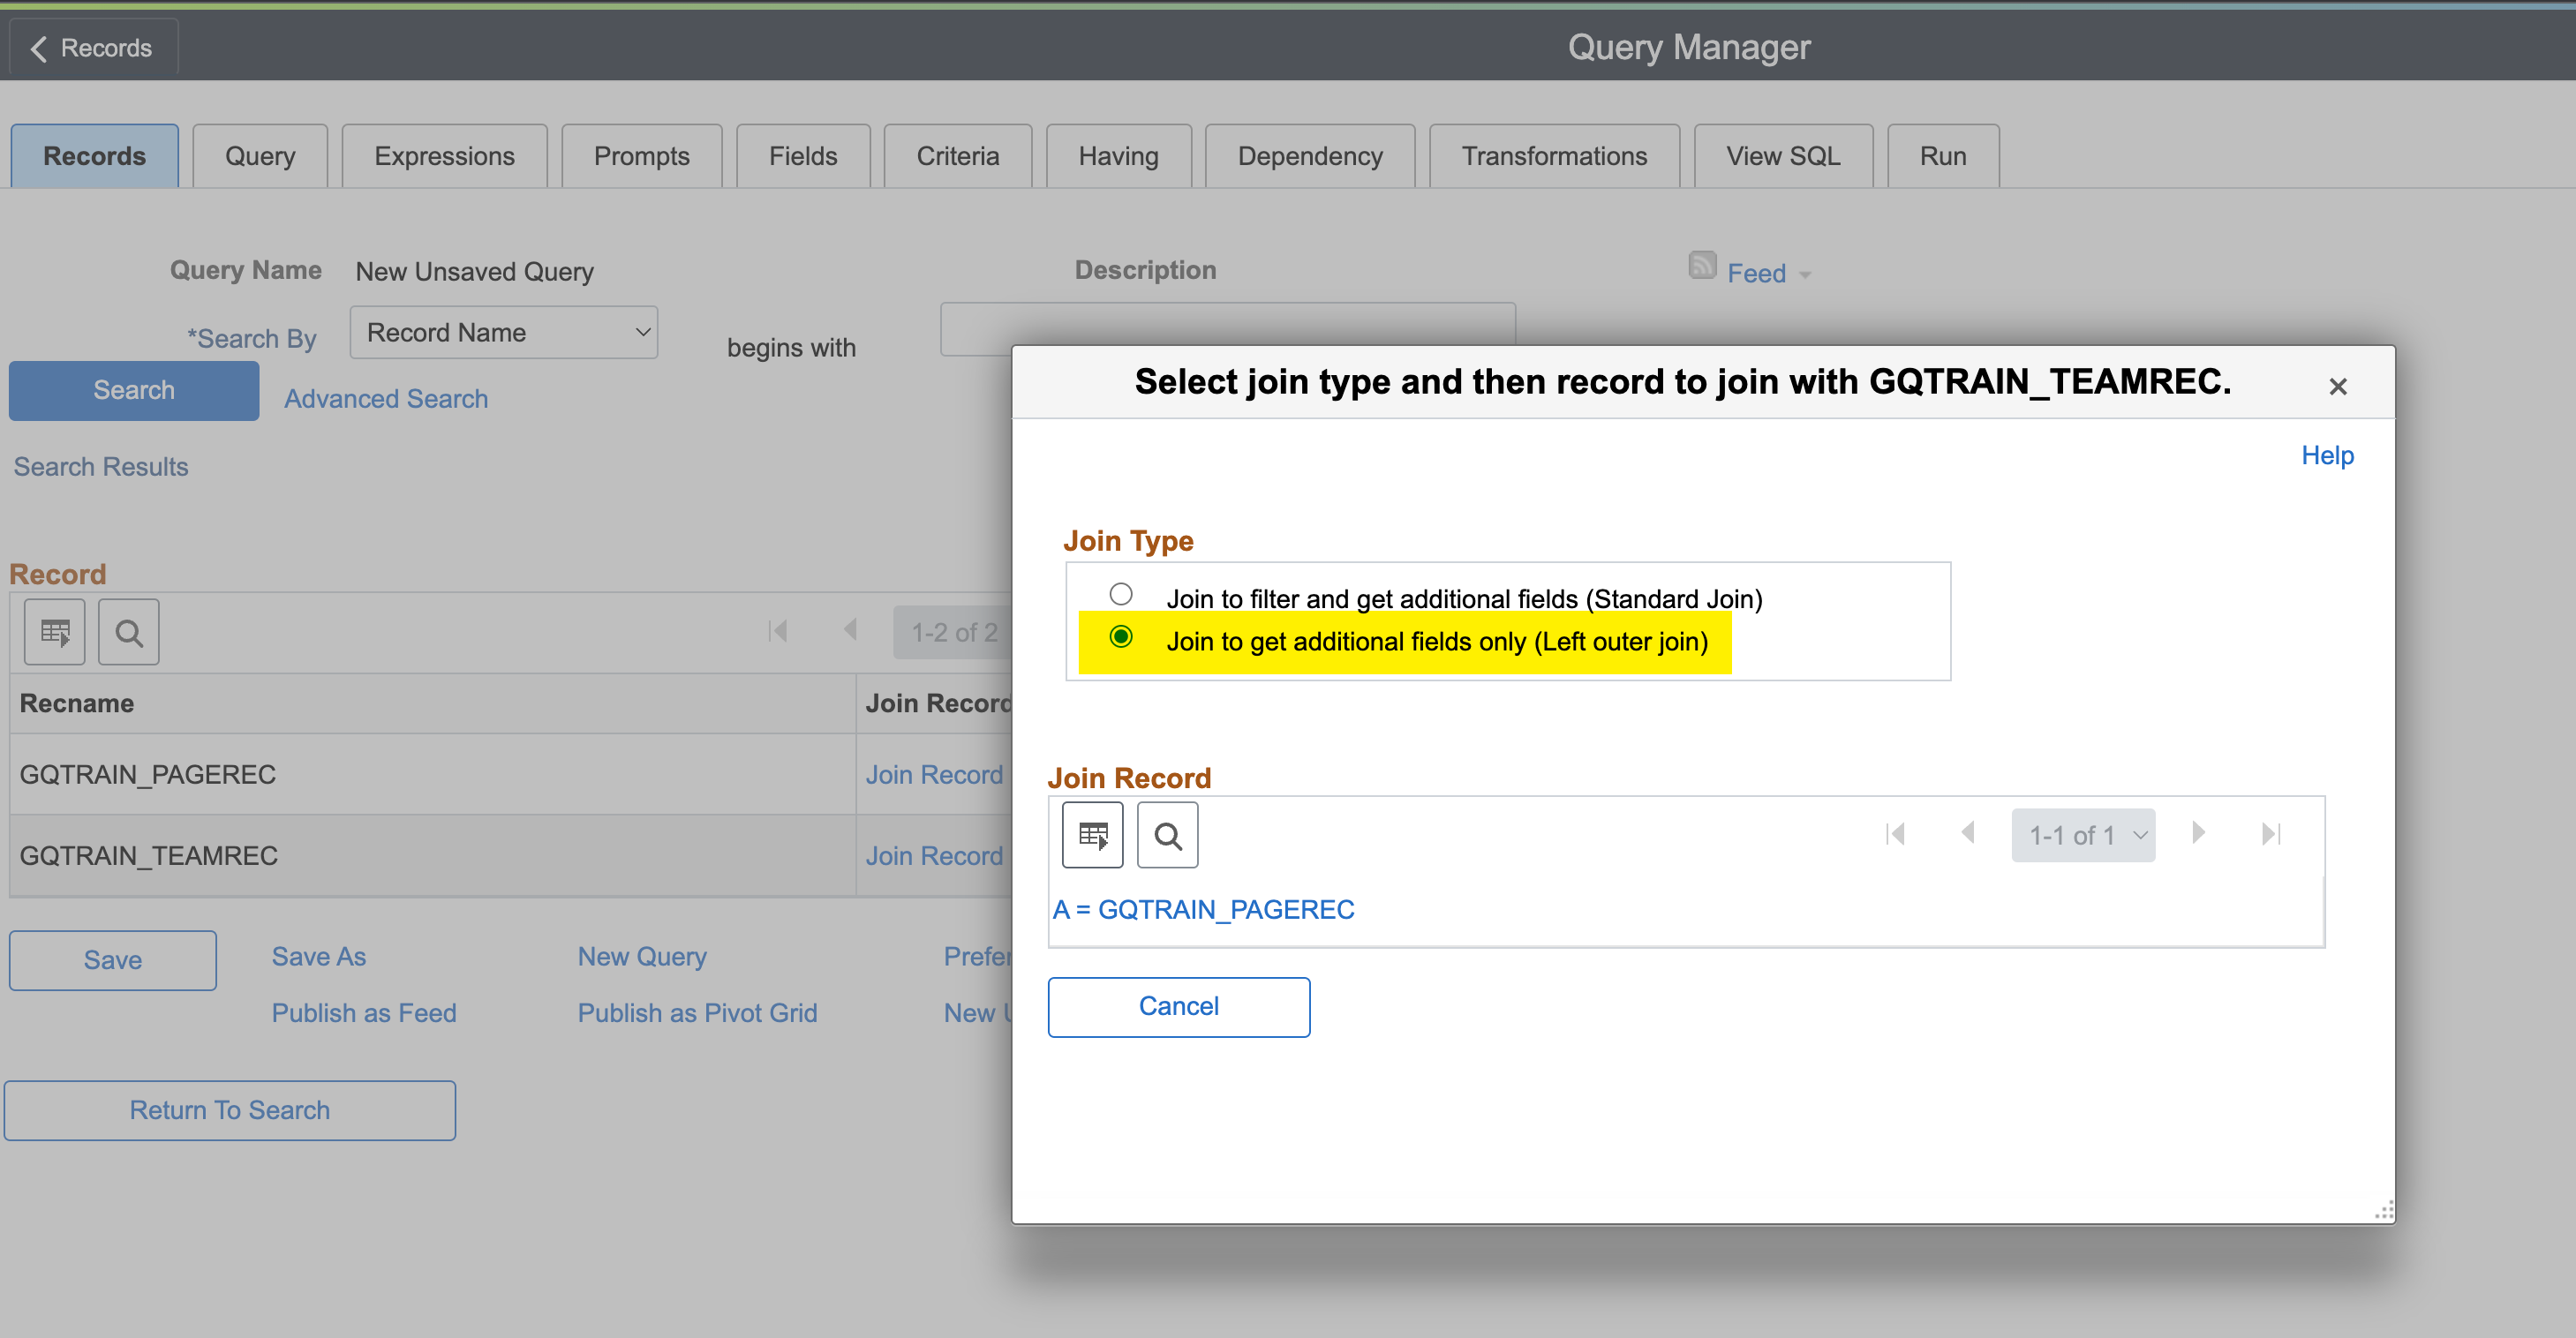
With Helium Form data stored in JSON, field data is organized by record tag instead of segment name. This has an impact on query records, where before, it was easy to understand that some fields that prepopulated on a condition were not applicable for a form transaction because they were in a separate segment. Now, you will need to use Form Condition as criteria when querying query records to keep your query data organized.
Note: with this change, you may find that a standard query join for all your form’s segment record tags do not display all the forms. If you ever find that you are not seeing all form transactions for your form type, try using a Left Outer Join when bringing in all the segment record tags.
Field Formatting
In Helium forms, users may see a difference in how fields are formatted. The Helium form engine displays field values in the format in which they are stored. For example, PHONE and SSN may have storage formatting settings with dashes. If so, Helium forms will automatically format the field values on the form with dashes. If the storage format is without dashes, that is how the field value will appear on the form. If you would like to have field values stored in one format but displayed in a different format, you will need to request a developer to implement two-way code to handle the conversion between the field display format and the storage format.
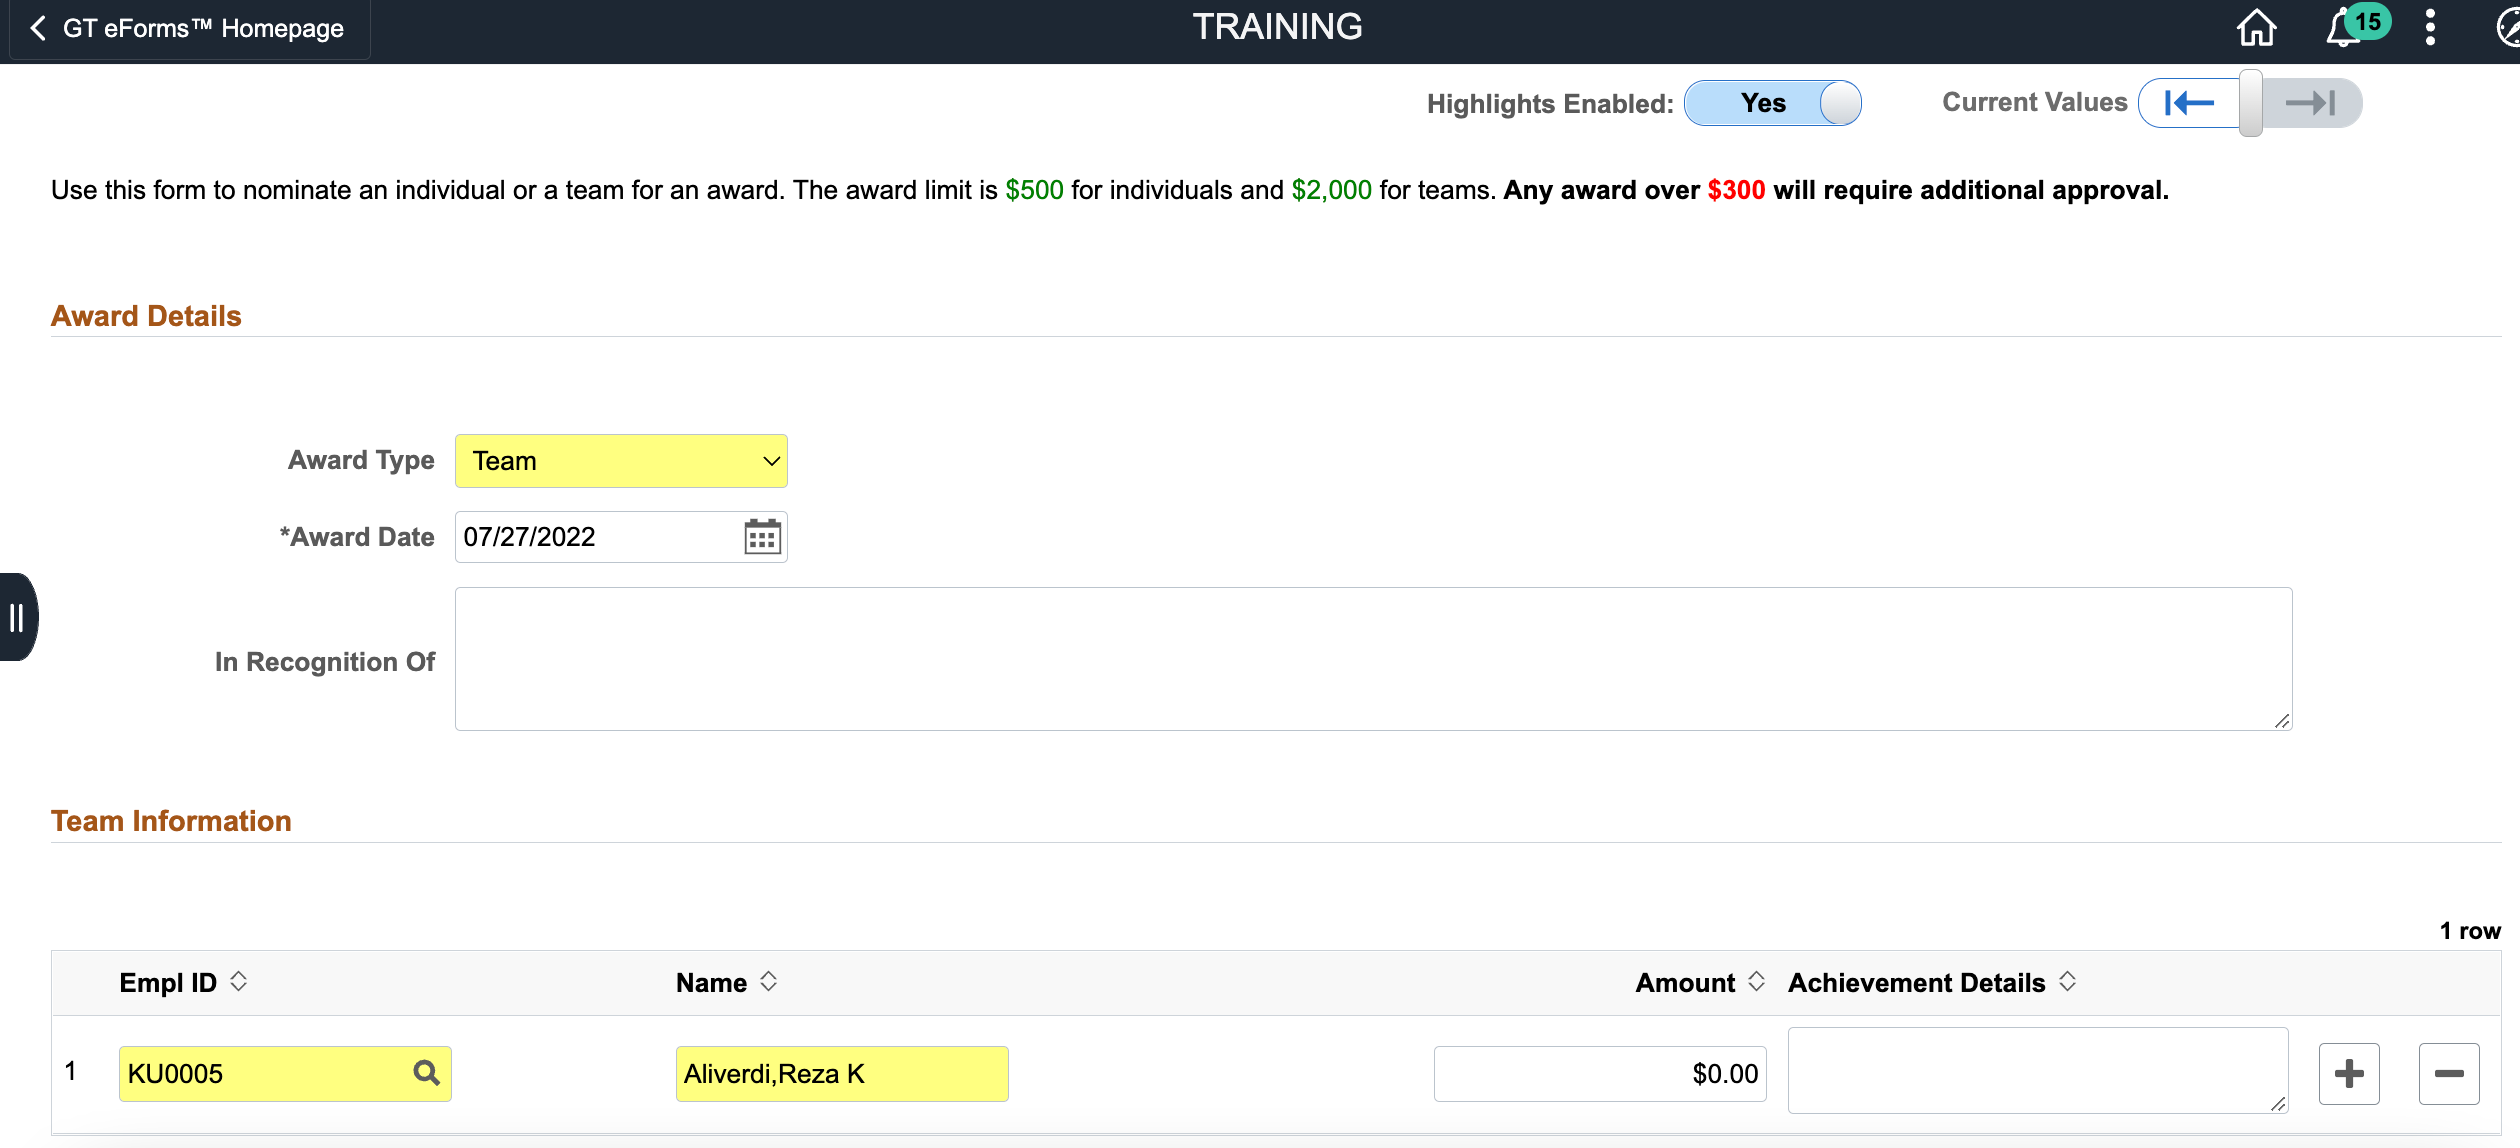
Highlighting Grid Fields
In Standard Form Types, if a form had Highlights enabled, any changes to a field in a grid highlighted the entire grid row, as shown below:
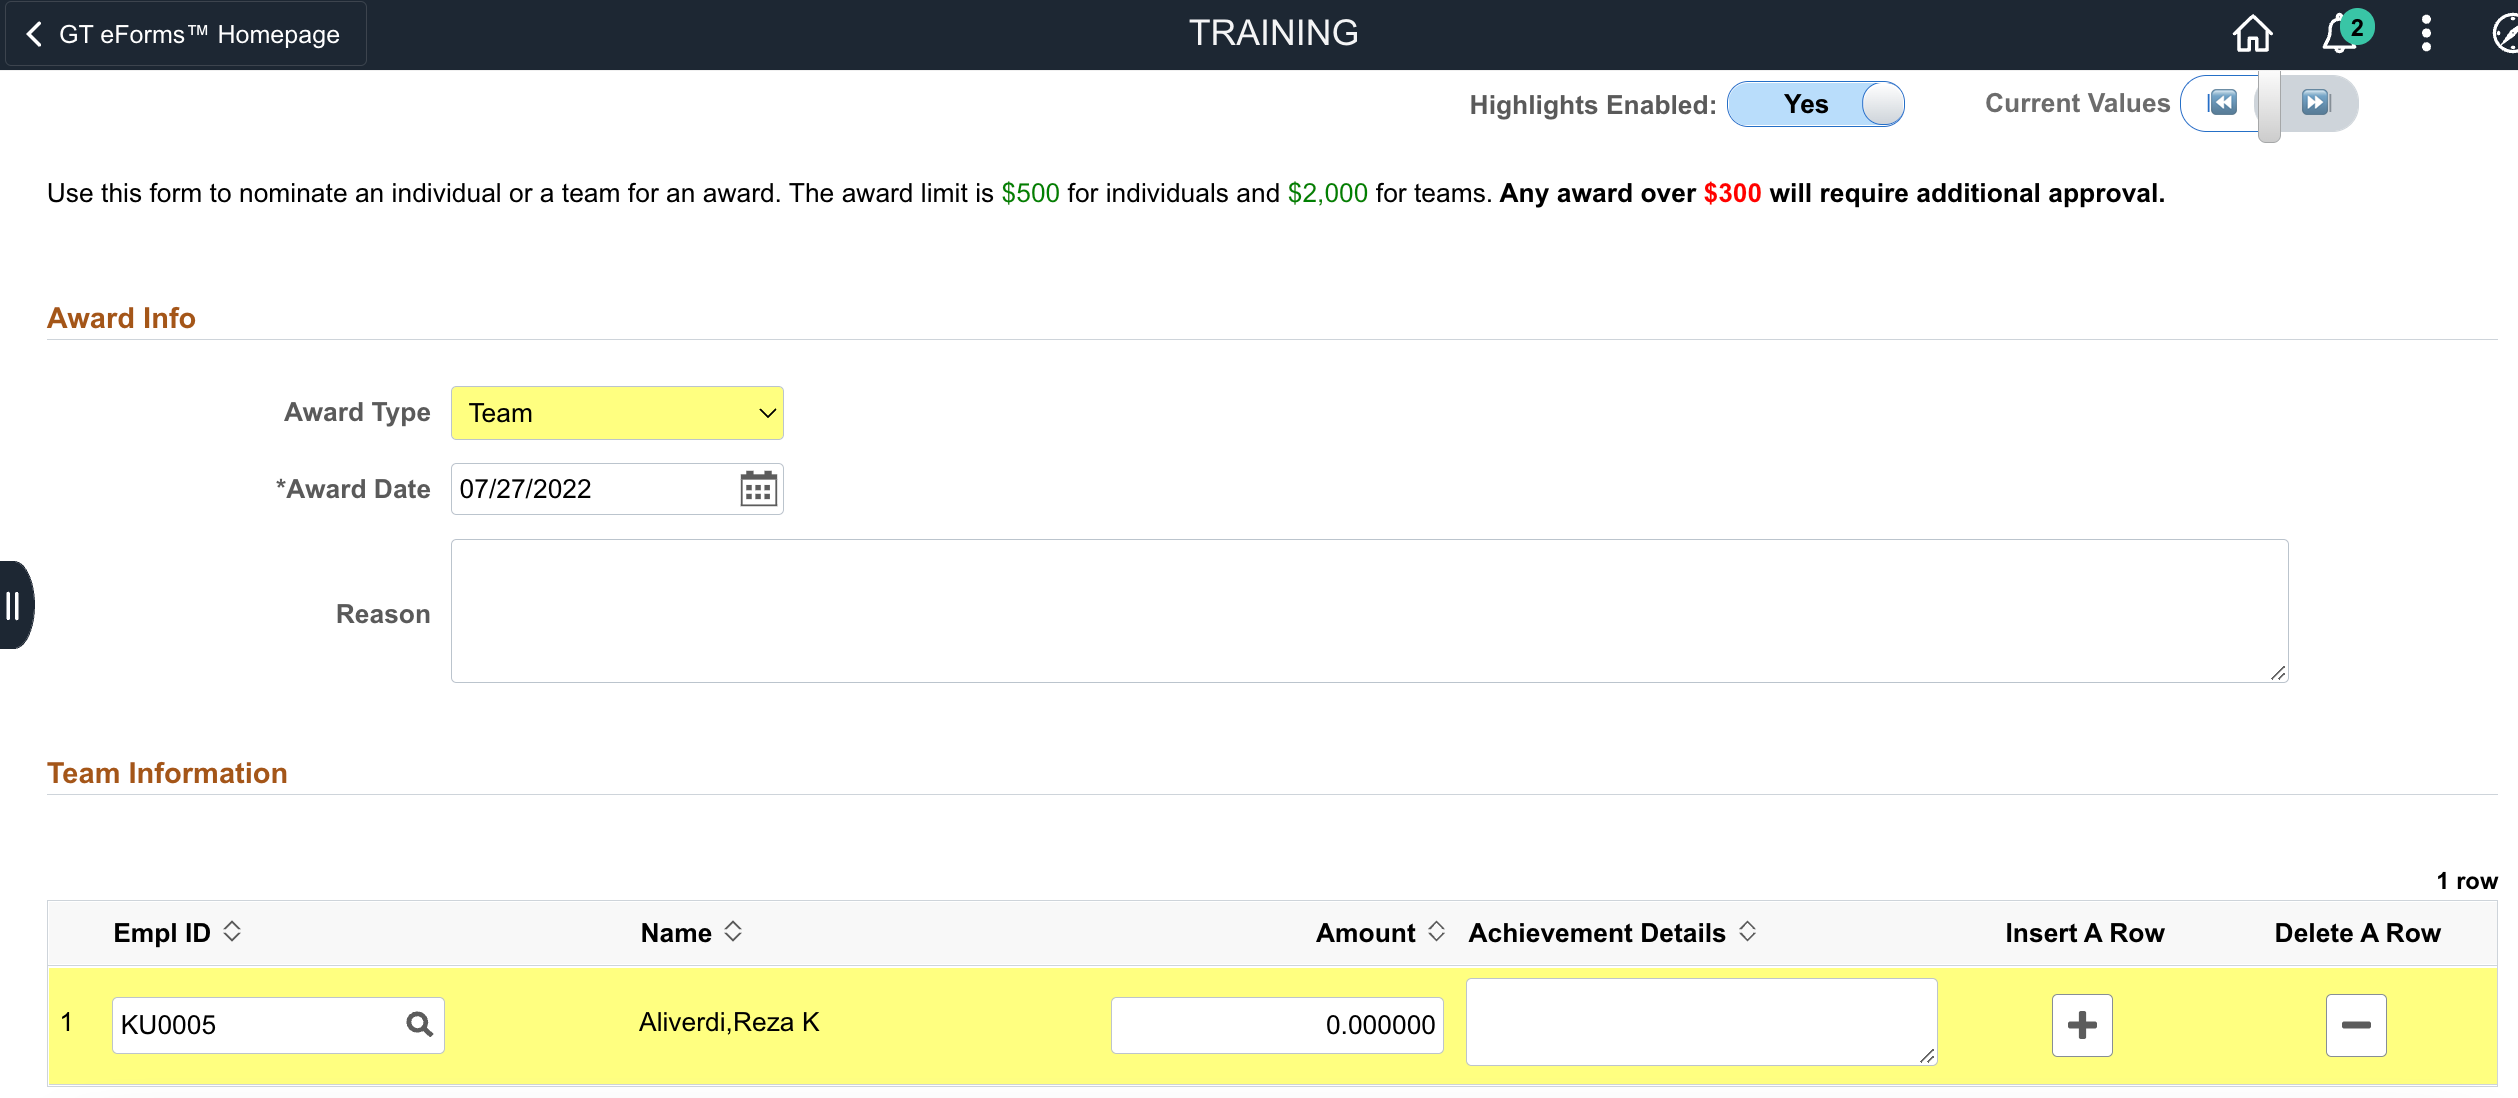
Helium Performance enables the framework to detect only the fields that changed and highlight just those fields, as shown below.
Change to Options for EFFDT and EFFSEQ Keys in the Data Pool
In Standard form types, form builders can save a data pool without setting the context on an EFFDT or EFFSEQ key. Leaving the context blank automatically sets these keys to the max effective date or max effective sequence. Below is an example data pool configuration.
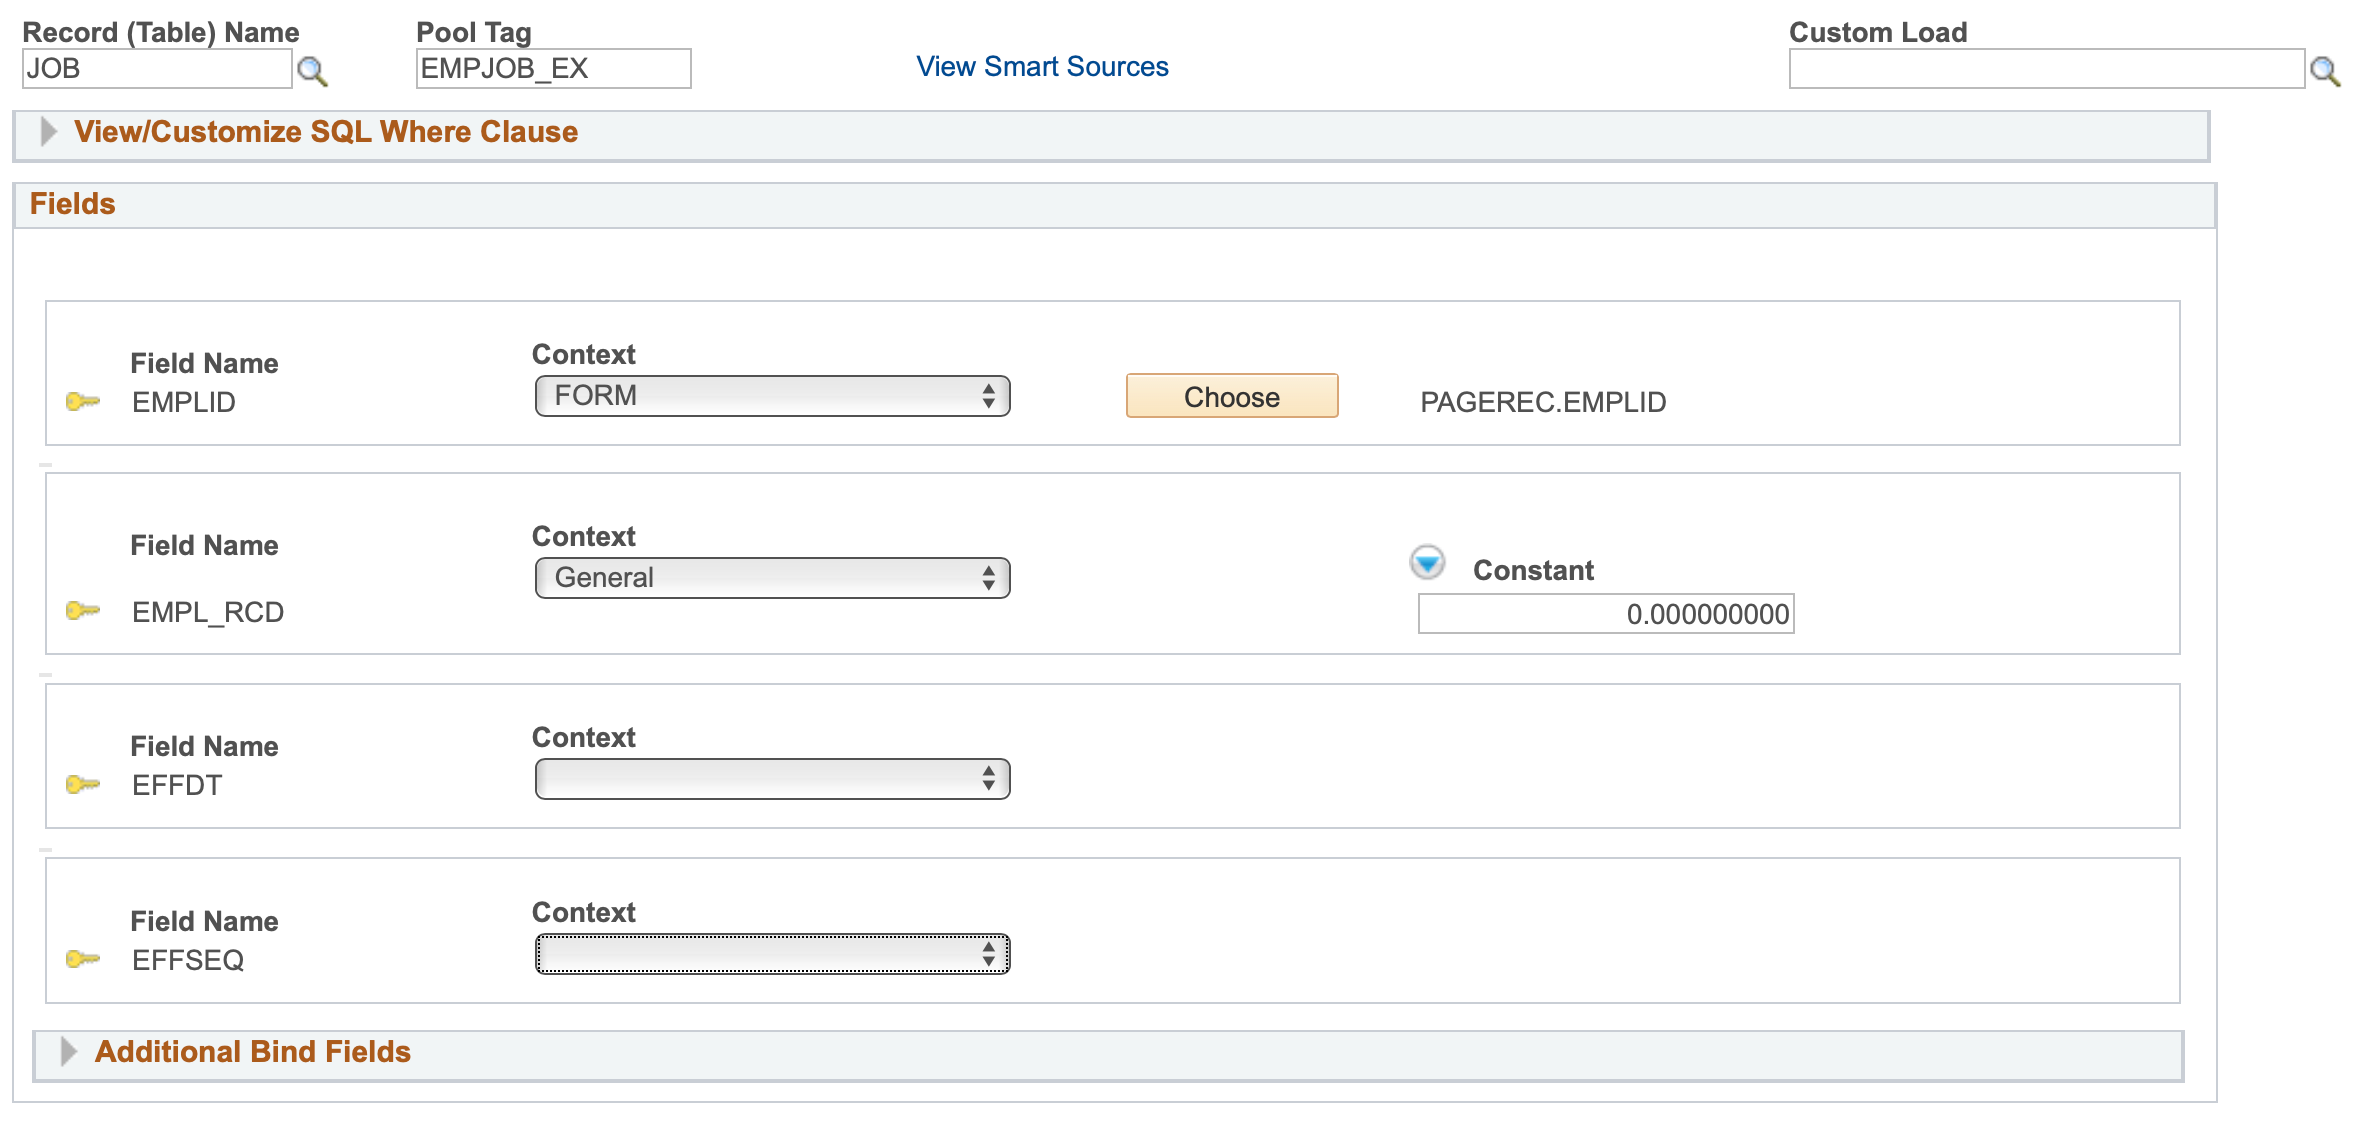
With Helium Performance, the system will alert users if any keys are left blank. To accommodate this, we have added two new context options that allow form builders to select max effective date and max effective sequence to satisfy those keys.
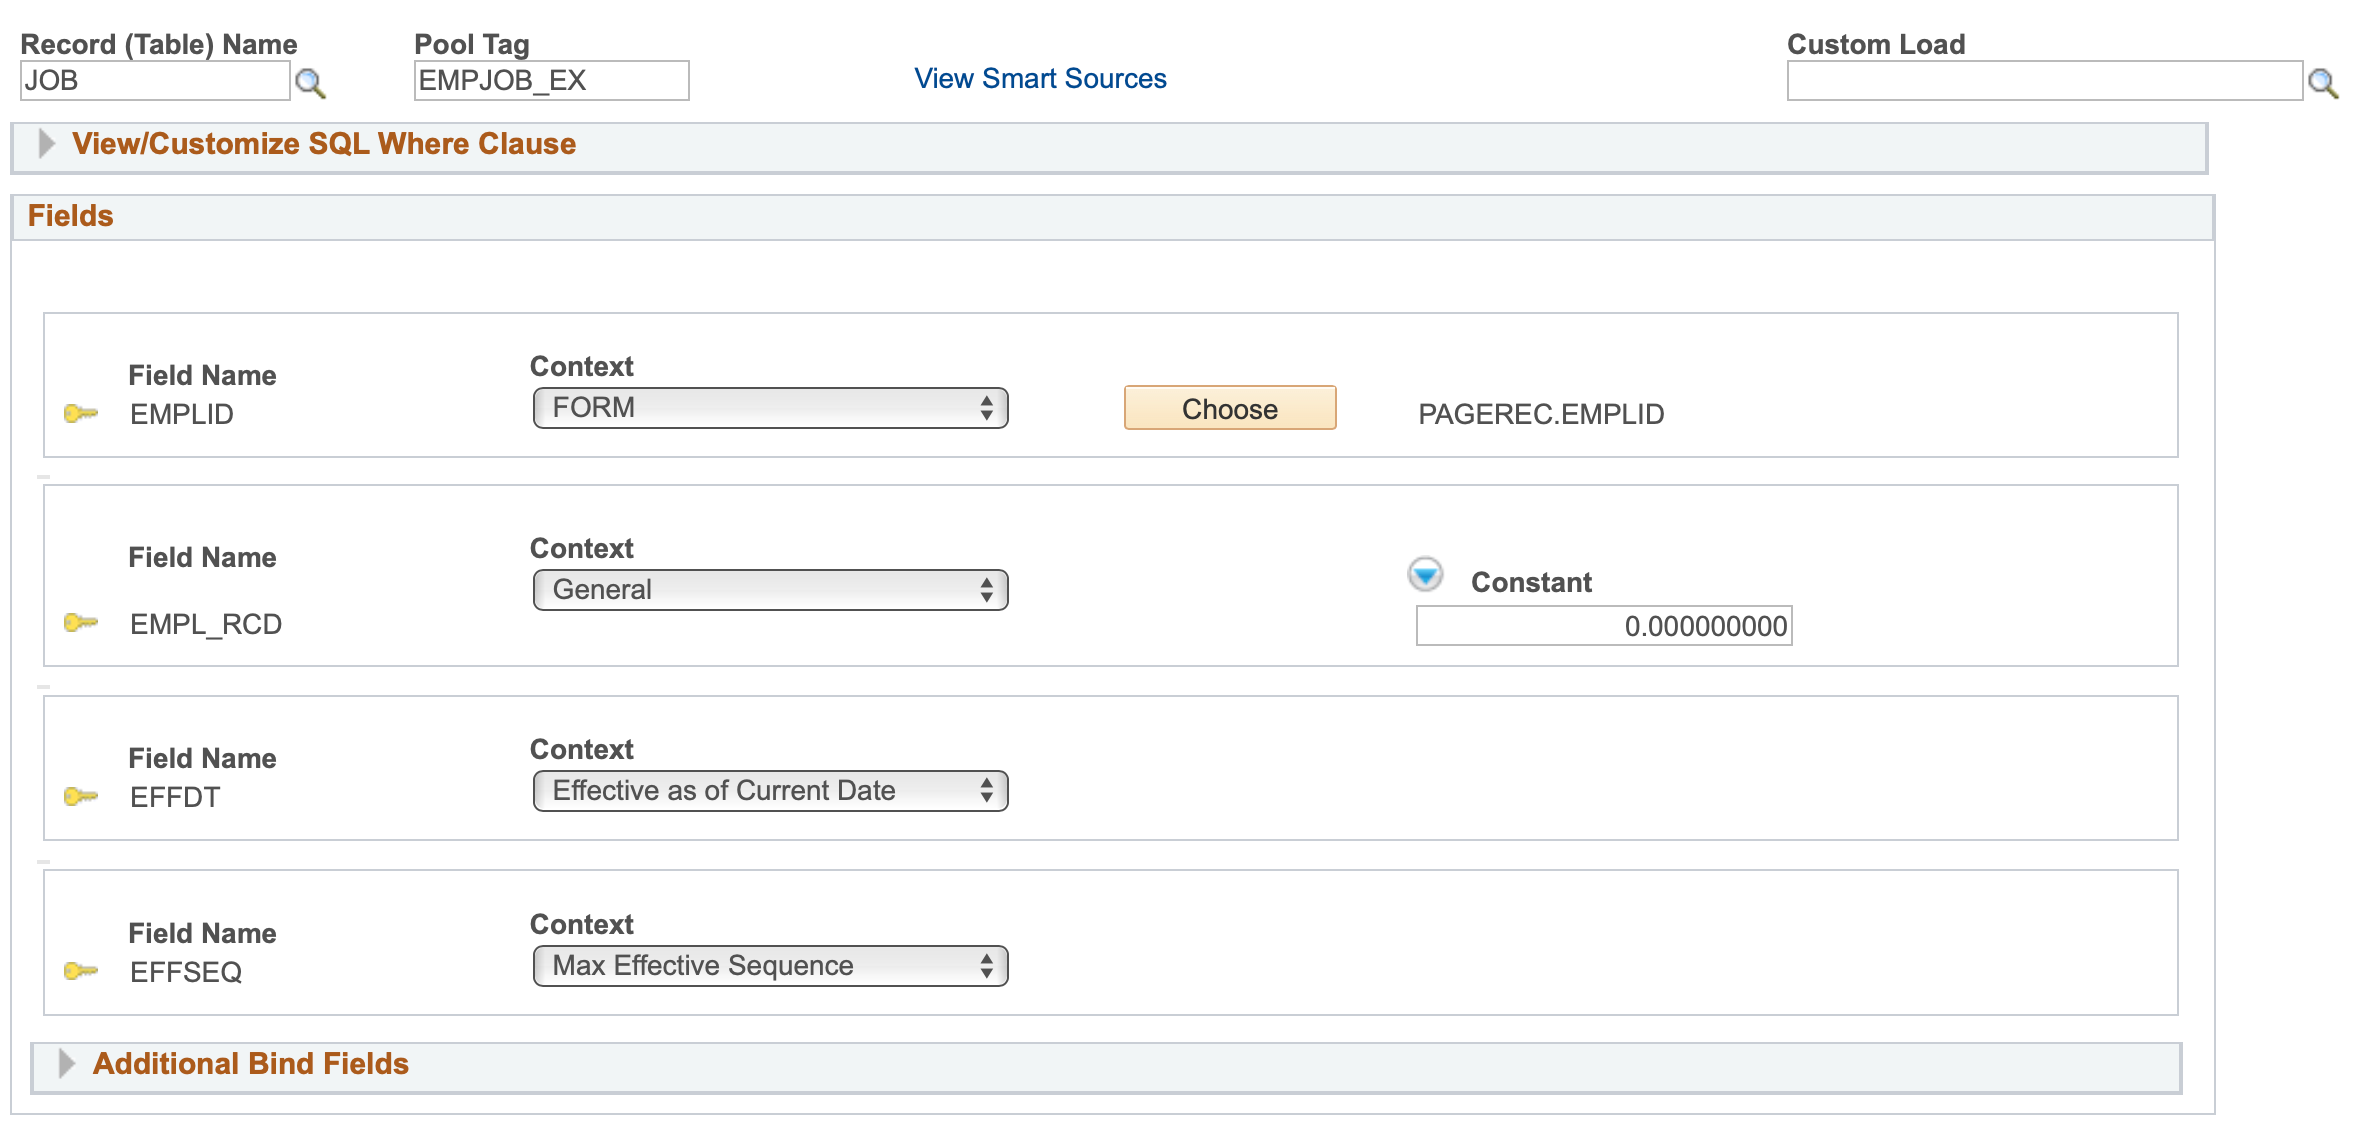
Please note, while you now have the option to return the max effective dated row for EFFDT keys, we still recommend joining EFFDT keys to a date field on the form, for the most flexibility. If your form already has a date field, you can join it to that field. Otherwise, you can create a date field, set it to initialize to Current Date, and hide it on the form. Having such a hidden field makes it easy to join all EFFDT key fields in the data pool to the same field.
Change in Allowed Configuration for Data Pools Using Grid Fields
This change only applies to eForms versions including 3.58.00 and later.
In previous versions of the framework, you would need a developer to create a custom load to populate data into a grid segment. In 3.58.x, you can now use configuration alone to populate data into a grid. However, regardless of the method (config vs custom load), you will need to select the new “Ignore” context for any grid fields populated based on column segment fields. Here is an example of the setup required to populate a grid with a list of roles held by a ROLEUSER. Note the use of the new “Ignore” context on the ROLENAME field.
Previously, it did not matter if you joined all the keys, including the keys for fields that were inside the grid you were populating. Below is an example from training where we used to use a custom load to populate all the roles for the user on the form.
For Helium forms, joining the ROLENAME key field, which is the grid field you want populated, will now cause the following error when opening the form.
You may still join data pool keys to grid fields if you are populating a grid field based on a value in another grid field. However, as mentioned above, you must use the “Ignore” context if populating grid fields from a column field. For more information about dynamic grid field population, refer to the Data Pool document.
Using Grid Fields as SmartSources
Grid fields cannot be used as SmartSources within the form or elsewhere in the framework without the involvement of a technical resource. Because fields in a grid are columns of data, a technical resource will flatten multiple rows of data into a usable value. Flattening the data allows you to take all the values for a column in a grid and add them or otherwise calculate from their values so that the result may be used in a SmartSource as a single piece of data.
Below are several examples where a technical resource must create a special SmartSource for a grid field:
-
SmartSources in Visual If expressions. Grid fields can be configured as SmartSources in visual if expressions relating to other fields within the grid. If a grid field is to be used as a SmartSource for a field elsewhere on the form, ask a tech!
Example: route a form to HR if any amount in the team award grid is greater than $500. -
Search fields or search result fields based on grid column data. Ask a tech!
Example: search for names in the team award grid, or show all the team nominees in search results -
Smartsources for email templates. Ask a tech!
Example: List all team members nominated for an award on the approval email
Need to Default Search Configuration Upon Task Creation
Default Search Configuration selects search fields and result fields automatically. While many clients find the automatic field selection to be sufficient, this process still requires that a user open Search Configuration and click ‘Default.’ We recommend that you set and review those fields sooner rather than later. When you create new shared tasks on your form (Evaluate, Update, and View) or if you configure an Add task search record, you should go to the Search Configuration page immediately after saving the Form Setup. If you don’t, you will see a search page when you go to test the form, but it will only display the Search button, as shown below.

To set your search and result fields, go to Search Configuration and start by clicking the “Default” button and then customize your search from there.
| Initial View of Search Configuration |
|---|
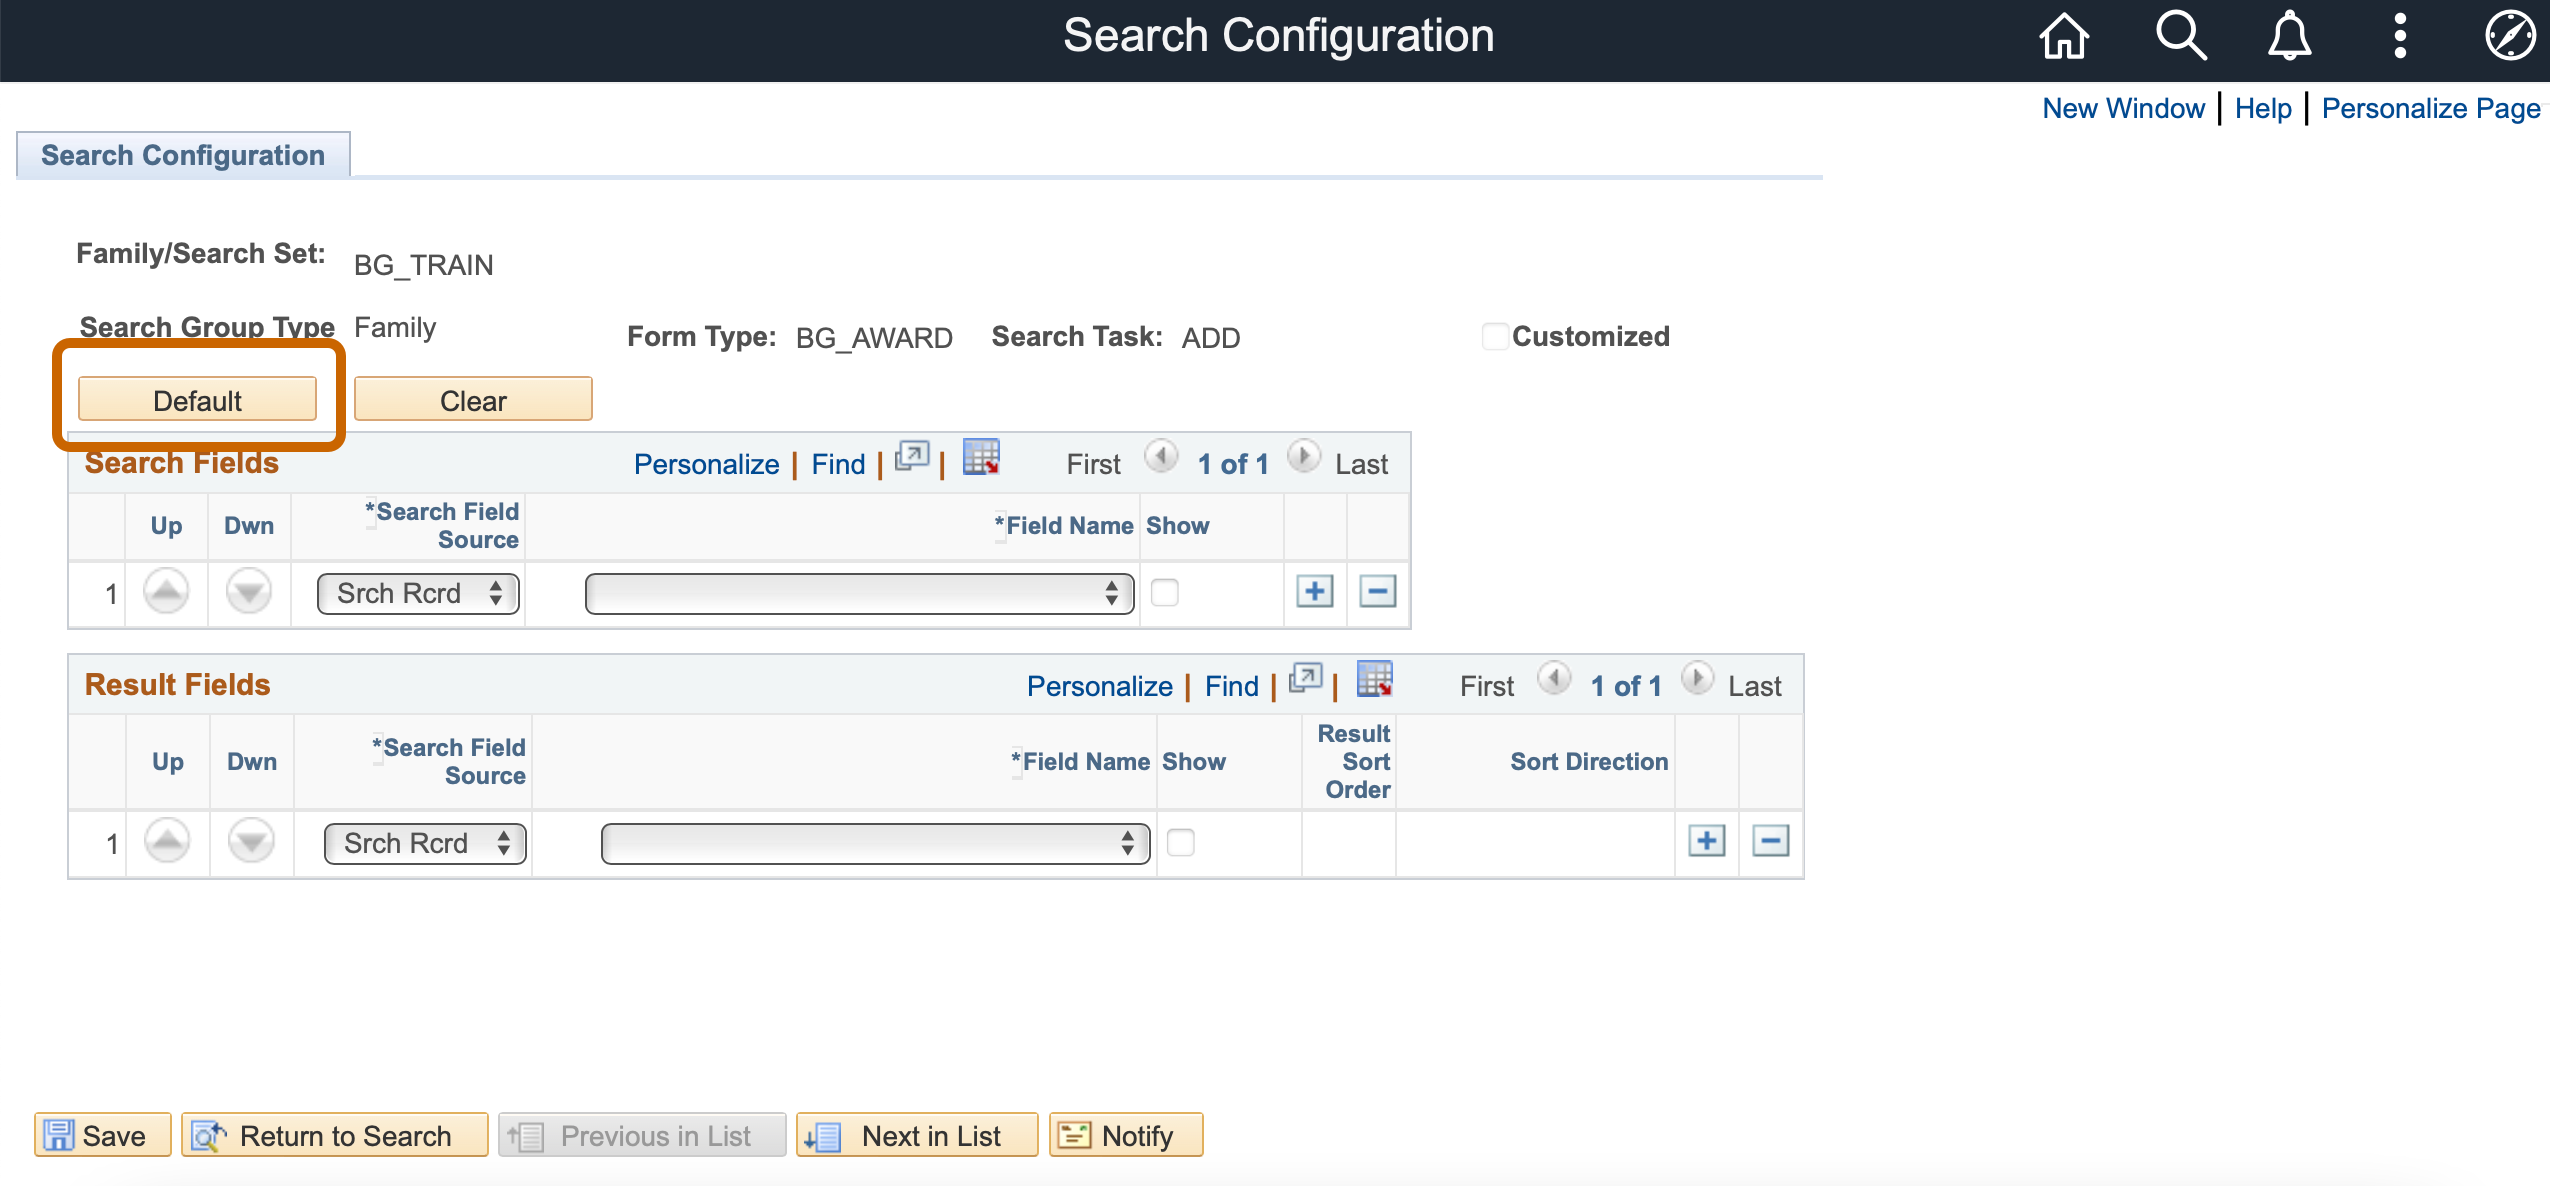 |
| View of Search Configuration After Clicking Default Button |
|---|
 |
Change to Action Item Behavior
Action Items in Helium forms no longer need to be reset if you go back and make changes to the form. This behavior is another benefit of the dependency network. Now that we know what logic is associated with an action item, we can allow users to acknowledge an action item but still make changes to non-related field and not require them to reacknowledge. Please note though, if you have multiple action items, and one of the action items is reset, the entire Action Items grid will repaint, and all action items will be reset.
Change to Required Unique Sequence Numbers on Segments
Segment sequence numbers are auto-generated when you add a new segment to a page, but it is possible you could manually change them. On Standard forms, we don’t enforce the sequence numbers entered for each segment. For Helium forms, we still don’t enforce the sequence numbers being unique and allow you to change the numbers, but you need to double check that the sequence numbers are unique. If they are not, the form will only display one of the segments for a given sequence number, as shown below.
| View of Award Information and Employee Information Segment as Sequence 1 |
|---|
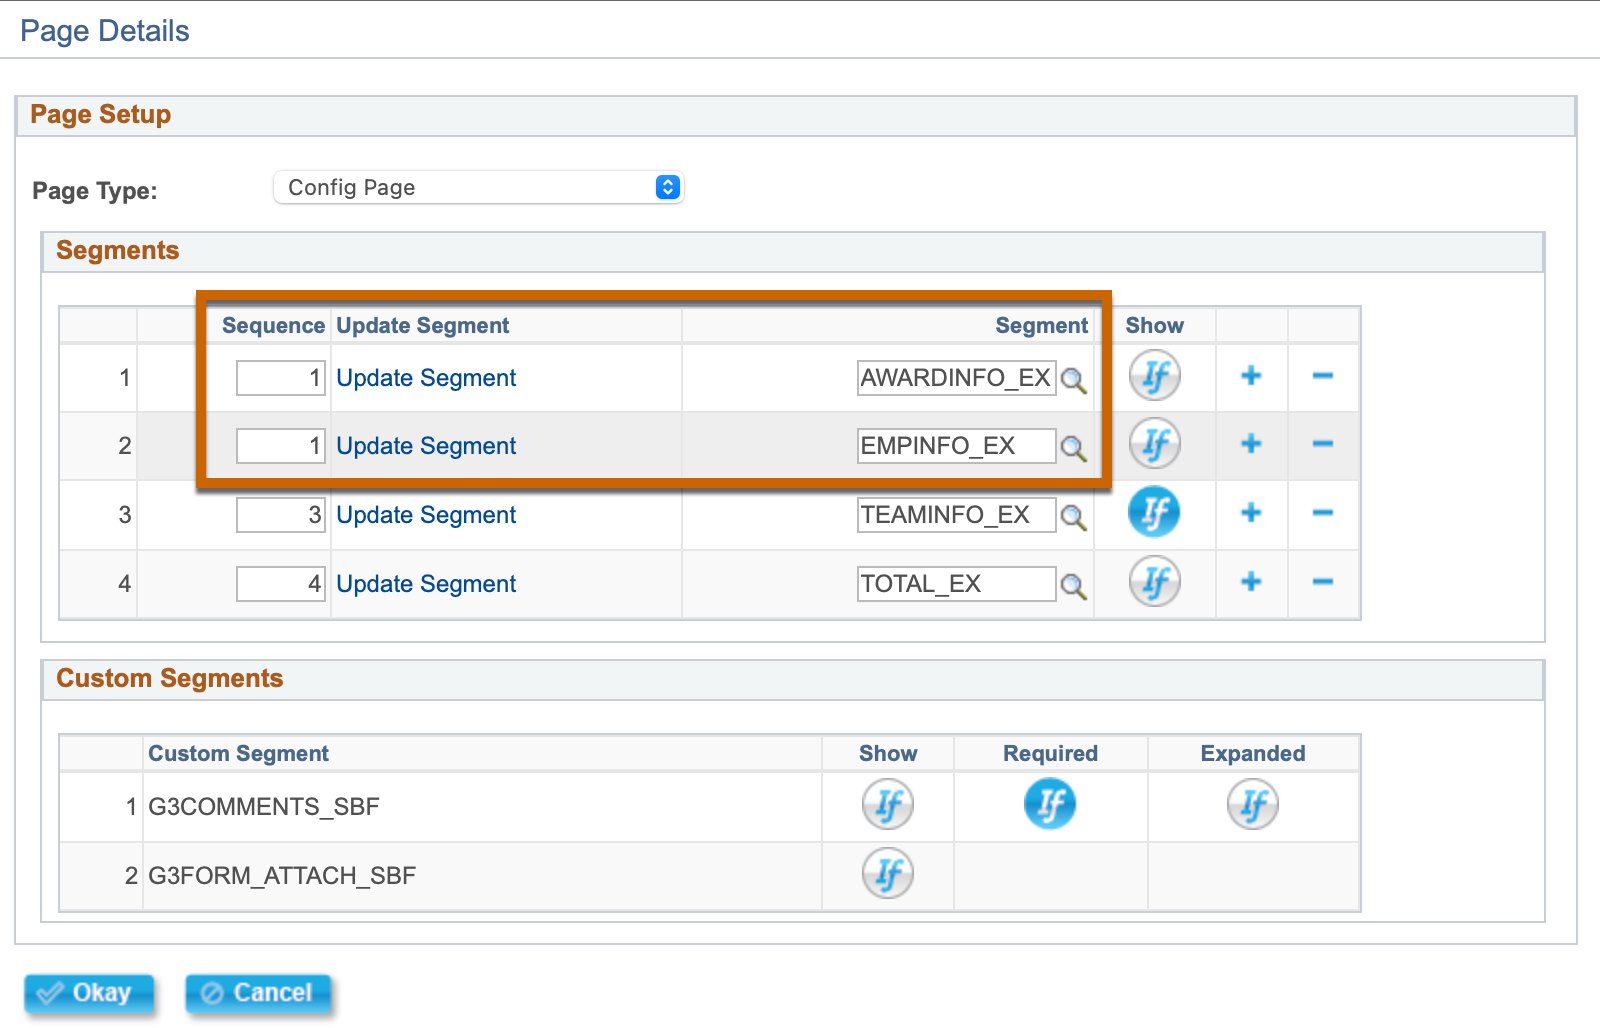 |
| View of Only Employee Information segment Displayed on Form |
|---|
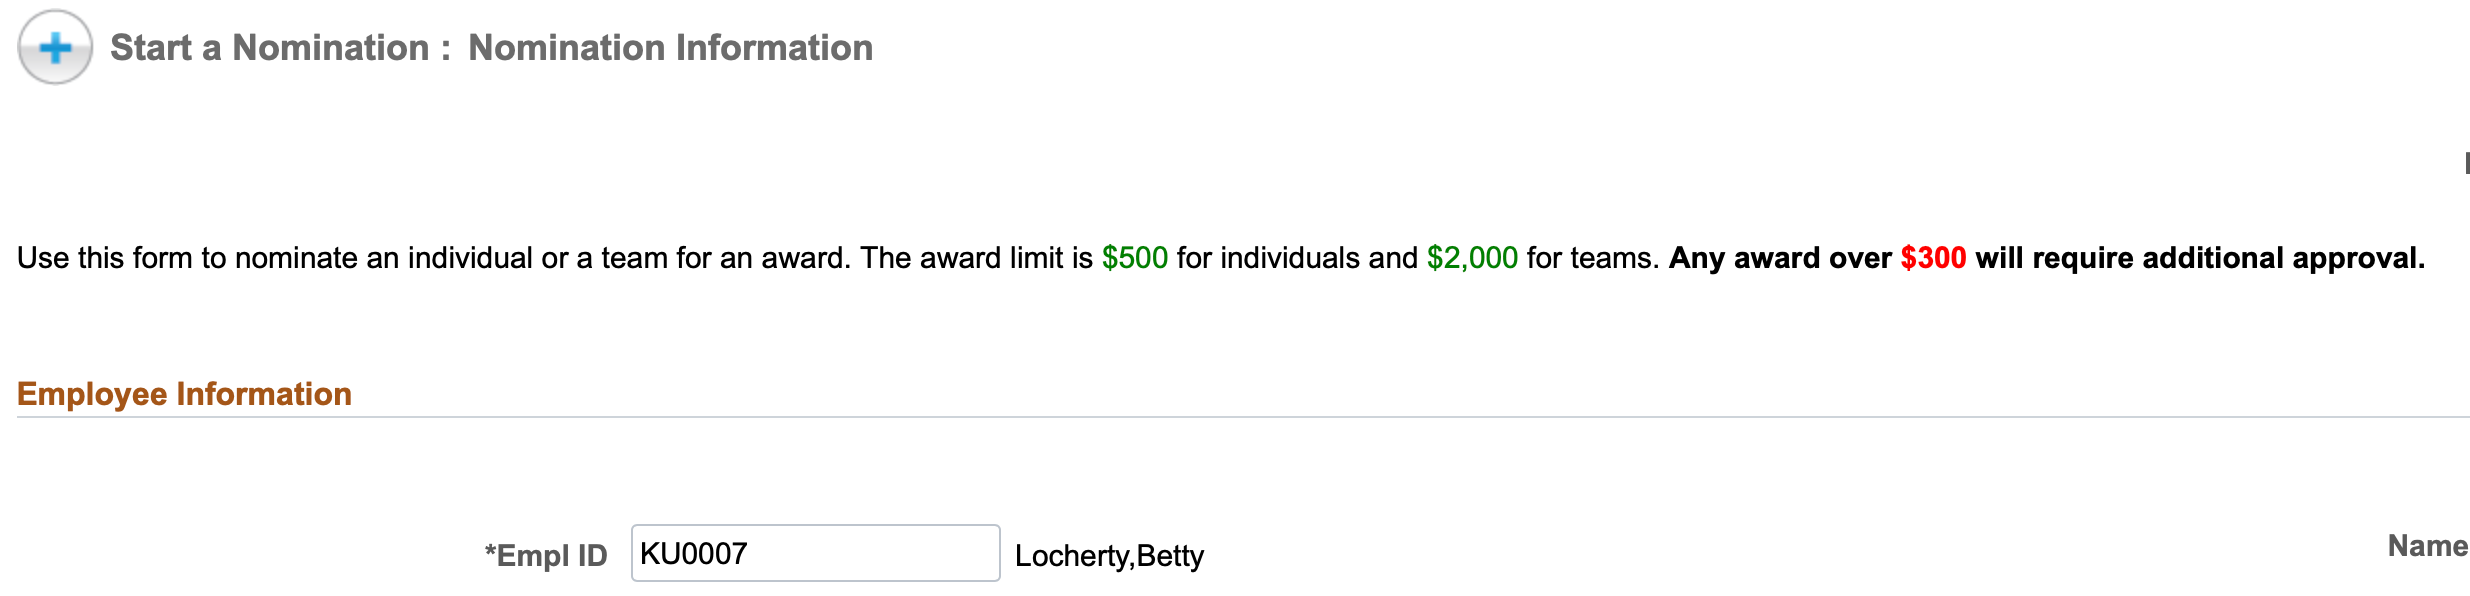 |
Changes to Field Data Types that Render Prior Forms Inaccessible
When a form builder creates a field, the field is designated a data type which determines how PeopleSoft stores the data for that field. Once the field is designated a data type, functional users can’t change that data type. However, sometimes form builders find the need to use a different data type after creating a field. If a form requires a change of field data type, the type of environment you’re using will help you decide what to do. If you’re in a DEV environment and you don’t need to access previous form transactions, a developer can change the data type of the field via App Designer.
In a Production environment, we do not recommend changing an existing field’s data type because it is likely to produce an error message when users try to open forms that were submitted before the change, rendering them inaccessible. In cases where previous form transactions need to be accessible and a field data type change is necessary, we recommend hiding the original field and creating a new field with the required data type, thus preserving the data connected to the original field. This is the easiest method for a Production environment as it doesn’t require any data conversion.
If you delete an old field and need to move the data in the old field from old forms into a new field, this will require the development of a data conversion process. Please contact Tech Support (support@gideontaylor.com) for assistance with this type of task.
3.58.XX CONFIGURATION CONSIDERATIONS
3.58.03 Service Pack
PeopleSoft Special Fields Used in Forms
PeopleSoft has defaulting mechanisms for the following “special fields” that GT handles differently.
- OPRID
- ROWSECLASS
- OPRCLASS
- EFFDT
- EFFSEQ
When these fields are added to a PeopleSoft page, they typically default automatically based on the current user session. However, if these fields are added to a GT eForm, we do not default any values. For example, if OPRID or EFFDT is added to a form, you must still configure it to initialize from the GT delivered smart sources, Current Oprid and Current Date, respectively.
Additionally, if these special fields appear on your form, you can indicate you want those form fields to be a search field on any form task, as shown below.
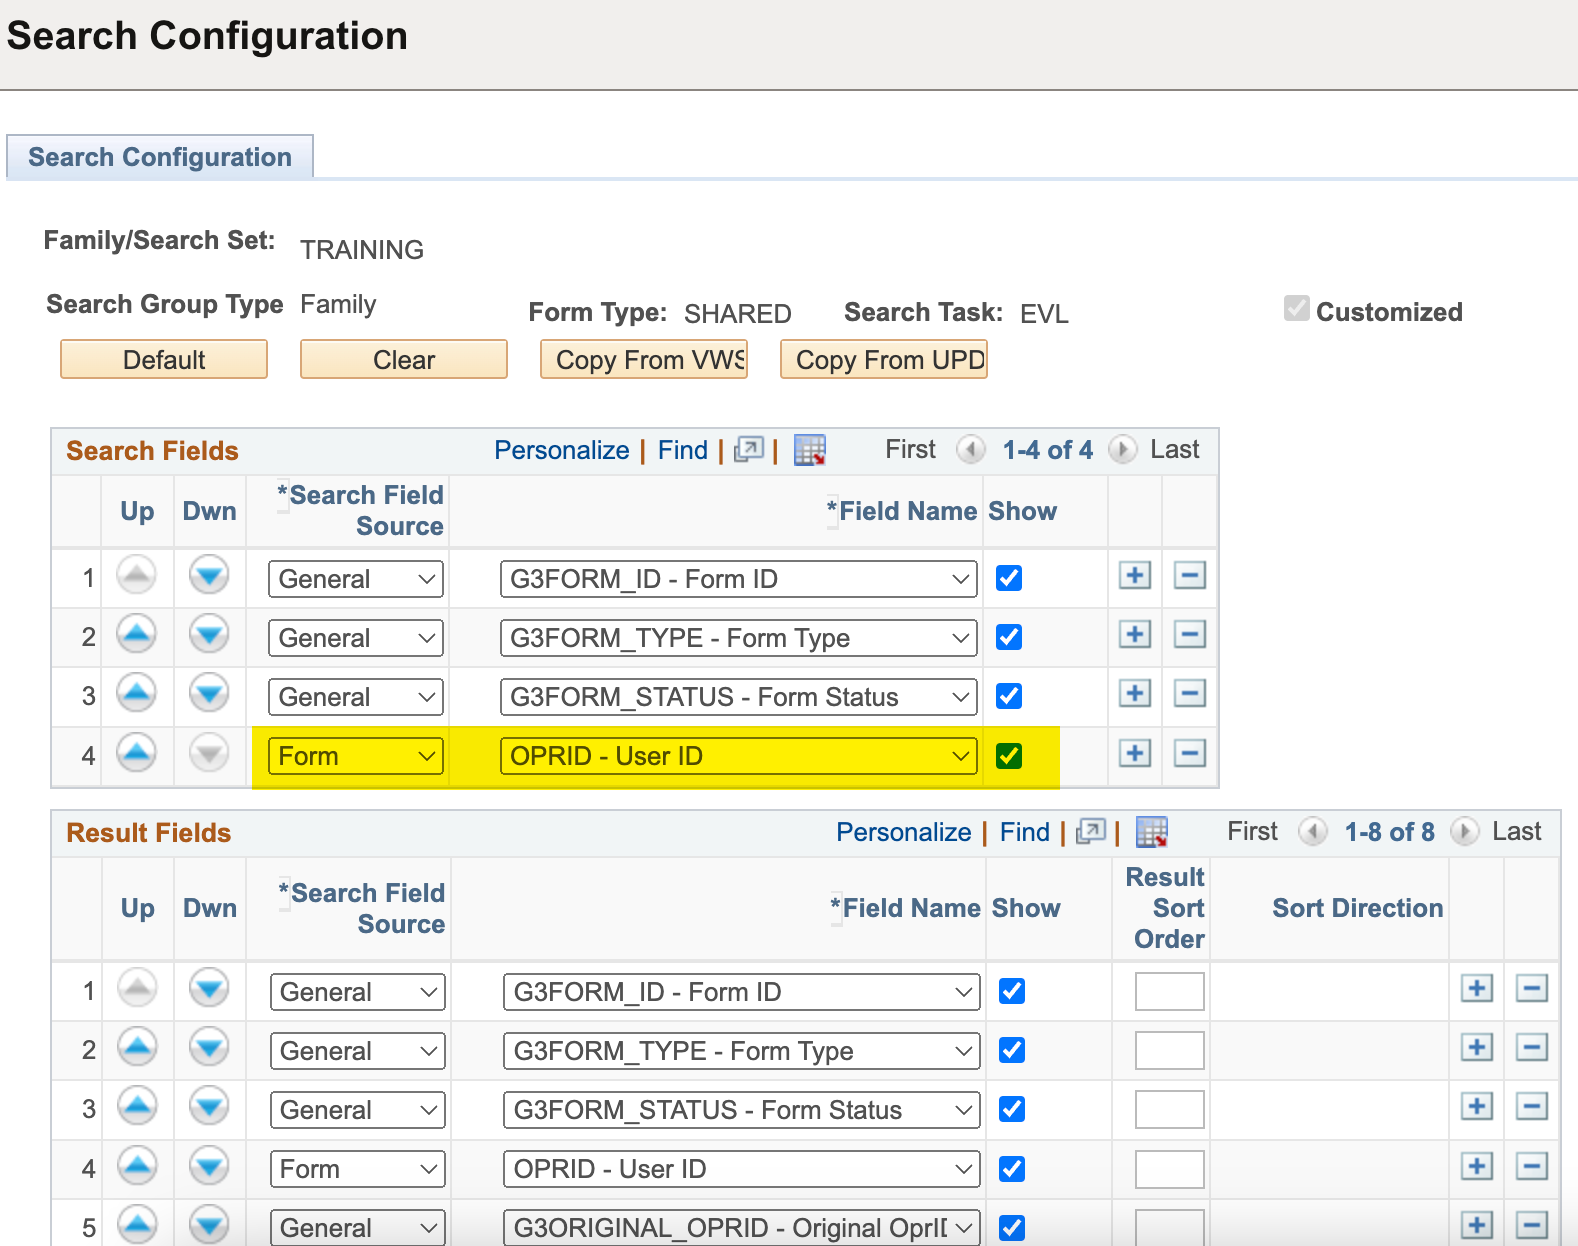
If a special field is used in Search Configuration and pulled from the form field source, it still will not default according to PeopleSoft rules.
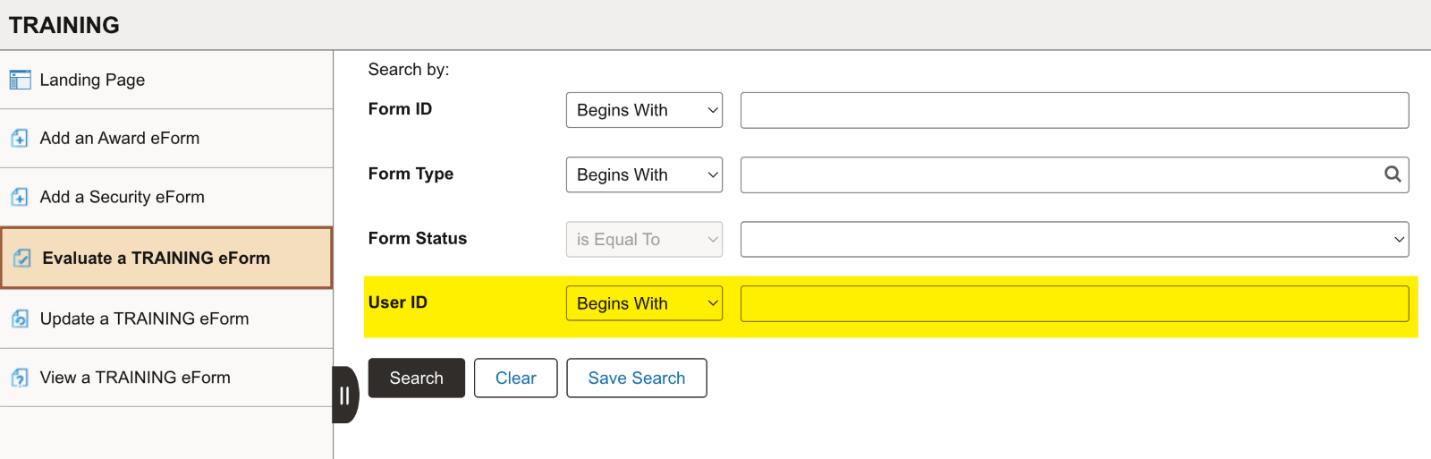
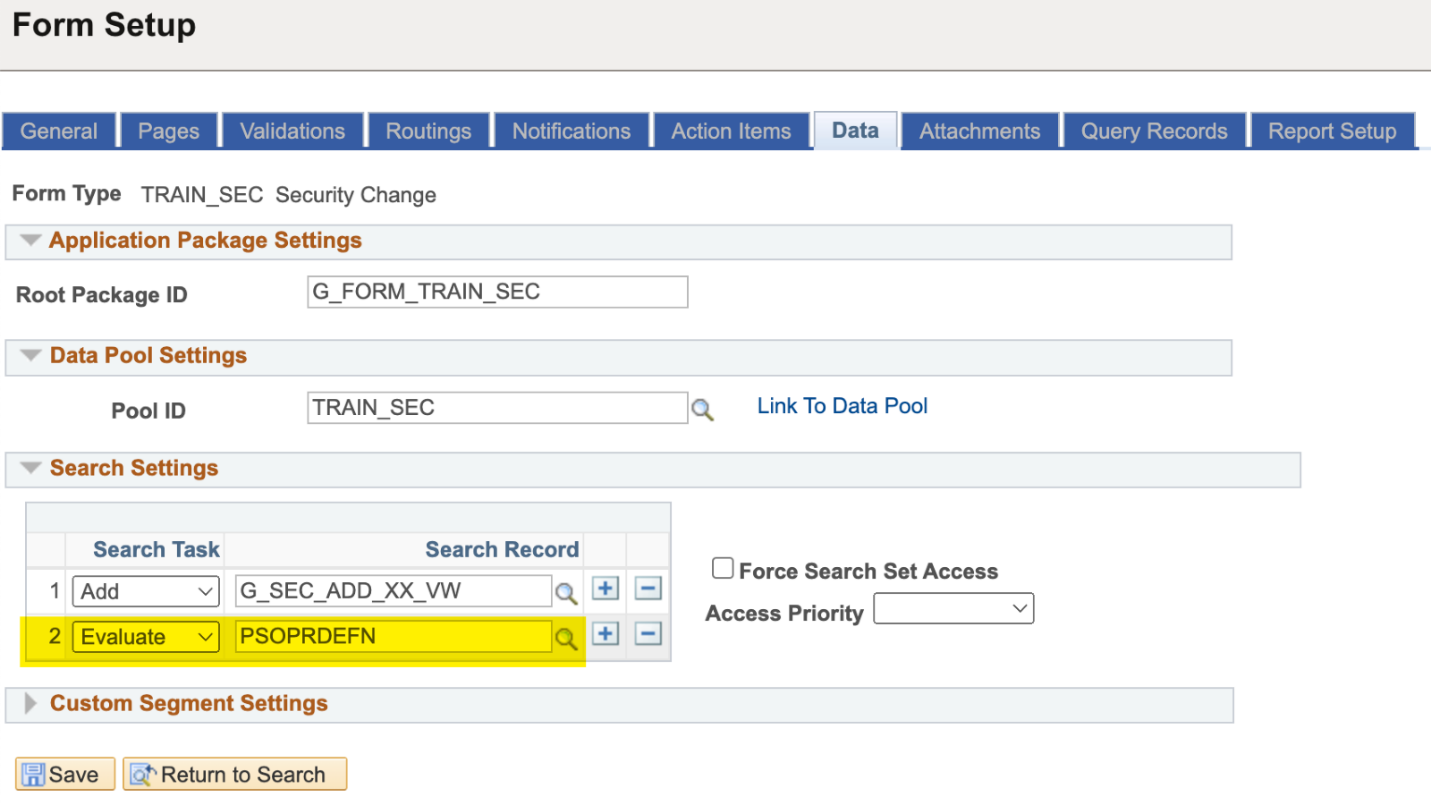
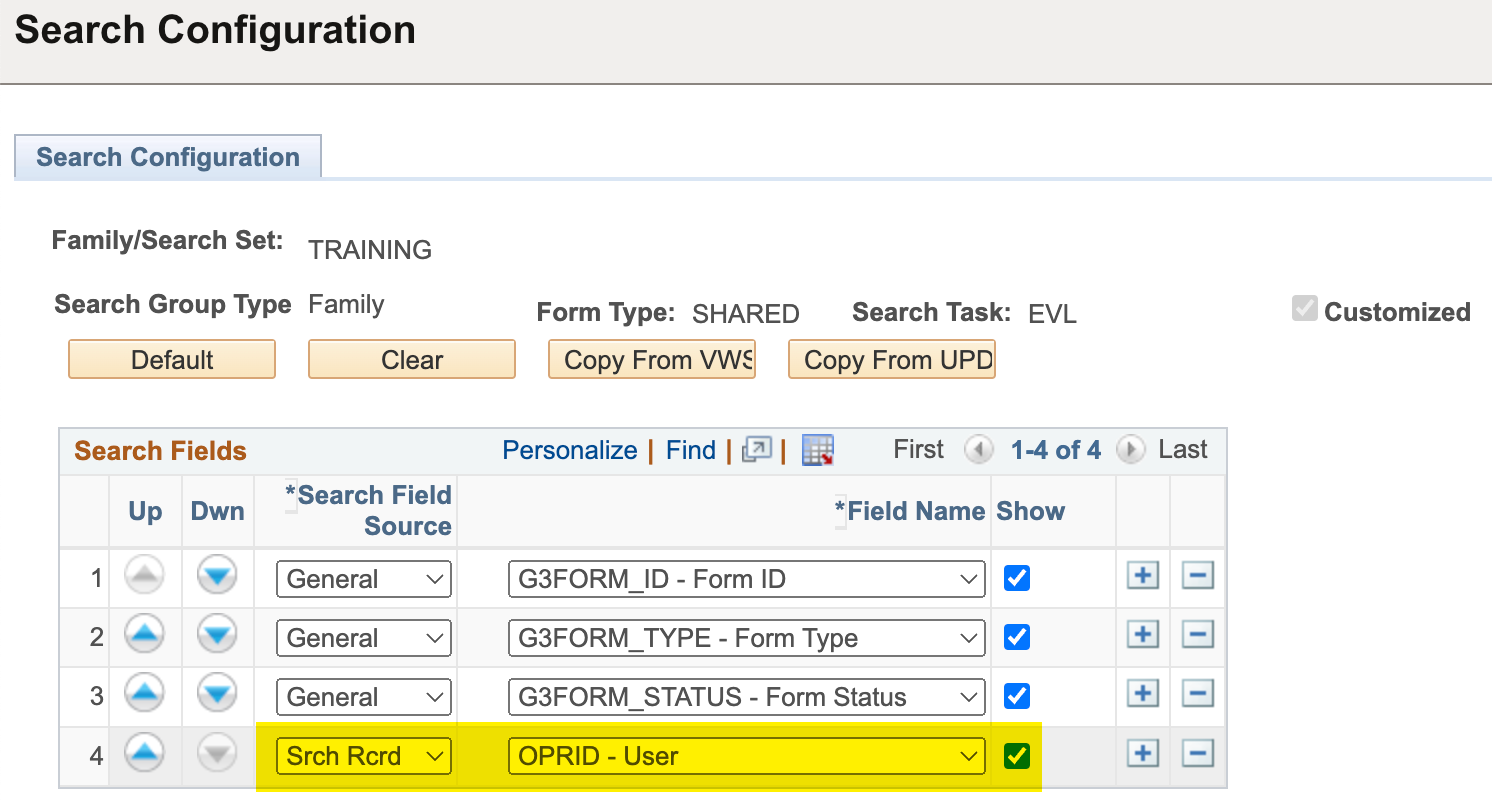
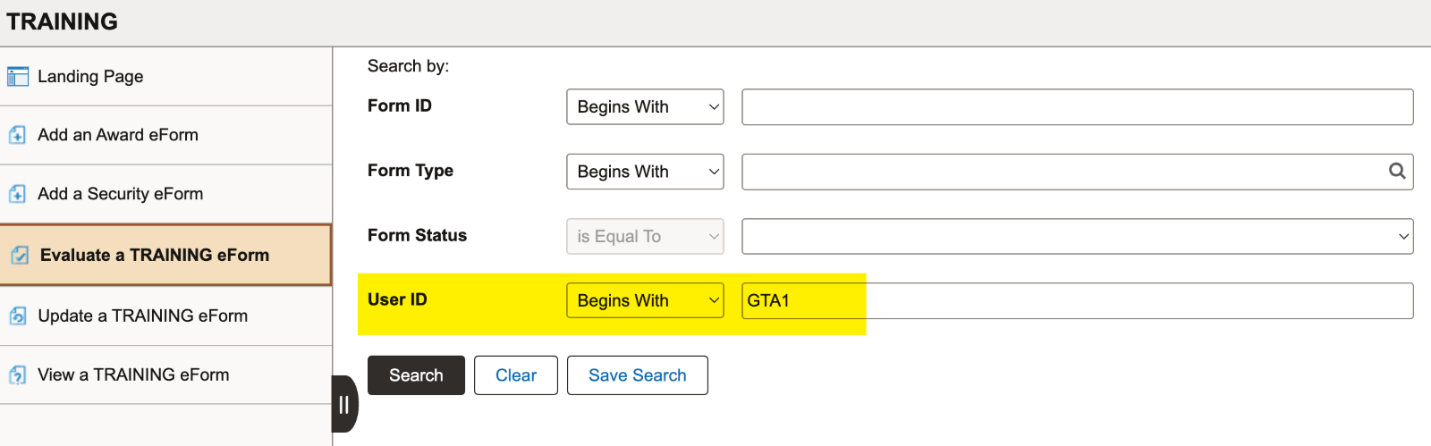
However, if you need one of these special fields on a search page to default when the search is opened, you can add a search record to the form and have that logic handled within the record. For example, if PSOPRDEFN is used as a search record, you can set OPRID to appear on the search with the source of the search record, which will then cause the form to default to the current user.
G3ORIGINAL_OPRID and G3LAST_OPRID no longer automatically capitalized
As of 3.58.03, the G3ORIGINAL_OPRID and G3LAST_OPRID fields are no longer automatically capitalized in form searches. Users must now make sure to type characters with the correct case when searching for these values in a Form Search.