GT eForms 3.58.01 Upgrade Guide
GT delivers this Upgrade Patch to all customers who are on active subscription or annual maintenance. This patch, like most modifications, contains potentially data destructive processes. The steps in this document must be followed and verified exactly to ensure that existing form data is not deleted from the environment. Also, this document and its accompanying install were designed for systems running GT eForms 3.58.00. If you are currently on a prior or subsequent version, do not use this process and contact the Solution Center for assistance. If you have any kind of post 3.58.00 customizations or extensions, you must contact the Solution Center at support@gideontaylor.com.
Installation Package
The installation package includes the following directories:
- Docs – Installation instructions
- Projects – Application Designer project(s)
- Scripts – DMS script(s)
- Data – Data files for the DMS script(s)
- Logs – Log files for the DMS script(s)
General Installation Instructions
It is always wise to make backups before importing new projects or adding a new product, but this guide contains no backup instructions or tasks.
Project Definition
-
Copy the
Projects/G3FRM35801_UPG_V01project from file to the target environment.- Be sure you use the file definition when copying the project into your environment and NOT the database definition if one exists.
-
Verify all done flags have been checked.
-
Build all records and make sure that the following build options are checked:
WARNING: do NOT do a destructive create or alter on these tables as data loss can occur.- Create Tables
- Alter Tables
- Create Views
- Execute and build script
- Recommended for DB2 Databases: Rebuild all GT views in case they depend on altered tables.
- Create a project with all the G3 and
G_views in your environment. - If you have any
G_materialized views created for your eForm solutions, they can be excluded from the project as they are essentially tables. You can use this page to identify materialized views in your environment: PeopleTools > Utilities > Administration > Materialized Views > Enable Materialized Views - Build the project with the following build options checked:
- Create Views
- Execute and build script
- Create a project with all the G3 and
-
Compile Directive PeopleCode by doing the following:
- Open the application package/class
- Add a space at the very beginning of the class
- Save and close the class
Complete those steps for each of these application classes:
G3FORM_NAV:StepPageG3FTT:FTTValidationsG3SEARCH:Search
-
Copy the
Projects/G3FRM35801_DEL_V01project from file to the target environment.- Be sure you use the file definition when copying the project into your environment and NOT the database definition if one exists. This project will delete objects that were included in the initial 3.58.00 install/upgrade project that have since been deprecated.
-
Copy the
Projects/G3FRM35801_CLT_OBJSproject from file to the target environment.- This project includes objects that are delivered with the
G_naming convention to indicate they are designed to be modified as part of solution development if needed. They will not be included in future release packages.
- This project includes objects that are delivered with the
DMS Script
There is a script provided in the upgrade: G3FRM35801_UPG_V01.dms. It needs to be run at install following the steps below.
- Update the
[FILEPATH]for the input and log files for the Script found in Scripts/G3FRM35801_UPG_V01.dms - Run the
Scripts/G3FRM35801_UPG_V01.dmsscript. This will import the Framework configuration and message catalog entries for this upgrade.- Important: If you have customized any GT delivered items in Message Catalog set 24842, be sure you re-apply these customizations after running this import DMS.
Deploy Form Transporter
- Navigate to Manage GT eForms 3.x > GT Technical Setup > Form Transporter Utilities. Go to the Form Transporter Deployment tab, and there will now be an updated version of the Standby Transporter UI. Deploy the Transporter using the button below the grid to update the Transporter Version.
Run the System Maintenance Process
-
In the PIA, navigate to Manage GT eForms 3.x > GT Technical Setup > System Maintenance. Select the dropdown and choose the "eForms 35801 Updates". Once presented with the page shown below, select the "Run All" button to start the process.
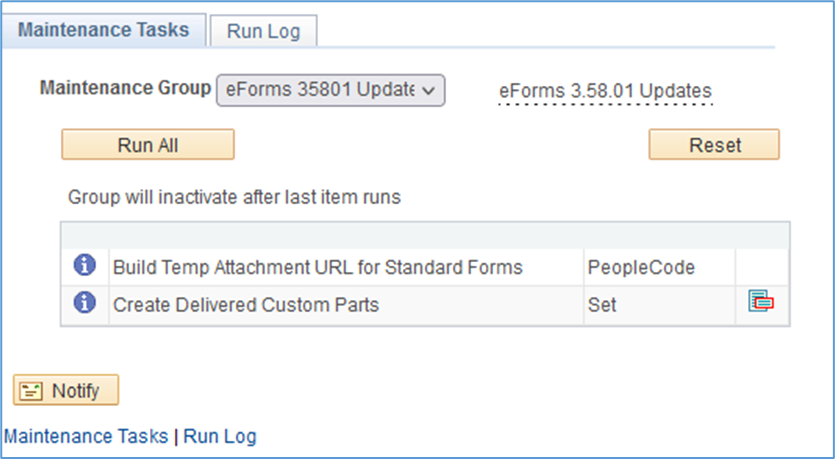 NOTE
NOTEFor Helium form types, the form build and this process replaces the "Load Custom Parts" process. The "Load Custom Parts" process is deprecated to only being needed/used for Standard Forms.
Build All Helium Forms
If you have any Helium forms, and once System Maintenance has been run, navigate in the PIA to Manage GT eForms 3.x > GT Utilities > Form Builder Utility. After entering a Run Control ID of your choosing, be sure all Form Types are selected, and Run. More information about the Form Builder Utility can be found in its respective documentation.
Environment Setup
The following steps do not have to be run immediately but must be run before general usage.
- Navigate to PeopleTools > Portal > Portal Security Sync and run the process for the Portal where GT eForms is installed.
- Shut down the application server.
- Clear the application server cache.
- Restart the application server(s).
- Restart the PUB/SUB server(s).
If you have questions, contact support@gideontaylor.com