General Tab - Advanced Settings
Ad Hoc Functionality
This feature makes it possible for users to specify additional approvers for an eForm.
Default Ad Hoc is Off
By default, the ad hoc functionality is disabled on the visualizer:
Turning on Ad Hoc
You can enable it on the form type table ‘General’ tab.
Navigate: Manage GT eForms 3.x > Form Setup
On the General tab, select the check box for ‘Enable Ad Hoc Approvals’
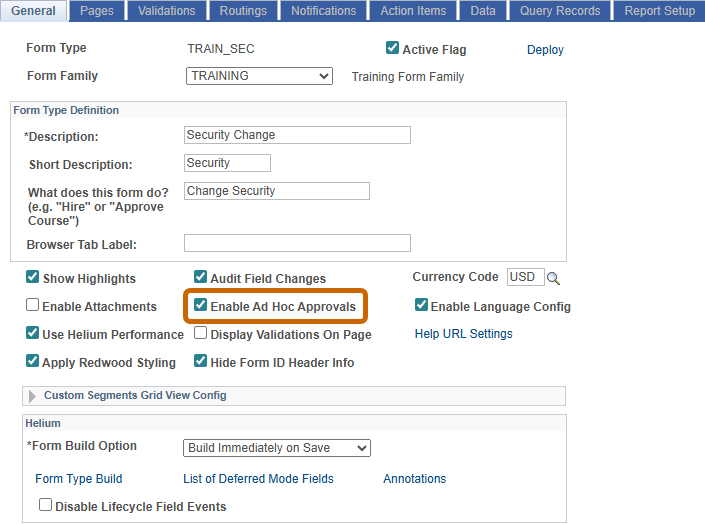
Save your change.
Enabling Ad Hoc in the Evaluate task prior to approval
GT has the 'Delivered AdHoc Page' that can be inserted prior to the ‘Delivered Result Page’. This page will be the last page an approver sees before making an evaluation decision. It makes it possible for the approver to insert an ad hoc approval to a specific user immediately following their approval action. If this page is not used, then the form will route to the next person in the defined process after approval and steps can only be added after that point. This is an optional page, but one that is encouraged.
To add the ‘Delivered AdHoc Page’:
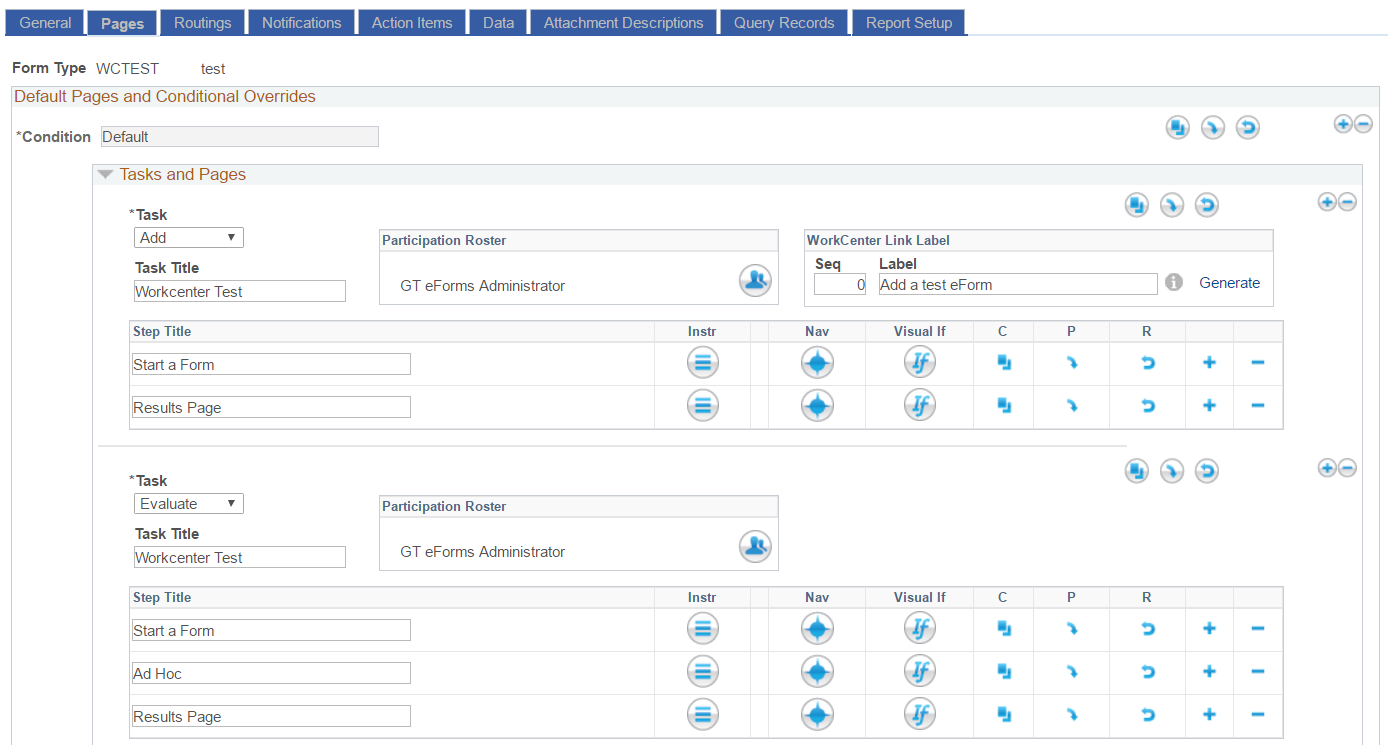
Navigate: Manage GT eForms 3.x > Form Setup – Pages Tab
In the Evaluation Task grid click on the ![]() button to add a line immediately prior to the row containing the ‘Delivered Result Page’. In most cases the new row should be the second to last page on the form for that task.
button to add a line immediately prior to the row containing the ‘Delivered Result Page’. In most cases the new row should be the second to last page on the form for that task.
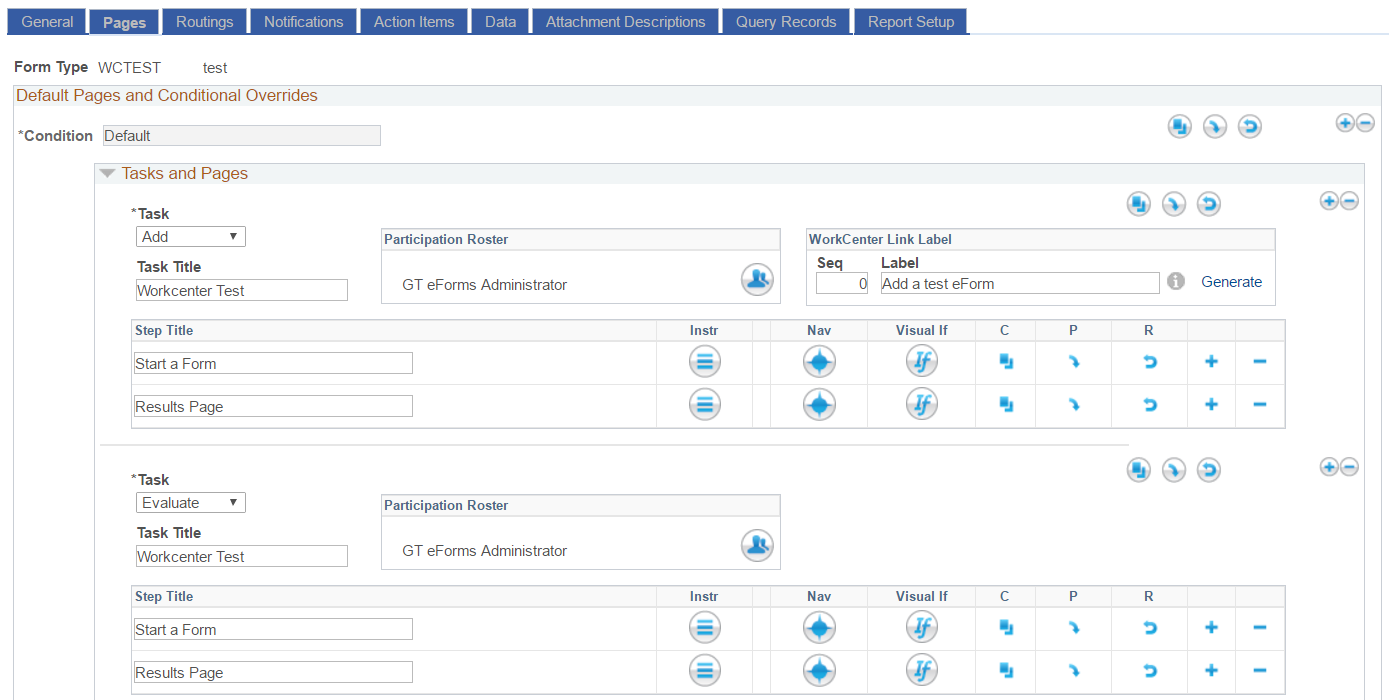
A new line will appear. Fill in the “Step Title” with the description that you would like to display at the top of the page, for example, “Ad Hoc”.
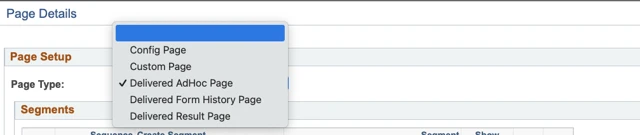
Click the setup icon for the new Ad Hoc page.Change the Page type to be 'Delivered Ad Hoc Page'.
Click Ok, then save the form.
Adding Ad Hoc Notifications
Notifications for ad hoc approvers need to be added separately because ad hoc approvers will not receive the "All Steps" notifications. The “Step Task” checkbox cannot be used because ad hoc approvers are not included in the step task. You will need to select the form task, which will generally be evaluate.
You can enable notifications for ad hoc approvers on the form type table Notifications tab.
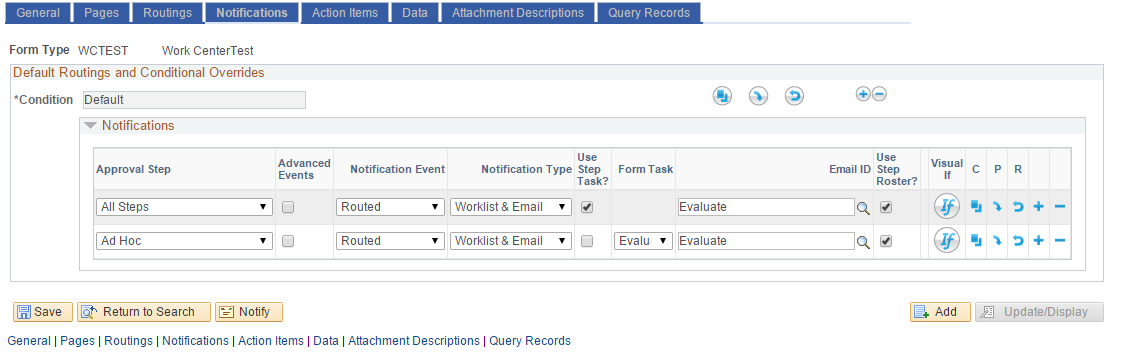
Select “Ad Hoc” in the “approval Step” dropdown.
Notification event will generally be set to Routed.
Select notification type and email ID (if email notification is selected.
Also verify that “Use Step Task” is not selected for the “Ad Hoc User.
Select “Save”
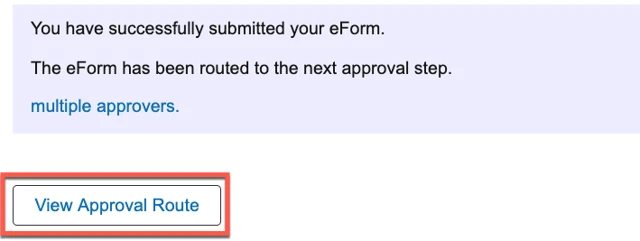
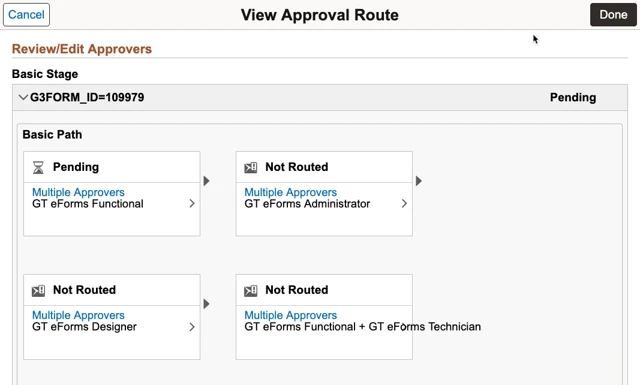
Approval Path
When the check box on the general tab is selected, the plus buttons in visualizer on the results page and the Ad Hoc page will show:
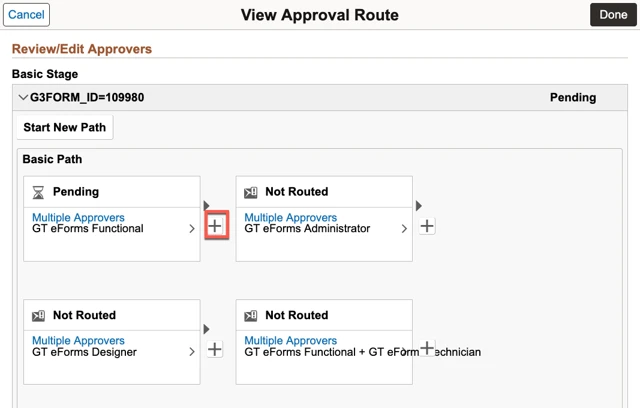
Once the changes are made, click "Done".
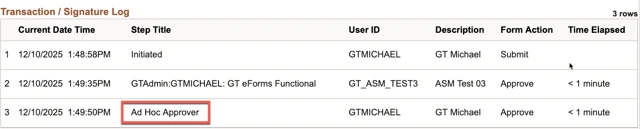
This how ad hoc approvals will show in the log:
Adding an ad hoc step on the form
Click on the ![]() to open the ad hoc window.
to open the ad hoc window.
The “Insert Additional Approver or Reviewer” window pops up.
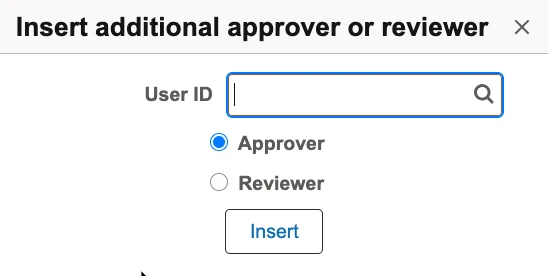
Search for a username and select approver. Then click Insert.
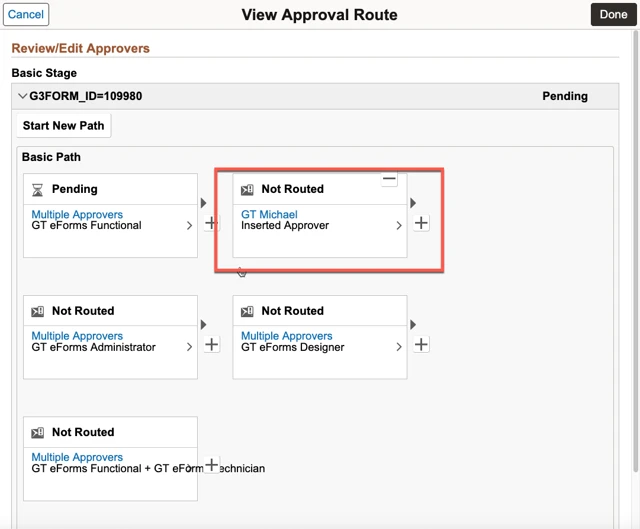
After clicking Insert, the ad-hoc approver will show in the roster as an additional step after the Plus + button that was clicked.
The result window returns with the additional approver.
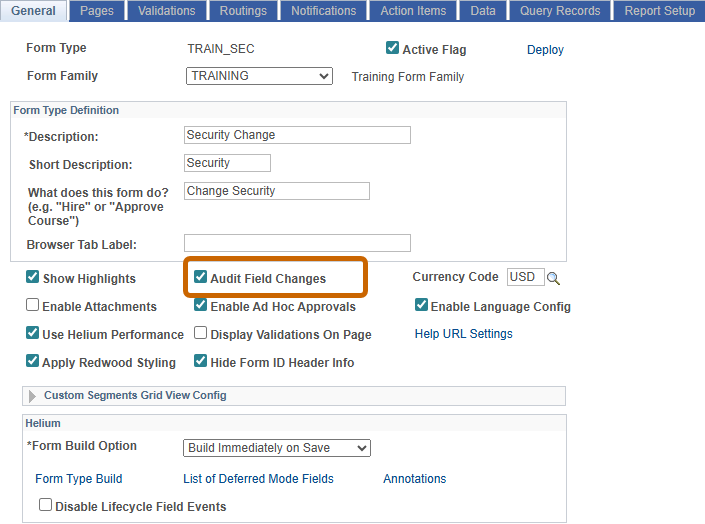
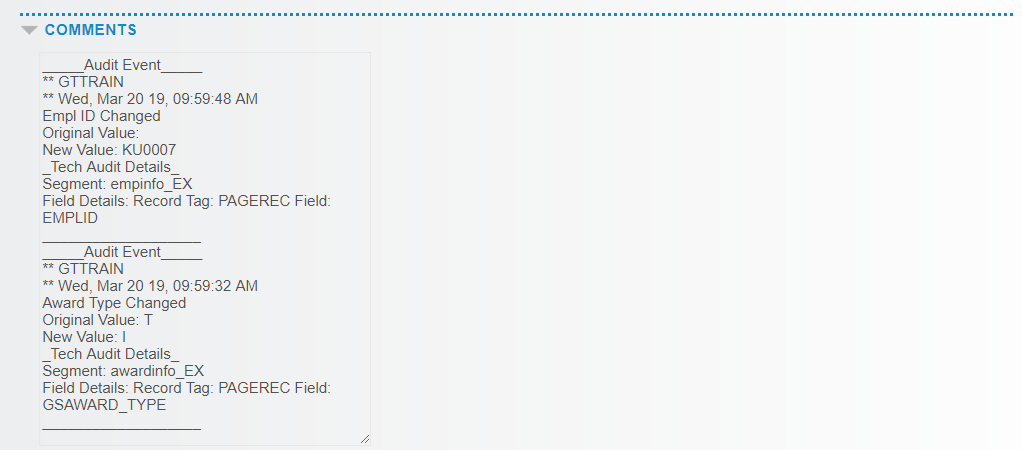
Audit Field Changes
The Audit Field Changes feature means that if a field is changed in a task other than ADD, then it will create a system comment on the form to note the changes that were made. It will track the many changes throughout the lifecycle of the form and display those changes in the Comments section.
Audit Field Changes Enabled
Navigation: Manage GT eForms 3.x > Form Setup > General tab
Using on eforms
When enabled and changes are made on a task other than ADD the following details are noted within the comments section of the form. A separate Audit Event will be noted for any field’s value that changed.
OPRIDof the user who made the change- Date and timestamp of the change
- Field where the change was made
- Original Value of the field that was changed. If the field was blank, there would be no value shown.
- New Value the field was changed to
- Segment record tag where the field that was changed is located
- Field Details shows the record tag and field label of the field that was changed.
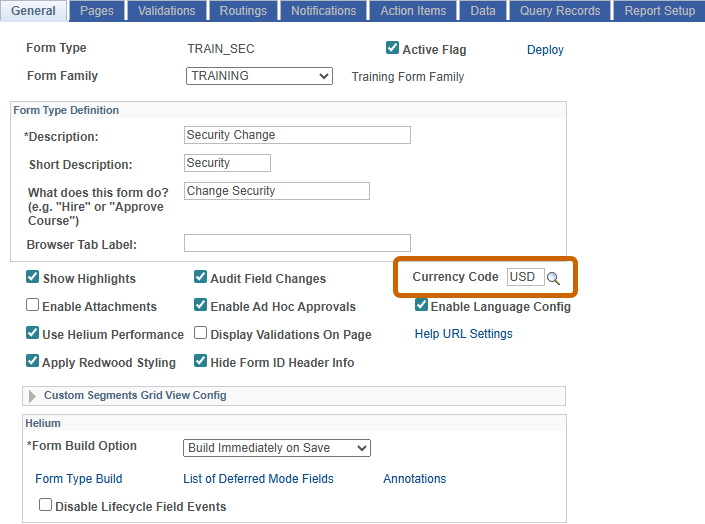
Currency Code
The currency code can be chosen on each individual form type. When used in conjunction with a currency field type, the selected Currency Code will display the currency symbol in the field and enforce the decimal position associated with the code.
Enabling Currency Code on Form Type
Selecting the Currency Code
Navigation: Manage GT eForms 3.x > Form Setup > General tab
Select a currency code by using the prompt lookup on the currency code field. The field defaults to United States dollars (USD).
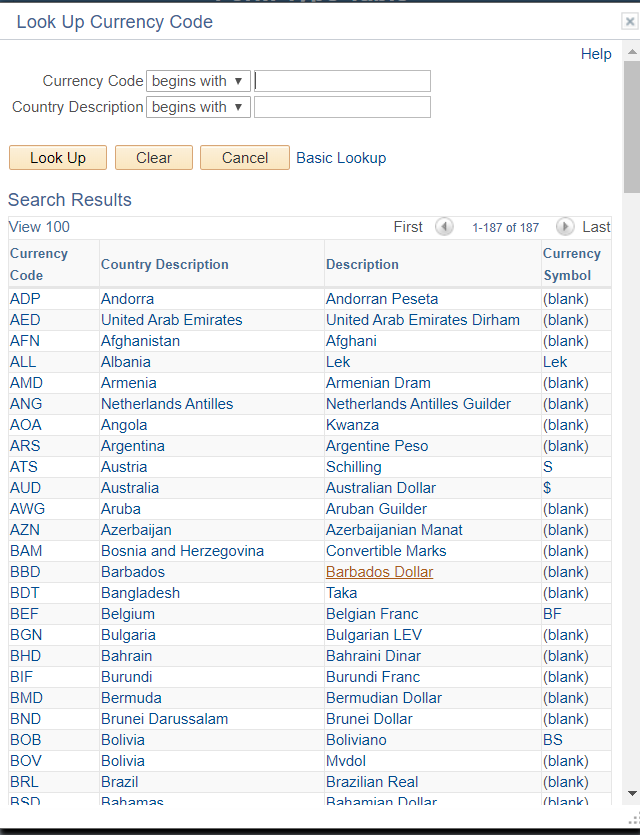
Currency code lookup prompt
If the currency code is populated in the General tab, the applicable symbol and decimal placement will be used in fields that are set to a currency field type.
Navigation: Manage GT eForms 3.x > Form Setup > Pages tab > (open the page and segment the currency field will be displayed on).
Click on the (+) button to add a new field to the segment and select currency as the field display type.
Once currency is indicated as the Field Display Type, there are 3 applicable Field Data Types to select from.
| Field | Value/Use |
|---|---|
| Integer | Only allows a whole number up to 31 characters in length. Will not allow any decimal places. |
| 2 Decimal | Allows for 2 decimal places. Characters prior to the decimal place has maximum length of 29. |
| Large Number | Allows for up to 6 decimal places. Characters prior to the decimal place has a maximum length of 25. The decimal place is determined by the decimal places indicated on the CURRENCY_CD_TBL. For example: the currency code USD is set to 2 decimal places so this field will be limited to 2 decimal places. |

Decimal Restriction on Large Number Data Type
The currency control field G3CURRENCY_CD restricts the decimal place. The value of the currency control field should be the name of a currency entry in the PS_CURRENCY_CD_TBL, which defines a currency symbol, thousands delimiter character, decimal character, integer positions, decimal positions and scale positions. The value for this field is constrained by the most restrictive of that format and the field’s format. For example: the currency code USD is set to 2 decimal places so this field will be limited to 2 decimal places.
If using Update When a Source Changes or Initialize from the Data Pool, the decimal place is also enforced based on the currency code selected and the value will be rounded up to meet the decimal restriction. For example, if the Peoplesoft value is 55.555, the field will display to $55.56.
Using the Currency Code
When the form is launched, the selected currency code’s symbol will now be displayed in the field. Users can either delete all contents in the field to type the numerical character or enter the character after the currency symbol. After tabbing out of the field or moving to another field, the field will refresh and display the characters in the field with the currency symbol.
Users should not enter numerical characters in front of the currency symbol as the field will display an error.
Here’s an example showing all three field types (integer, 2 decimal, and big number) as currency fields with USD as the default currency code.

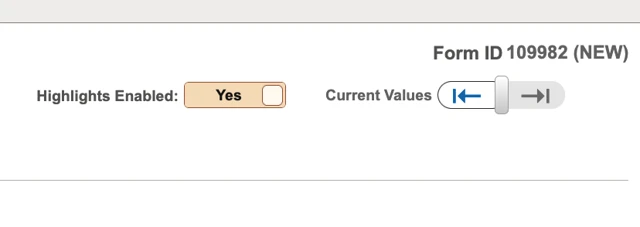
eForm Highlights
The Highlights feature on GT eForms 3.x allows users to view changes made to a form after it is opened. When “Show Highlights” is checked, fields will be highlighted when changed from blank to a value, or when a prepopulated (initialized) value is changed to another value after the form is opened.
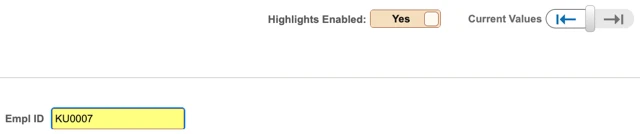
Show Highlights
See the Form Setup – General Tab document for more information about showing Highlights.
Working with Highlights in the Form
When Show Highlights is checked on the Form Setup page, it will make the Highlight controls visible on the eForm for all tasks: Add, Update, Evaluate and View.
- To view Highlights, make a change to a form field.
| Button Control | Action |
|---|---|
| Highlights On/Off button | On – default form view, highlights in yellow any form field changed after the form was opened Off – no yellow highlights will be visible if a form field has been changed after the form was opened Disabled – when viewing the original version of a form |
| Current/Inital Values Toggle | Toggles between versions of an eForm. Click the arrow to scroll through versions and view updates made to an eForm. Currently supports original and current versions. |
| GT eForm with a Highlighted field |
|---|
 |
| GT eForm Original Version |
|---|
 |
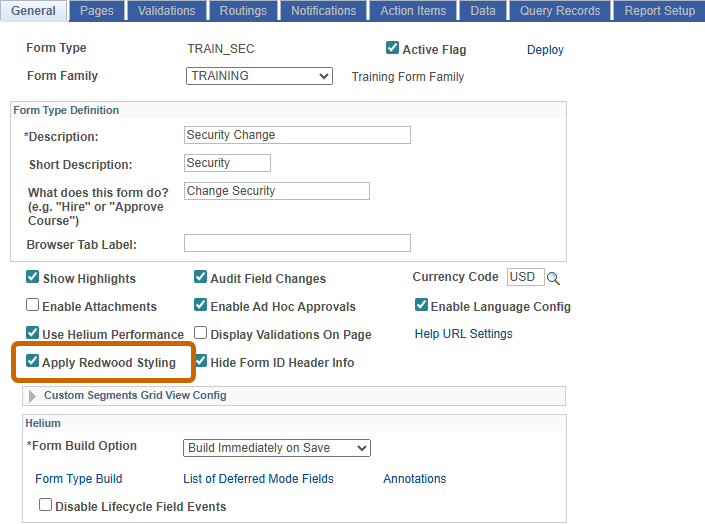
Redwood Styling
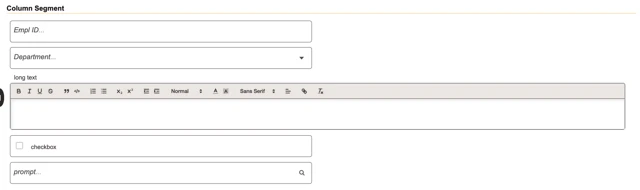
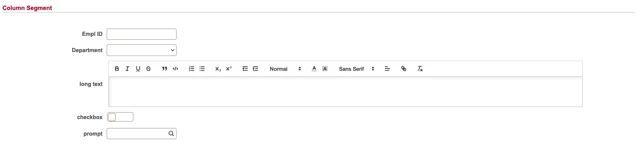
Apply Redwood Styling enables the new Redwood-inspired CSS theme to be used. This will alter the overall look and feel of the form and make it easier to customize Cascading Style Sheets. Here are some example screenshots showing what a segment may look like with and without Redwood styling. Some fields appear similar, while others, like checkboxes, will look very different.
Enabling Redwood Styling
Navigation: Manage GT eForms 3.x > Form Setup > General tab
A style sheet must be active for the form type, and the Apply Redwood Styling option checked on the general tab of form setup. See Form Type Styles documentation for more information.
Redwood Column Segment
Non-Redwood Column Segment
Redwood Grid Segment

Non-Redwood Grid Segment

Form ID Header Management
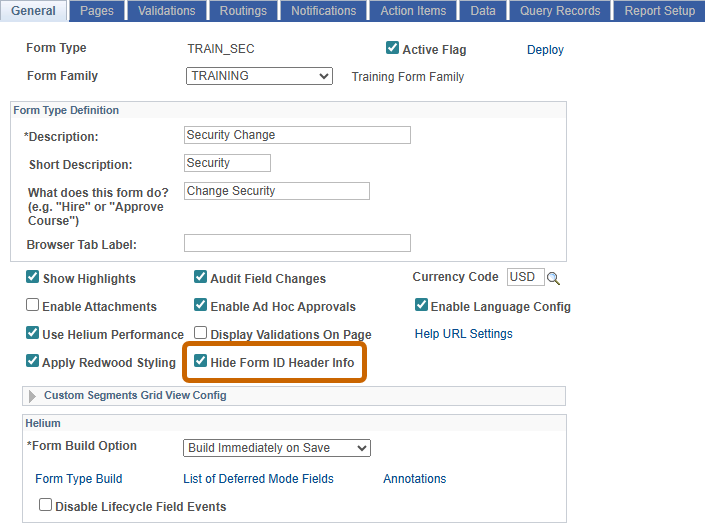
The Hide Form ID Header Info feature hides the Form ID number and form status that is typically shown on the top right of a form page. Checking this option impacts all pages and all tasks regardless of user. One scenario in which you may choose to enable this option is when you configure a form that populates information but is used for informational purposes only with no need to submit or attach a workflow.
Hide Form ID Header Info enabled
Navigation: Manage GT eForms 3.x > Form Setup > General tab
Impact to Form User Interface
With the checkbox unchecked, the Form ID and Form Status are shown on the form.

With the checkbox checked, the Form ID and Form Status are not shown on the form.

Language Translation Support
GT Language Translation Support adds language translation configuration options to GT eForms for clients using GT eForms Framework 3.10.02 and greater. When alternate languages are setup, this feature enables users to experience GT eForms in their session language. Full GT eForms translation can be accomplished using a combination of GT eForms configuration described in this document and delivered PeopleSoft Translation pages.
GT Language Configuration
The following sections describe language translation configuration features.
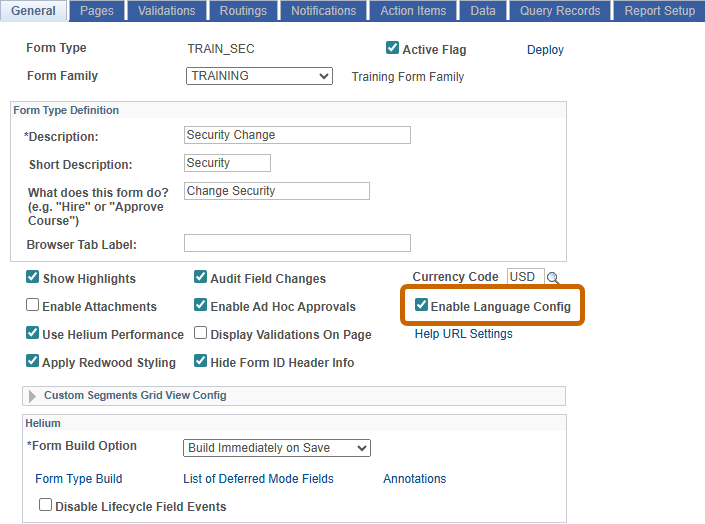
Enable Language Config
Navigation: Manage GT eForms 3.x > Form Setup > General tab
Click the checkbox to enable language configuration on form setup pages. Language translation options are hidden unless this box is checked.
Form Condition Translation
Translate the following features:
- Task Title
- Page Title
- Page Instructions
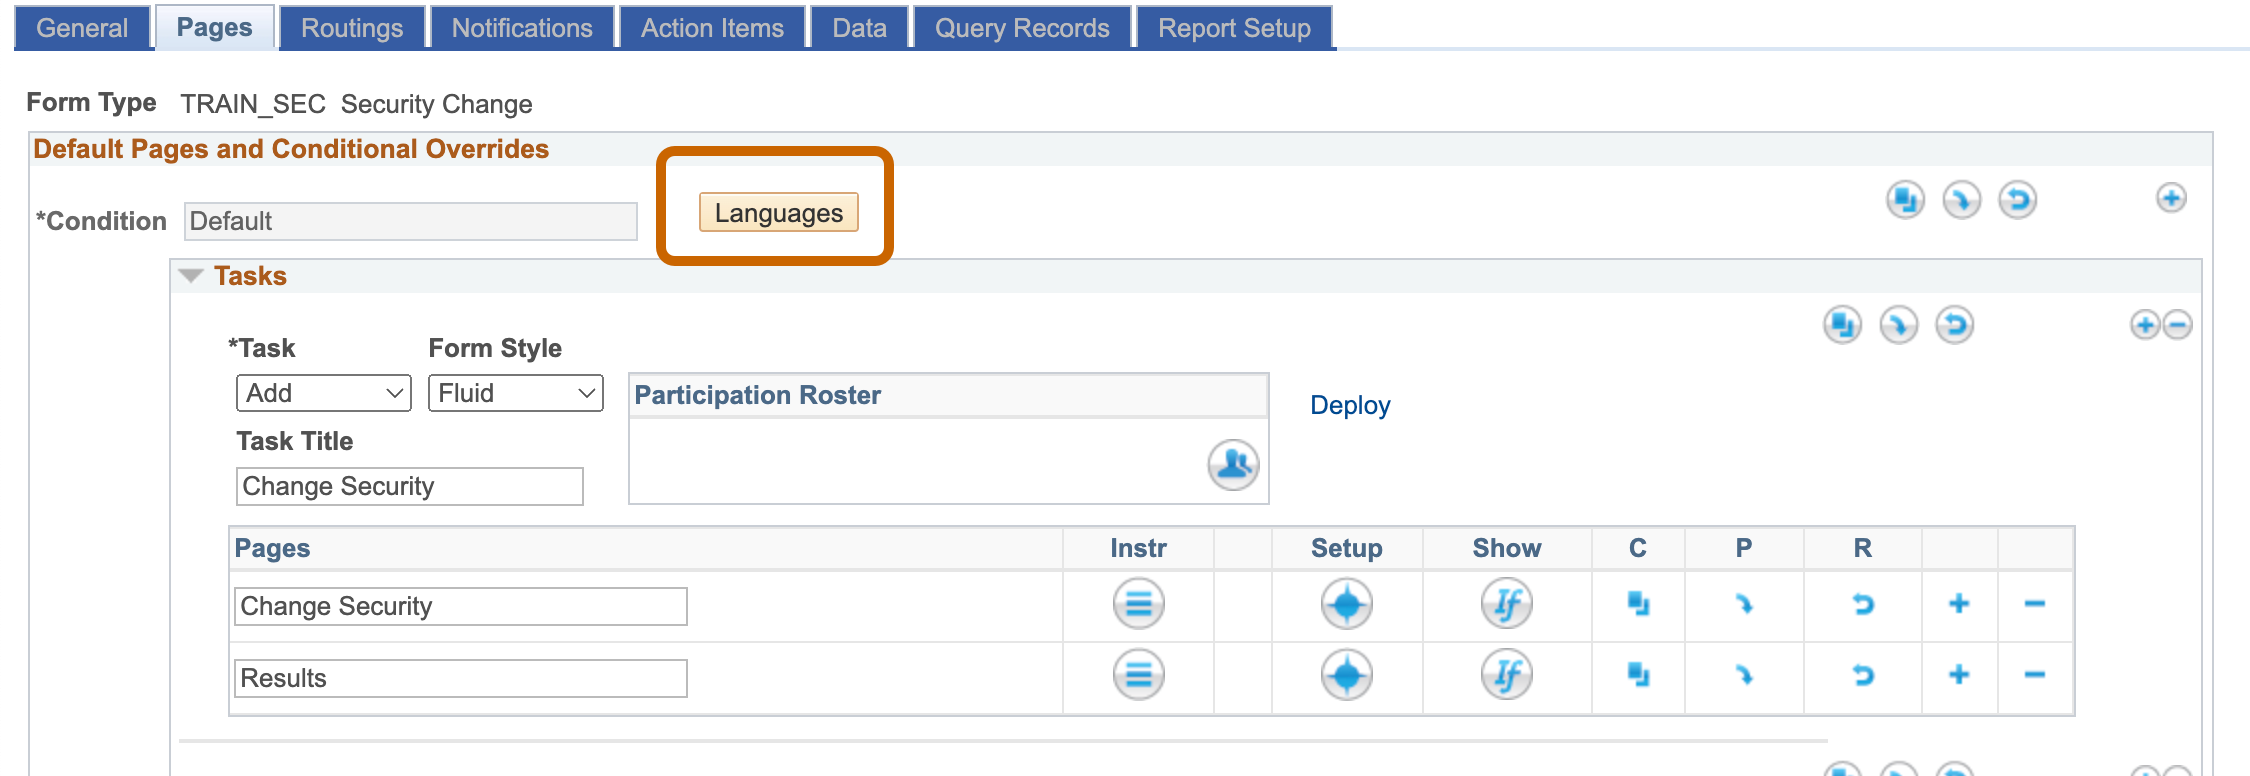
Navigation: Manage GT eForms 3.x > Form Setup > Pages tab
Languages Button
Click the Languages button to open Task and Page translation.
Base language for form setup may not be English.
| Feature | Use |
|---|---|
| Languages (button) | Opens translation for related GT configuration |
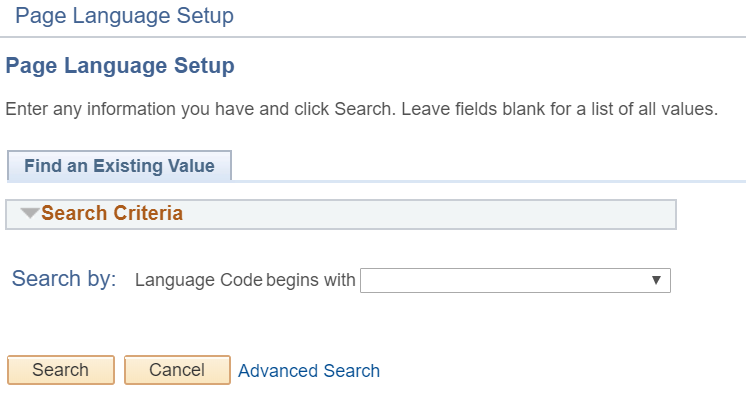
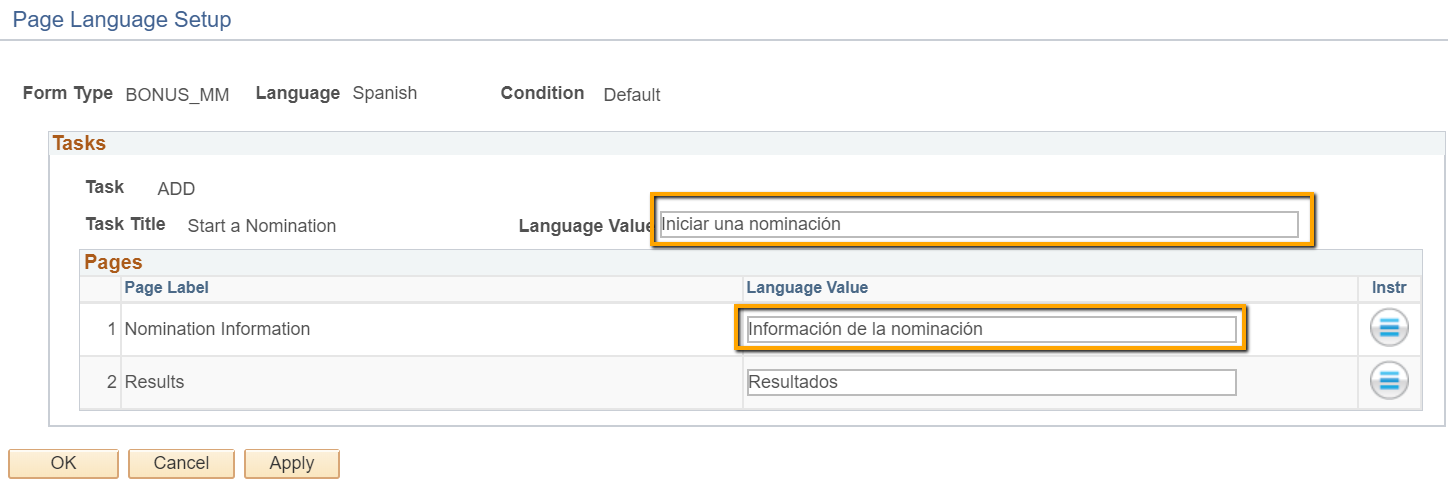
Page Language Setup – Language Selection
Select a language and click search. Here the Task Titles, Page Titles, and Page Instructions can be translated into the selected language.
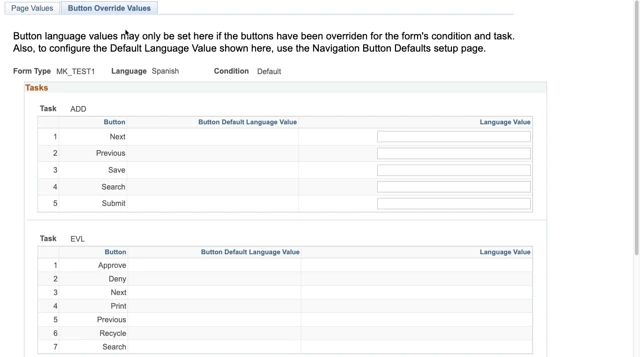
If buttons have been overridden for any tasks, translations can also be added here using the “Button Override Values” tab. Below, only the ADD task has been overriden, the Evaluate task inherits translations from Navigation Button Defaults setup page.
| Feature | Use |
|---|---|
| Language Code | Dropdown displays a list of languages supported by PeopleSoft Translation pages |
Page Language Setup – Language Translation
Enter task and page title translations for selected language. Click the Instructions icon to translate instructions.
| Feature | Use |
|---|---|
| Task Title Language Value | Translated value for Task Title |
| Page Label Language Value | Translated value for Page Title |
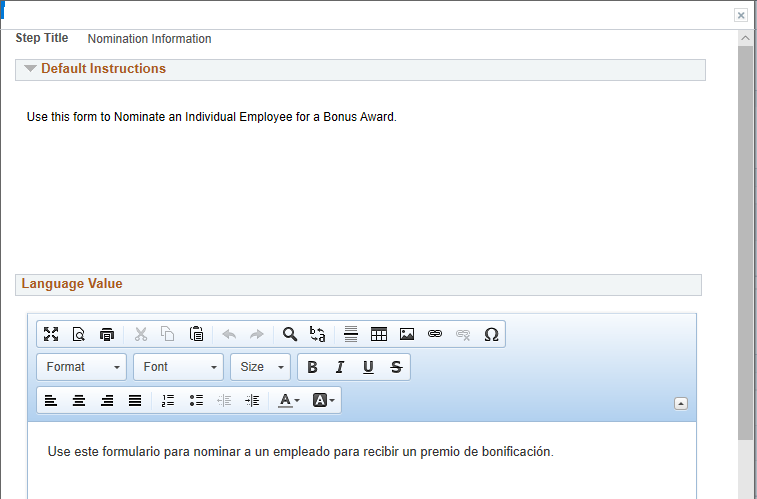
Page Language Setup – Instructions Translation
Click the instructions icon on language translation screen to open. Translate Instructions to selected language.
| Feature | Use |
|---|---|
| Instructions Language Value | Translated value for page instructions |
Form Segment and Field Translation
Translate the following features:
- Segment Label
- Segment Instructions
- Field Labels
Navigation: Manage GT eForms 3.x > Form Setup > Pages tab > Segment setup
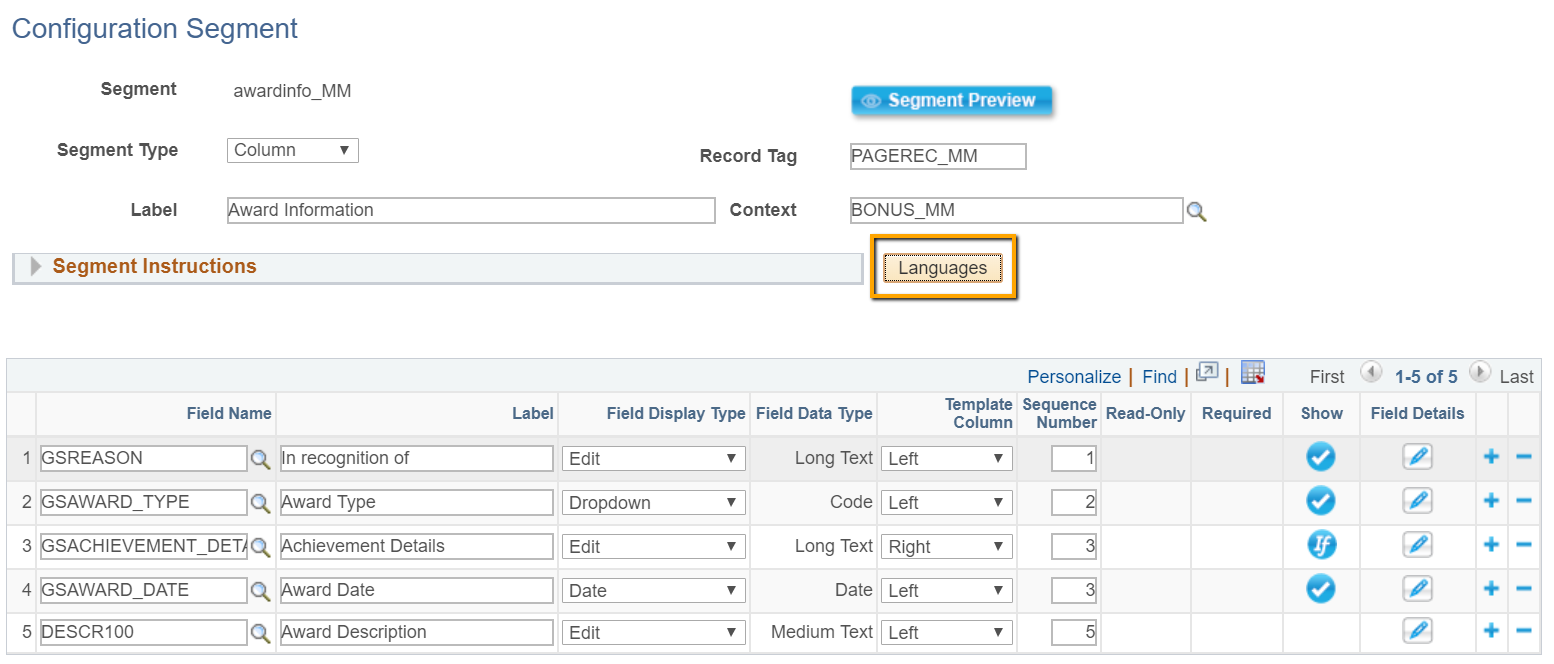
Languages Button
Click the Languages button to open segment and field translation.
Segment Language Setup – Language Selection
Select a language to translate segment and field titles and instructions then click Search.
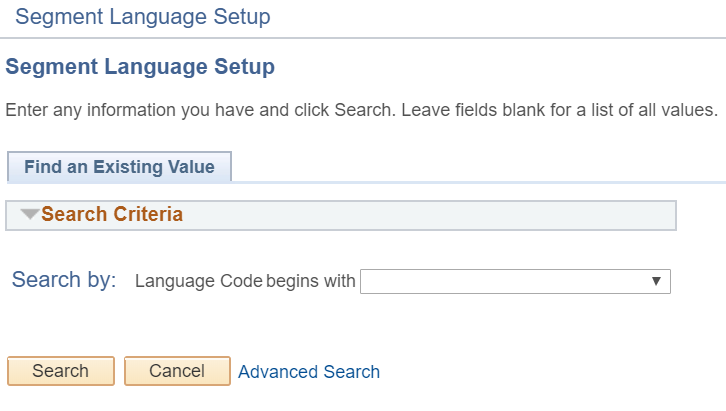
| Feature | Use |
|---|---|
| Language Code | Dropdown displays a list of languages supported by PeopleSoft Translation pages |
Segment Language Setup – Segment translation
Enter segment label instructions translation for selected language.
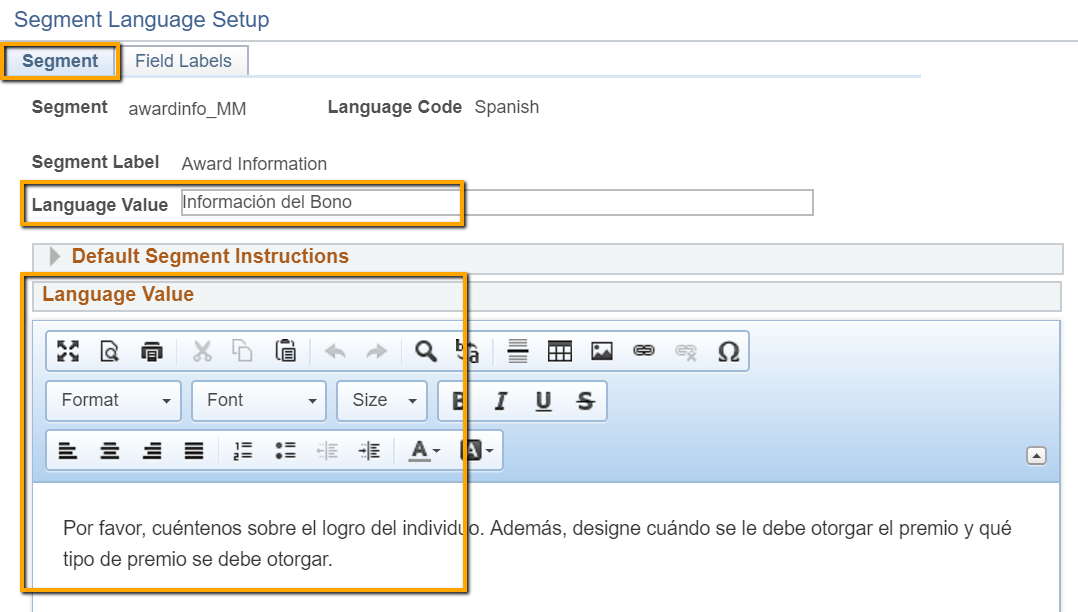
| Feature | Use |
|---|---|
| Segment Label Language Value | Translated value for Segment Label |
| Segment Instructions Language Value | Translated value for Segment Instructions |
Segment Language Setup – Field Labels tab
Enter Field label translations.
- Field labels can also be translated in App Designer > Translate Designer; however, label configuration on this page will override values in App Designer.
- The Default Labels button will overwrite configuration on this page with values defined in App Designer.
- Saving translations configuration on the Segment Language Setup page does not update App Designer objects.
- Field label configuration affects only the form type on which they are configured.
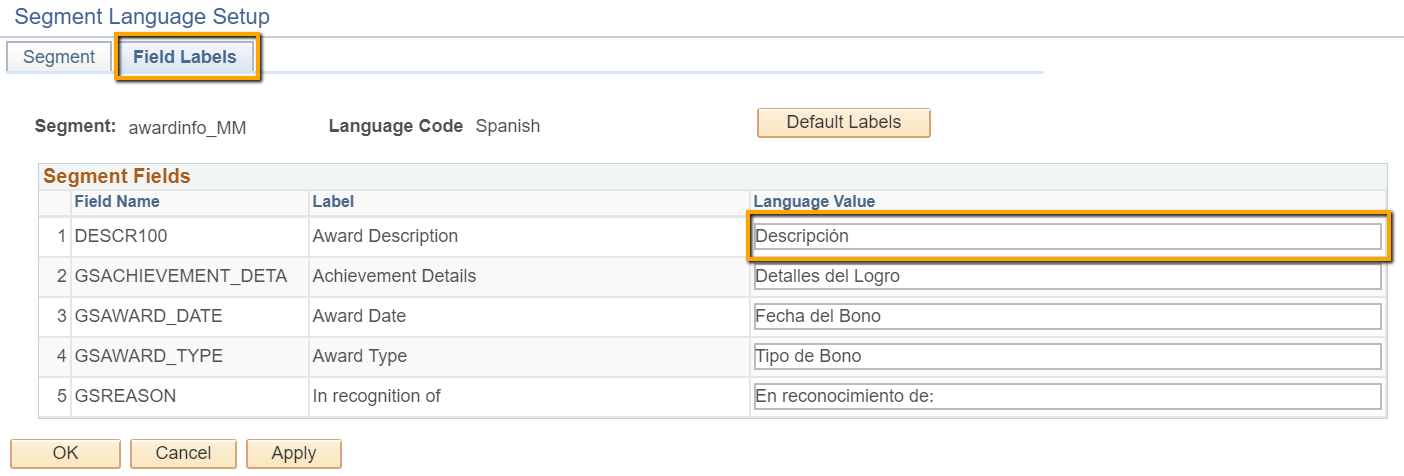
| Feature | Use |
|---|---|
| Default Labels button | Loads existing PeopleSoft field label translations, if any. |
| Field Label Language Value | Translated value for Field Name |
Email Template Translation
Translate the following features:
- Email Subject
- Email Body
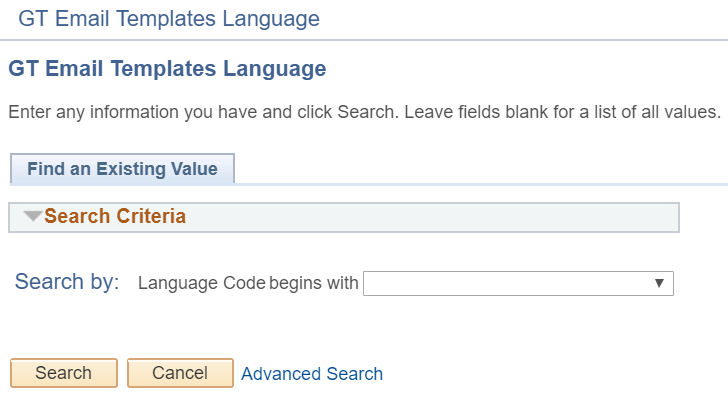
Navigation: Manage GT eForms 3.x > eForm Parts Gallery > Email Templates
Languages Button
Click the Languages button to open email template translation.
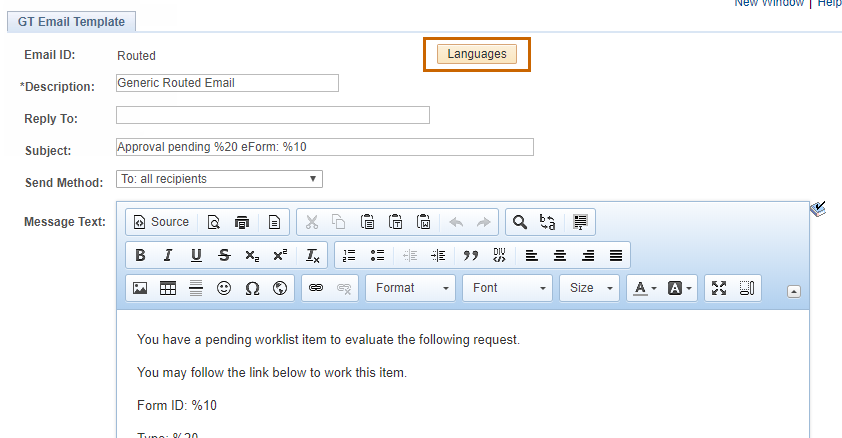
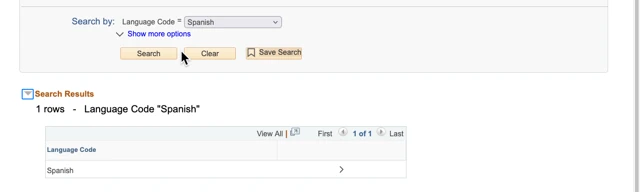
Email Template Language Setup – Language Selection
Select a language to translate email template subject and message body then click Search.
| Feature | Use |
|---|---|
| Language Code | Dropdown displays a list of languages supported by PeopleSoft Translation pages |
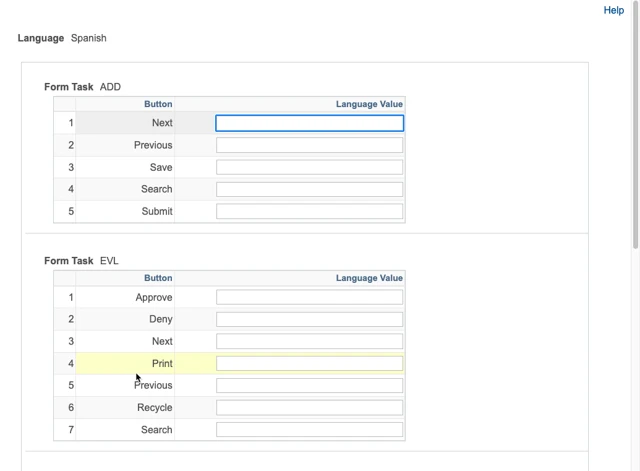
Email Template Language Setup – Subject and Message Translation
Enter subject and message text translation for the selection language.

| Feature | Use |
|---|---|
| Subject Language Value | Translated field for email subject |
| Message Text Language Value | Translated value for Message Text |
Navigation Buttons Default Translation
Navigation: Manage GT eForms 3x > GT Functional Setup > GT System Setup > Navigation Button Defaults
Click the “Languages” button on the Navigation Button Defaults setup page

Select the language to translate the button text into and click search. Select the language in the results.
Enter the desired default translation for each of the form buttons. Any form tasks where the buttons are not overridden will inhert these translations.
| Value | Description |
|---|---|
| Form Task | The form task that will have the translated button text |
| Button Name (Approve, Deny, Next...) | The default text for the button that was set on the Navigation Button Defaults setup page. |
| Language Value | The translated value for the specified button |
When finished entering translations, click OK at the bottom of the window to save the translations.