Validations Tab
This document gives an overview of Form Setup and is focused on the third tab, Validations. Using configuration, users can determine the validation text to fire, where they want the validation to fire, and the logic for when it should fire. This behavior is only supported in GT eForms 3.58+ on forms where Use Helium Performance is checked.
Navigation: Manage GT eForms 3.x > Form Setup > Validations Tab
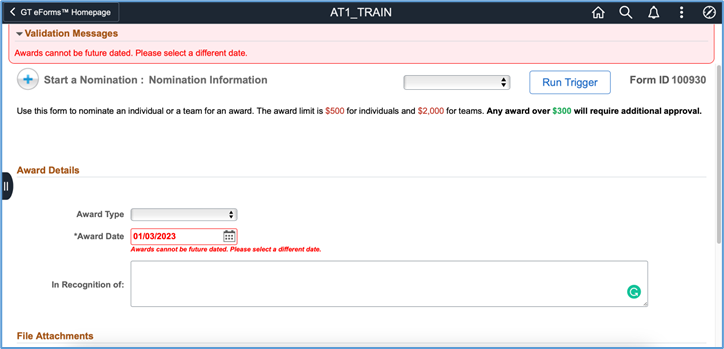
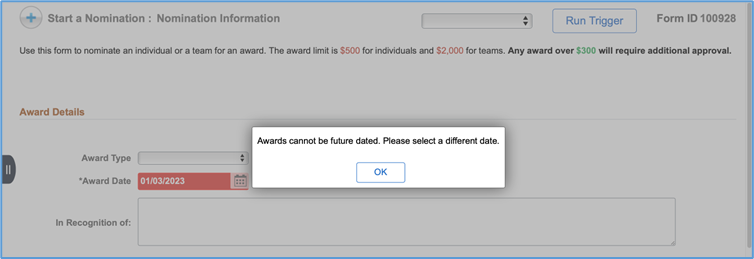
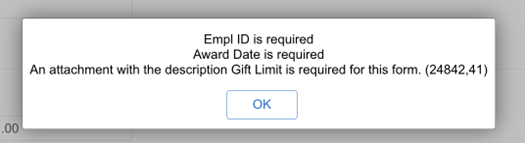
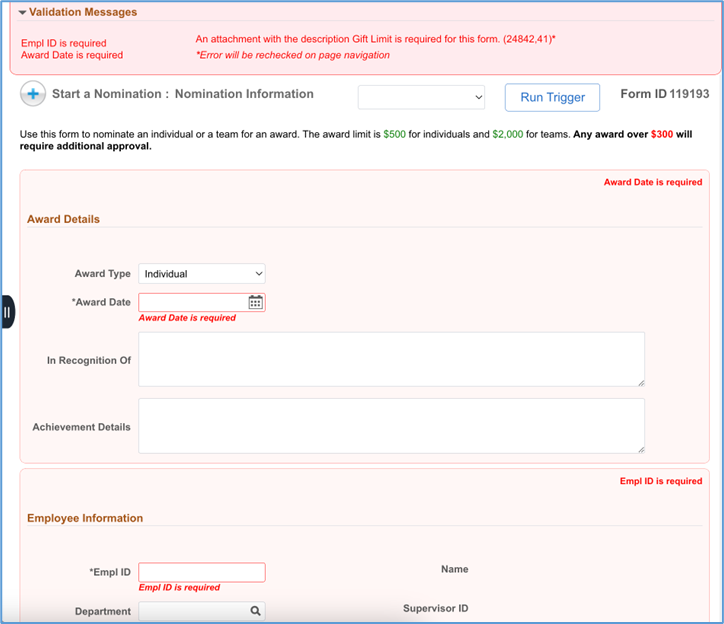
The way the delivered and configured validation messages appear depends on the Display Validations On Page (Beta) checkbox located on the General Tab of Form Setup. When the Display Validations On Page (Beta) is unchecked, all validation messages appear within a single pop-up box. When Display Validations On Page (Beta) is checked, messages related to fields will appear below the field and those messages, as well as validation messages pertaining to the segment or page level, will appear in a Validation Messages segment at the top of the page.
| Example: Configured Validation - Display Validation On Page is Checked |
|---|
 |
| Example: Configured Validation - Display Validation On Page is unchecked |
|---|
 |
| Example - Delivered Validations - Display Validations On Page is unchecked |
|---|
 |
| Example - Delivered Validations - Display Validations On Page is checked |
|---|
 |
-
Even when checked, PeopleSoft-formatted validations will still appear as pop-up boxes. For example, if you enter an invalid value in a prompt or a date that is not valid, a pop-up message will display.
-
The "Validation Messages" section will not appear at the top of the page on mobile devices.
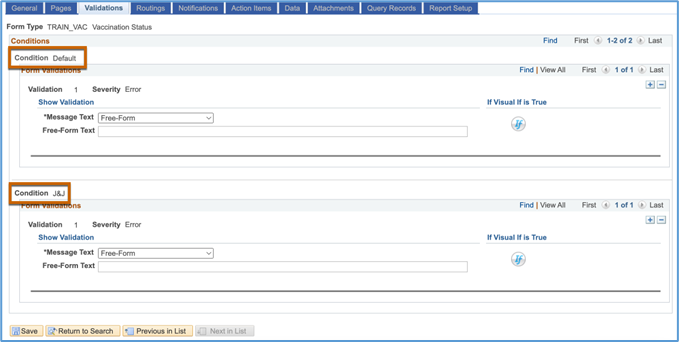
Conditions Level
Validations can be customized for each form condition configured on the form. As conditions are added on the Pages tab in Form Setup, an additional Conditions level row for the new condition will be added.
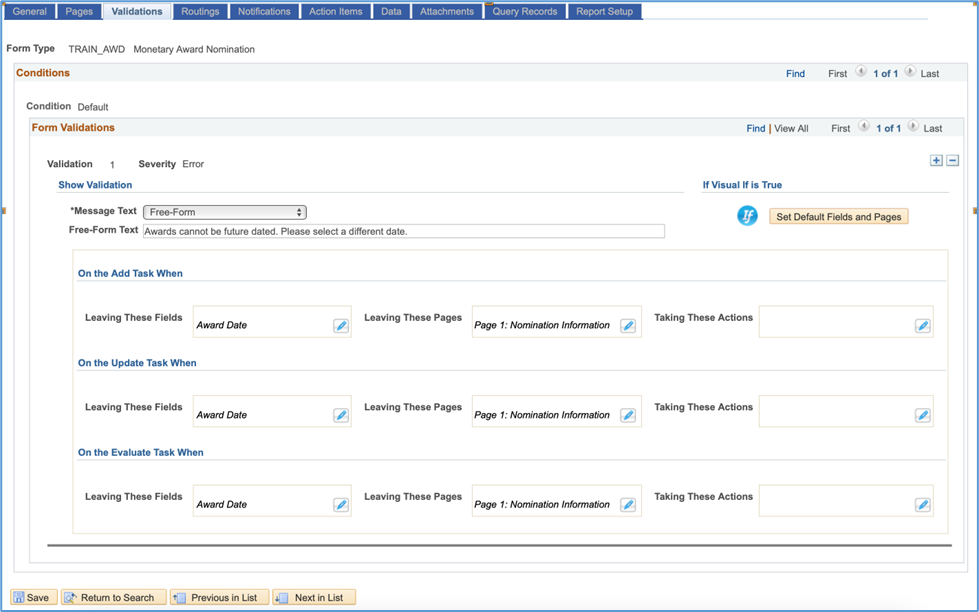
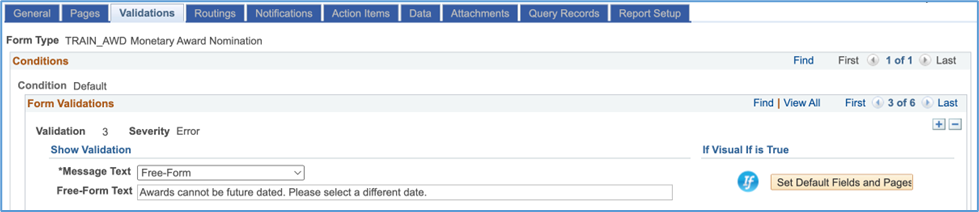
Form Validations Level
The Form Validations section is where you will begin to specify the error message text and the logic criteria for when to display said error message. By default, the framework will only display one validation at a time, and you can click the back and forward arrows to shuffle through all configured validations. However, there is also a View All option available to display all validations at once.
| Field | Functionality |
|---|---|
| Validation | Auto numbering the validations for reference purposes only. This does not impact the order in which the validations will trigger on the form. |
| Severity | Read-only field showing that all validations set will display as errors on the form. |
| +/- Buttons | Used to add or delete validations. |
'Show Validation' Area
| Field | Functionality |
|---|---|
| Message Text | Dropdown to select the source of text to display when triggering the validation. Free-Form: create a custom message using plain text Message Catalog: use an existing message catalog set and number to return the message description as the text Smart Source: use a Smart Source to return a text value See below for details on the fields that appear based on the Message Text selected. |
'If Visual If is True' Area
| Field | Functionality |
|---|---|
| Visual If | Set the criteria for when the message should fire. Click the button and apply the logic using the standard Visual If options. |
| Set Default Fields and Pages | Once Visual If logic has been added, this button appears. Click the button to set the “Leaving These Fields” and “Leavings These Pages” sections for the Add, Evaluate, and Update task. These sections are set based on the fields used in the Visual If and what pages those fields are on for the Add, Evaluate, and Update tasks. If changes are made to the Visual If or if you want to undo any changes to the “Leaving These Fields” or “Leaving These Pages” sections, this button can be clicked again to default in the fields and pages based on the Visual If. |
Show Validation -- Free Form

| Field | Functionality |
|---|---|
| Free-Form Text | Enter plain text to appear to the end-user, up to 100 characters |
Show Validation -- Message Catalog

| Field | Functionality |
|---|---|
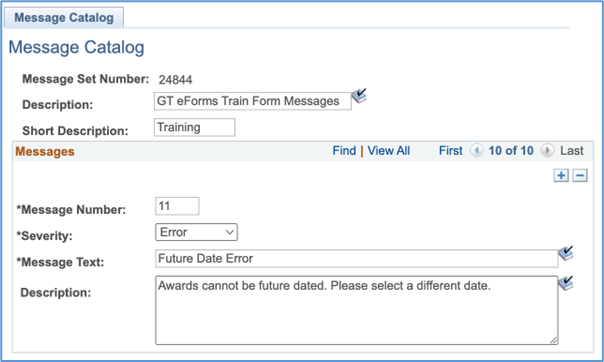
| Message Set | Enter the message set number from the PeopleSoft message catalog where the form message text can be found |
| Number | Enter the message number from the PeopleSoft message catalog where form message text can be found |
| Text | Once the Message Set and Number are selected, displays the Description value from the message catalog, which will be used as the text in the error message on the form. See the example below. |
Show Validation -- Smart Source

| Field | Functionality |
|---|---|
| Smart Source | Use the magnifying glass to select the desired Smart Source. The message that appears when the validation is triggered will be the information contained in the Smart Source. |
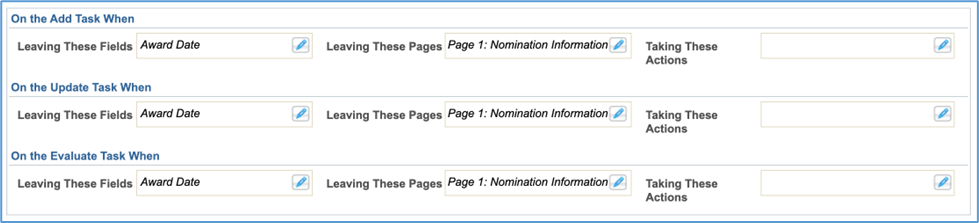
Task Level
Validations can be set up to vary by task. If there is an Add, Evaluate, and Update task present on the Pages tab of Form Setup, a section for each of those tasks will appear here.
A section for the View task will never appear on the Validations tab, as the View task is always read-only and there is no reason to validate.
| Field | Functionality |
|---|---|
| Leaving These Fields | Displays a list of fields for that task where the framework will evaluate if the validation should appear when a user tabs out of the listed field(s). The fields listed by default are all fields used in the Visual If. Click the pencil icon to open a modal window that allows you to edit the fields listed. See the Editing Fields section below for more information. |
| Leaving These Pages | Displays a list of pages for that task where the framework will evaluate if the validation should appear when a user navigates away from the listed page(s). Navigating away could mean using the “Next” button to advance to the following page or taking a form action to navigate to the results page. The pages listed by default include any page where a field used in the Visual If exists. Click the pencil icon to open a modal window that allows you to edit the pages listed. See the Editing Pages section below for more information. |
| Taking These Actions | Displays a list of form actions for that task where the framework will evaluate if the validation should appear when a clicks on the corresponding action button on the form. No form actions will be selected by default. Click the pencil icon to open a modal window that allows you to select the desired actions. See the Editing Actions section below for more information. |
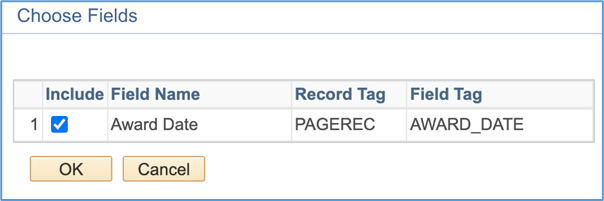
Editing Fields
| Field | Functionality |
|---|---|
| Include | Use the checkbox to indicate if the validation should fire after leaving this field. The fields that are referenced in the validation Visual If will default as checked. |
| Field Name | Display only and populates a row for each field used in the Visual If. |
| Record Tag | Display only and populates the record tag based upon the field referenced in the Visual If. |
| Field Tag | Display only and populates the field name based upon the field referenced in the Visual If. |
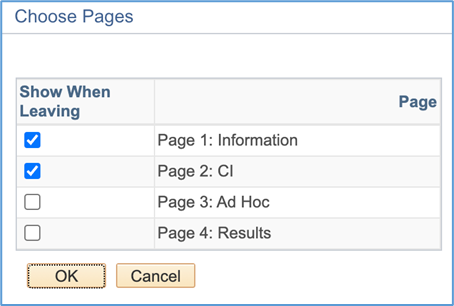
Editing Pages
| Field | Functionality |
|---|---|
| Show When Leaving | Use the checkbox to indicate if the validation should fire on when leaving this page. All pages where the field exists will be defaulted as checked. |
| Page | Display only and populates a row for all pages within the task, based on the Pages Tab. |
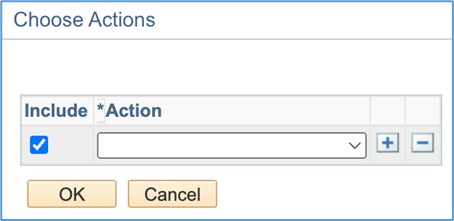
Editing Actions
| Field | Functionality |
|---|---|
| Include | Use the checkbox to indicate if the validation should fire when this action is taken on the form for a given task. No form actions will appear by default. |
| Action | Select the form action(s) in which this validation should be reviewed when the corresponding button is clicked on the form. The following actions are available: Approved, Denied, Placed on Hold, Recycled, Resubmitted, Saved, Submitted, or Withdrawn. |
| + / - Button | Use this button to add or delete actions. |
Considerations When Configuration Validations
-
Consider applying the same validations on both Add and Update so those validations fire consistently when the form is initially created and when changes are made in the Update task.
-
For a validation message to act as an error, you must have an option in the
Leaving These PagesorTaking These Actionssection configured. You can also have aLeaving These Fieldsconfigured if you would like the user to be aware when leaving the field but having an option onLeaving These PagesorTaking These Actionsconfigured means the user will not be able to leave the page or form without correcting the error. -
When configuring a validation under
Taking These Actions, ensure the actions selected are valid for the task. There is no framework validation to ensure the selected action is valid for the task. For example, if you have a validation when taking the Deny action configured on the Add task, that validation will never appear to the user as there is no Deny button on the Add task. -
With
Display Validation On Pagechecked, then the "Validation Messages" section at the top of the page will continually update to reflect the last validation triggered. This means validations triggered by a user's change may be replaced with validations from the user's next change. You will not get a comprehensive list of all validations on the page until you try to leave the page. Once you trigger a comprehensive list in the Validation Messages segment, as you resolve the validations, they will be removed from the validation Message segment. Segment-level and page-level validations will not be rechecked until you try to navigate away from the page. Those types of validations will have an asterisk * at the end of the message. Form action validations will not be rechecked until you try to take a form action. Those validations will have a dagger † at the end of the message.