GT Batch Form Processing
The Batch Tool is a Bolt-On to GT eForms that allows users to submit multiple eForms rapidly in batches. This document outlines the following:
- Purpose and characteristics of the Batch Tool
- Formatting CSV files for use with the Batch Tool
- How to use the Batch Tool in general
- PPC hooks that can be used to add custom client functionality to the Batch Tool ID
The Batch Tool is an administrative tool that allows a user to act as a developer would, manipulating form data as they please. It’s tempting to envision the Batch Tool as a robot that acts on behalf of a human to submit forms much faster than a human would. However, this is not an accurate representation of the Batch Tool’s capabilities. Here are some important things to understand about the Batch Tool:
-
When using the Batch Tool to submit forms, there is no concept of form pages. Normally, a user navigates through a form by completing one page and moving onto each subsequent page individually. In the Batch Tool, it’s more accurate to visualize a form as a single page on which the user can see and manipulate all the form’s fields.
-
The Batch Tool operates outside normal constraints of eForms. As was mentioned in the first point, there is often logic tied to navigating through and validating an eForm. This logic may affect the values users can select, manipulate, or view based on a set of circumstances. In the Batch Tool, these limitations rarely apply. For example, a page, segment, or field on an eForm might be read-only or even hidden under certain circumstances. This is not possible with the Batch Tool. Any user with the capability of submitting forms via the Batch Tool can ignore configured form logic and change the value of any form field, whether it is normally read-only, hidden or otherwise.
Batch Tool users can still benefit from some configured form logic, such as data propagation. For example, if the form has a Data Pool and form logic configured that populates a field with the name of an employee based on an Employee ID field, the form will still automatically populate the name field as long as the Batch Tool user doesn’t override that field with another value.
There are two versions of the Batch Tool. V1 is only compatible with Standard form transactions. V2 is compatible with Helium form transactions starting with GT eForms version 3.58.03.
The only version currently available on the Online GT Library is V2.
CSV File Formatting Guidelines
The Batch Tool uses data from CSV files to generate/submit form transactions. To ensure compatibility with the GT Batch Tool, format your CSV files according to the following guidelines:
Guidelines
- The first row contains the Input Field IDs – These will represent your fields in the Batch Setup
These field IDs need to match the field IDs you configure in the Batch Load Setup menu.
To decide which fields to include, start by looking at your form and the logic it uses to initialize and update form fields. You may not need to include every form field in your CSV or Batch Setup if form logic will populate those fields automatically.
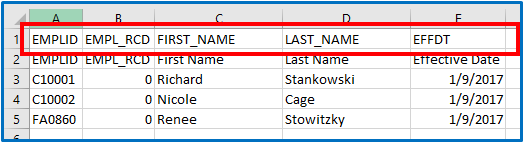
- The second row contains the Field Labels. These do not have to match Input Field IDs or Field Names used during Batch Setup. This row is not used by the Batch Processing tool. It is simply an arbitrary label created for convenience by the creator(s)/viewer(s) of the CSV file. Though it serves no purpose in batch processing, this row still must exist, and you must not leave the cells blank. The Batch Processing tool assumes that the first form in a batch will always be on row 3.
- Each subsequent row contains data for one form. The data in these rows will populate form fields when the tool begins processing and creating forms.
Batch Processing Setup
Setting Up Batch Processing for a Form Type
-
Navigate to [Root] > Manage GT eForms 3.x > Batch > Batch Load Setup
-
Click the ‘Add a New Value’ tab and enter the following information:
- Form Type: use the prompt to select the desired the form type
- Batch Configuration: enter any value
- This will be how you reference the batch process and is limited to 8 characters
-
Click ‘Add’ to be taken to the Batch Load Setup Page

-
Form Action (Dropdown) – This allows users to designate whether the batch configuration should take a Save or Submit action.
-
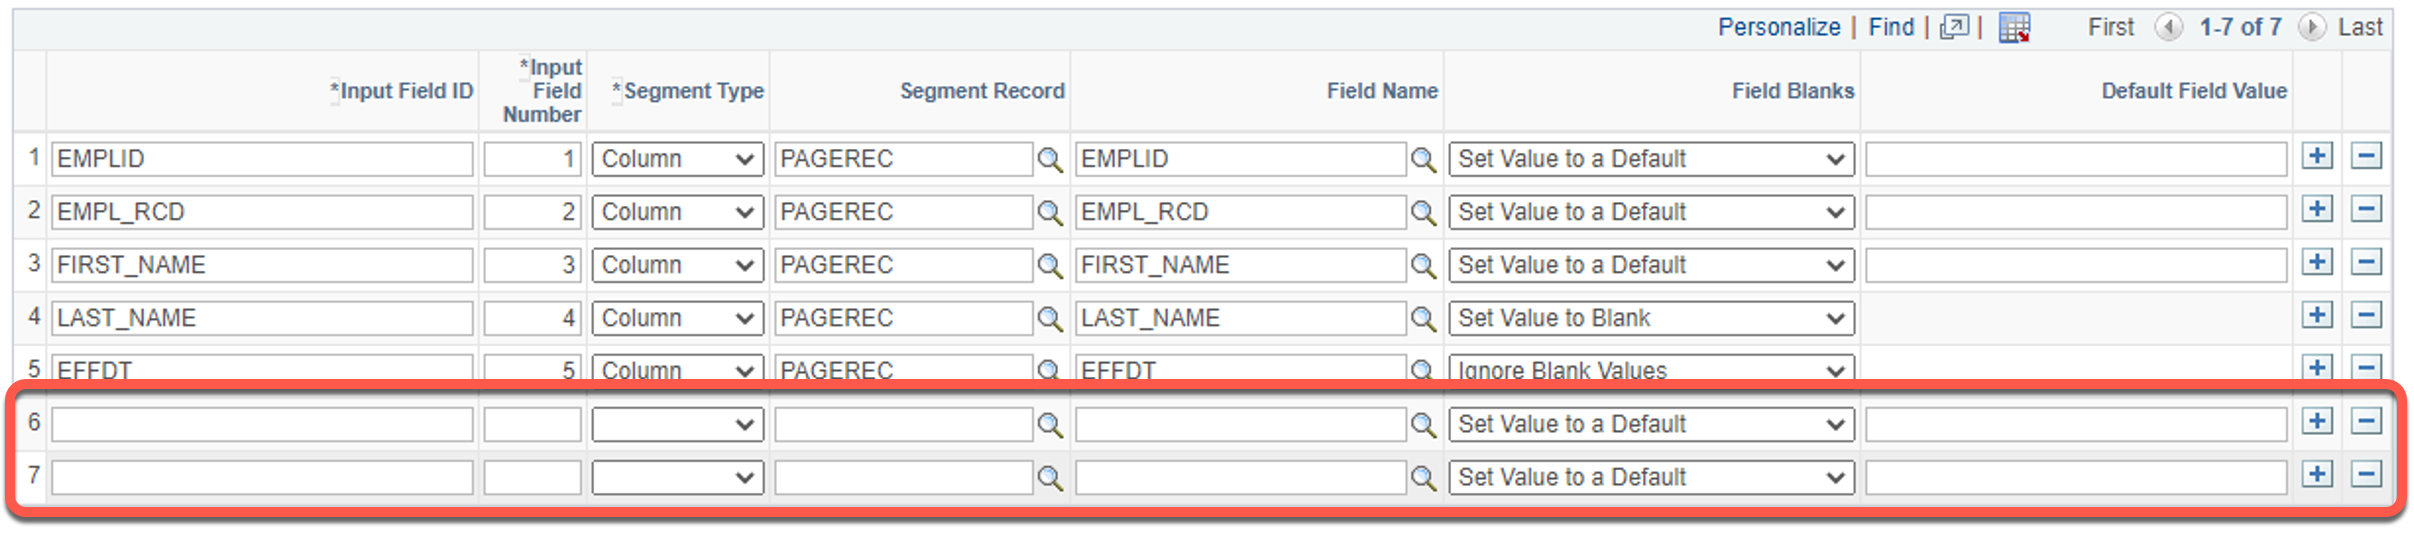
Input Field ID – This is a required field. It corresponds to the top row of your CSV file. The batch tool will match the text in the top row of your CSV with this field. The values in this field must exactly match the Field IDs in the CSV file. Using the CSV file shown in the General Formatting Rules section, the Input Field IDs in this setup table would be
EMPLID,EMPL_RCD,FIRST_NAME,LAST_NAME, andEFFDT. -
Input Field Number – This is a required field. This tells the tool which order the input field IDs will appear in the CSV file.
-
Segment Type – This is a required field. This specifies the type of segment that the form field is on, i.e. Column or Grid.
-
Segment Record – This is the record tag that the form field is on. It is used to match the CSV field value to the form’s desired Field Value when the form is created and fields are populated. This is not a required field because there are special cases that may require this to be left blank. For more information on when you might leave this field blank see the Add Task Search Keys section below.
-
Field Name – This corresponds to the form field name that the CSV file field will match to when creating the form and populating field values. It is not required because you can have fields in your CSV that will not populate actual form fields.
-
Field Blanks – This allows you three options on how to control the behavior of the default field value on the form. It is recommended that you set this field to one of the three options for every Input Field ID. The three options are:
- Ignore Blank Values – When the batch process sees a blank in the spreadsheet it will skip it and not allow a Default Field Value to be entered. This can be used when the form is set to default values in a field when the form is initiated, and you do not want that value changed.
- Set Value to Blank – When the batch process sees a blank in the spreadsheet it will set the field to blank and not allow a Default Field Value to be entered. This will set the value in the form to blank, even if there is a default value set when the form is initiated.
- Set Value to a Default (Page Default Setting) – When the batch process sees a blank in the spreadsheet it will put whatever is in the Default Field Value field. This will overwrite any default value set when the form is initiated.
-
Default Field Value – You can use this field to default a value when your CSV has a blank value. i.e. If the
SUPERVISOR_IDrow in a CSV is blank, a Default Field Value can be set to a certain supervisor’s EMPLID so that rows with blank supervisors will still populate a value when the form is created. This field can only be set when the Field Blanks field is set toSet Value to a Default.The setup for the example used in the General Formatting Rules section might look like this:

Special Cases
Special Fields
INITIATOR_ID– If you would like to control the initiator id for each form separately, you must add a row in the setup (and a column in your CSV) with an Input Field ID ofINITIATOR_ID. If you do not specifyINITIATOR_IDin your CSV, the batch tool will assume the initiator is the user that is processing the batch.G3THIS_COMMENT– If you would like to add comments for forms in a batch, you must add a row in the setup (and a column in your CSV) with an Input Field ID ofG3THIS_COMMENT. You can leave the ‘Segment Record’ and ‘Field Name’ columns empty on the setup page.
Grid Segments
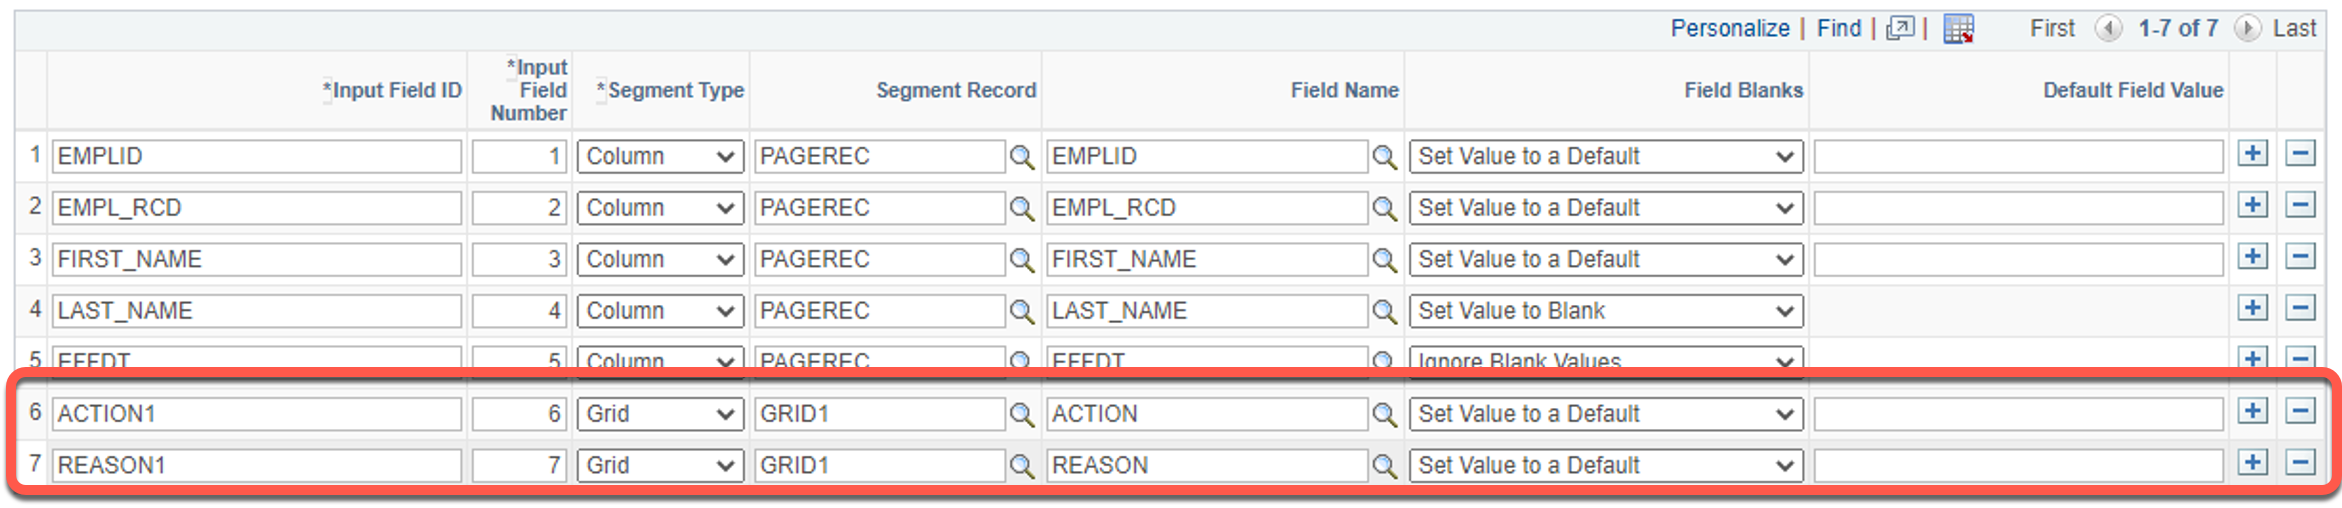
Grid segments must be handled differently because the batch tool must convert flattened data from a single CSV row to multiple rows in a grid on a form. An example of how to set up the configuration for a grid segment is as follows:
-
Add a row for each field in the form grid. In the screenshot below, the assumption is that there are only two fields in the form grid.
-
Set the configuration as you normally would.
-
Append a ‘1’ to the ends of each Input Field ID.
-
Set Segment Type to ‘Grid’ and ensure that you use the same Segment Record tag for each row of the same grid.
-
Repeat steps 1-4 according to the number of rows you want to be able to add to your form grid. i.e. If you want to add data for 4 rows in a form grid, you must repeat those steps 3 more times.
- Instead of appending a ‘1’ to Input Field ID each time, append the number of reoccurrences of each field.
When you are done, it will look something like this:
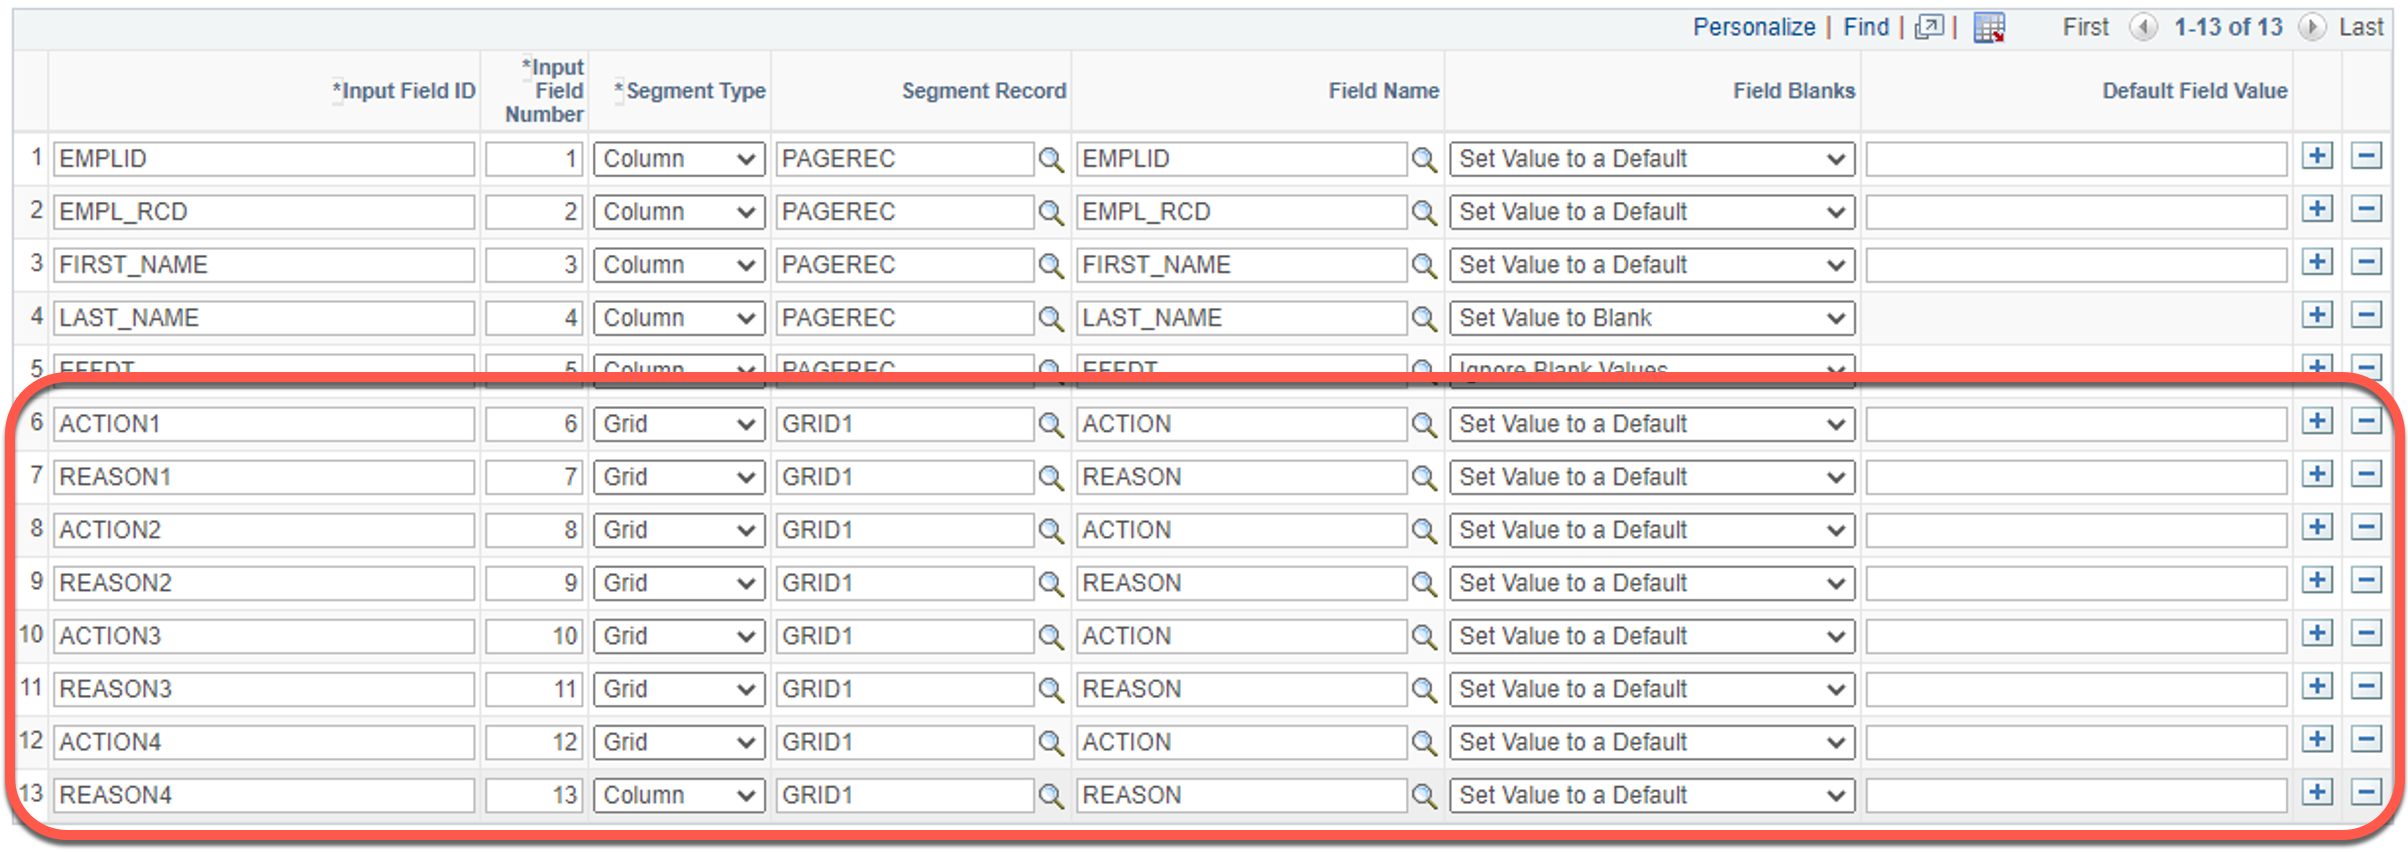
Notice that even though the appended number for each Input Field ID increases, the Field Names and Segment Record tag will stay the same.
It is important to know that form grid values will be inserted according to the number appended to the Input Field ID, and not in the order they appear on the spreadsheet. This means that when ACTION4 and REASON4 appear before ACTION1 and REASON1 in the CSV, the values in ACTION1/REASON1 will be inserted into the form grid before ACTION4/REASON4.
Also, just like column segment fields, it is not required to populate every Input Field ID. If for a particular form it is necessary to add fewer rows than the configuration’s capacity, that is perfectly fine. However, best practice would be to leave the higher-numbered fields blank first.
Add Task Search Keys
When a form has a Search Record configured for the Add Task, Batch Tool users will need to add the Search Keys from that record to the Batch Setup and CSV even if those fields are not on the form. Failure to do so will result in an error.
The alternate search keys are not necessary, but they will be mentioned in the error message. Only adding the main search keys is necessary to resolve the error message if it appears. These Search Keys should be first fields that appear in the CSV file, and users will most likely need to provide values for those fields in the CSV to create forms with the Batch Tool. When adding Task Search Keys, it is not necessary to specify a segment record or field name in the fourth and fifth columns of the setup grid.
Additionally, there are some search keys that receive built-in special handling:
OPRID– IfOPRIDis on the form’s search record, it will be populated by theINITIATOR_IDfield from the CSV. IfINITIATOR_IDis not specified, OPRID will be populated with theOPRIDof the user that is processing the batch.ROWSECCLASS– IfROWSECCLASSis on the form’s search record, it will automatically be filled based on the value assigned for OPRID. There is no need to haveROWSECCLASSbe a field in your CSV.OPRCLASS– IfOPRCLASSis on the form’s search record, it will automatically be filled based on the value assigned for OPRID. There is no need to haveOPRCLASSbe a field in your CSV.
Uploading and Processing a Batch
Once the batch setup is complete, you will be able to upload and process a batch which will create a form for each row in your csv.
Uploading a Batch
The following section details how to upload a batch csv file.
-
Navigate to [Root] > Manage GT eForms 3.x > Batch > Process Batch
-
Click the Add a New Value tab
- Batch ID will default to NEW and should not be changed.
-
Click Add
-
Select Form Type
-
Select Batch Configuration
-
Select Form Condition
-
The batch process will default with a check on “Don’t generate eForm if error encountered”. If you do not have a specific use case to allow forms with errors to still be created, keep this box checked.
-
Click Upload File

-
Click Choose File and browse to the location where your CSV file is saved
-
Click Upload
-
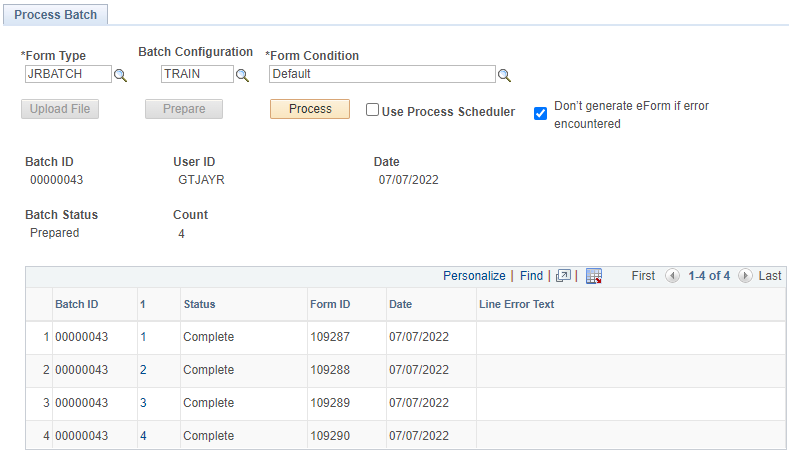
Click Prepare
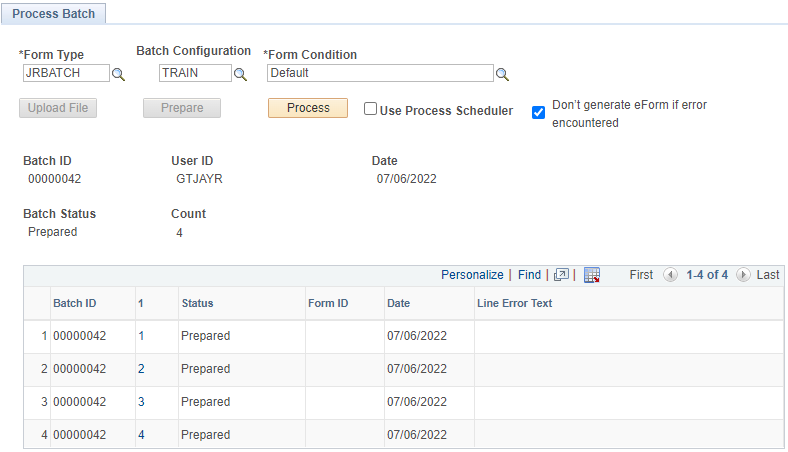
-
Click Process
This may take some time depending on the number of forms in your batch file. You may need to refresh the page to update the status. If you find the process is timing out, you may change the check the “Use Process Scheduler” box, prior to hitting the process button, to run through the process monitor. If you use the process scheduler it will bring you to this screen and you will need to hit the Run button.

The Process List Type is Web and the Format is TXT. Click the OK button.

When the tool finishes processing the batch, it will change the status of each row to Complete or Error depending on whether the tool successfully created a form. If an error did occur, the error will be output to the Line Error Text field to aid in debugging. You may have to refresh the page or go back into Process Batch for the Batch ID for the Status to update.
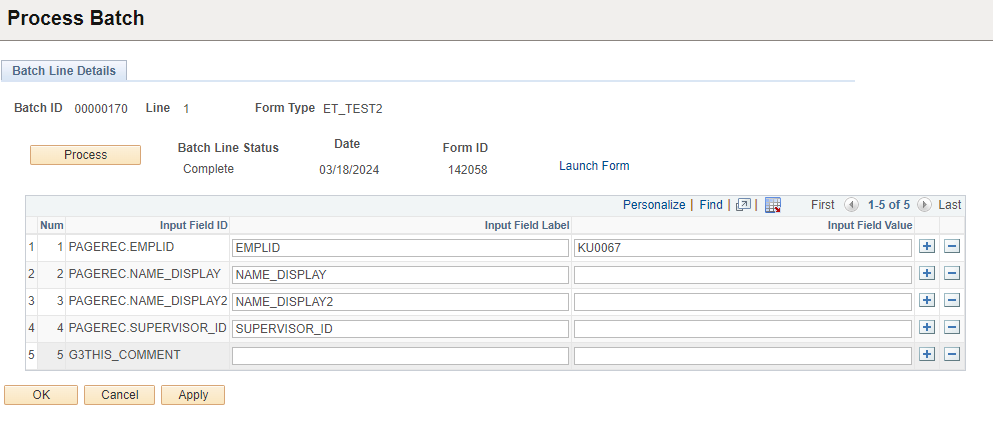
You can view the details of a single processed form or manage an unsubmitted form by clicking the digit in the second column (titled ‘1’). This menu allows you to review the fields represented in the CSV file and the values (if any) that the Batch Tool used to populate those fields on the form. There is also a Launch Form link that will open the form transaction in the View Task if it’s already submitted. View the screenshot below for an image of this page.
V2 Security
Batch Tool V2 comes with a Permission List and a Role that allow users to access the necessary components and processes for batch processing.
G3BATCH Permission list
The G3BATCH Permission List grants access to the following:
Components
G3BATCH_HDR– This is the Batch Processing component.G3BATCH_LN– This is the component that contains details of an individual form transaction in a batch.G3BATCH_RC– This is the component that appears when a user processes a batch via the Process SchedulerG3BATCH_SETUP– This is the Batch Load Setup page.
App Engine Process
G3BATCH_GRP– This is the process group that is used when running the Batch Tool in the Process Scheduler.
GT Batch User Role
This role has the G3BATCH Permission List.
PeopleCode Hooks
To facilitate client customization, there are several PeopleCode hooks that can be employed. This section details each hook and offers examples of what you could potentially do with each. The hooks are explained in the order that they fire in the code, meaning that PreProcessBatch is the first hook to fire, whereas FinalizeBatch is the last.
General Information
Each of these hooks must reside in the BatchEvents class which needs to be located at the base level of the form package. For example, if the form app package is G_FORM_HIRE, each PeopleCode hook should reside in the G_FORM_HIRE:BatchEvents app class. These hooks are optional; if a hook is not defined, the tool will function according to its standard behavior.
PeopleCode Hook Definitions
PreProcessBatch
| Description | Fires immediately after clicking the Process button |
| Method | method PreProcessBatch(&batchEvent As G3BATCH:BatchMethods); |
| When to Use this hook | - Any adjustments that need to be made to the entire batch file - Validation that needs to be done to the entire batch file |
import G3BATCH:BatchMethods;

class BatchEvents
   method PreProcessBatch(&batchEvent As G3BATCH:BatchMethods);
end-class;

method PreProcessBatch
   /+ &batchEvent as G3BATCH:BatchMethods +/
   MessageBox(0, "", 0, 0, "Firing PreProcessBatch Batch Event ");
end-method;
PreProcessLine
| Description | Fires right before each row in the csv is processed. Only fires the first time a form is processed. |
| Method | method PreProcessLine(&lineRec As Record, \&fieldRS As Rowset); |
| When to Use this hook | - Validation to make sure the line is valid - Adjusting any values on the line |
import G3DEBUG:DebugMethods;

class BatchEvents
   method BatchEvents();
   method PreProcessLine(&lineRec As Record, &fieldRS As Rowset);
end-class;

Global any &GDBG;

method BatchEvents
   If None(&GDBG) Then
      &GDBG = create G3DEBUG:DebugMethods();
   End-If;
end-method;

method PreProcessLine
   /+ &lineRec as Record, +/
   /+ &fieldRS as Rowset +/

   &GDBG.log(&GDBG._DEBUG, &lineRec);
   &GDBG.log(&GDBG._DEBUG, &fieldRS);
   MessageBox(0, "", 0, 0, "Throwing Error in  PreProcessLine Batch Event ");
end-method;
PostFormCreate
| Description | While a csv row is being processed, a form is created. PostFormCreate fires immediately after the form object has been instantiated. Only fires the first time a form is processed. |
| Method | method PostFormCreate(&lineRec As Record, \&fieldRS As Rowset, \&G3FRM As G3FORM:Form); |
import G3DEBUG:DebugMethods;
import G3FORM:Form;

class BatchEvents
   method BatchEvents();
   method PostFormCreate(&lineRec As Record, &fieldRS As Rowset, &G3FRM As G3FORM:Form);
end-class;

Global any &GDBG;

method BatchEvents
   If None(&GDBG) Then
      &GDBG = create G3DEBUG:DebugMethods();
   End-If;
end-method;

method PostFormCreate
   /+ &lineRec as Record, +/
   /+ &fieldRS as Rowset, +/
   /+ &G3FRM as G3FORM:Form +/

   &G3FRM.record("PAGEREC").field("END_DATE").Value = Date(20010101);

   &GDBG.log(&GDBG._DEBUG, &lineRec);
   &GDBG.log(&GDBG._DEBUG, &fieldRS);
   MessageBox(0, "", 0, 0, "Firing PostFormCreate Batch Event ");
end-method;
PopulateField
| Description | Fires after PostFormCreate |
| Method | method PopulateField(&batchRec As Record, \&setupRec As Record, \&G3FRM As G3FORM:Form); |
| When to Use this hook | - Applying special formatting to text values from CSV - Translating CSV values to acceptable form values - Field-specific logic |
import G3DEBUG:DebugMethods;
import G3FORM:Form;

class BatchEvents
   method BatchEvents();
   method PopulateField(&batchRec As Record, &setupRec As Record, &G3FRM As G3FORM:Form);
end-class;

Global any &GDBG;

method BatchEvents
   If None(&GDBG) Then
      &GDBG = create G3DEBUG:DebugMethods();
   End-If;
end-method;

method PopulateField
   /+ &batchRec as Record, +/
   /+ &setupRec as Record, +/
   /+ &G3FRM as G3FORM:Form +/

   If (&batchRec.G3BATCH_FLDID.Value = "STATE") Then;
      &batchRec.G3BATCH_FLDVALUE.Value = "UT"
   End-If;

   &GDBG.log(&GDBG._DEBUG, &batchRec);
   &GDBG.log(&GDBG._DEBUG, &setupRec);
   MessageBox(0, "", 0, 0, "Firing PopulateField Batch Event. Should Fire after PostFormCreate. ");
end-method;
FinalizeForm
| Description | Fires when the processing for each row in the csv is complete. |
| Method | method FinalizeForm(&G3FRM As G3FORM:Form); |
| When to Use this hook | - Email notifications on form error/success - Final form adjustments |
import G3DEBUG:DebugMethods;
import G3FORM:Form;

class BatchEvents
   method BatchEvents();
   method FinalizeForm(&G3FRM As G3FORM:Form);
end-class;

Global any &GDBG;

method BatchEvents
   If None(&GDBG) Then
      &GDBG = create G3DEBUG:DebugMethods();
   End-If;
end-method;

method FinalizeForm
   /+ &G3FRM as G3FORM:Form +/

   MessageBox(0, "", 0, 0, "Throwing Error in FinalizeForm Batch Event ");
end-method;
FinalizeBatch
| Description | Fires at the very end of processing the batch. It is the last thing that happens before the tool’s grid is populated with the results from processing the batch. |
| Method | method FinalizeBatch(&batchEvent As G3BATCH:BatchMethods); |
| When to Use this hook | Email notifications on batch completion |
import G3DEBUG:DebugMethods;
import G3FORM:Form;
import G3BATCH:BatchMethods;

class BatchEvents
   method BatchEvents();
   method FinalizeBatch(&batchEvent As G3BATCH:BatchMethods);
end-class;

Global any &GDBG;

method BatchEvents
   If None(&GDBG) Then
      &GDBG = create G3DEBUG:DebugMethods();
   End-If;
end-method;

method FinalizeBatch
   /+ &batchEvent as G3BATCH:BatchMethods +/

   MessageBox(0, "", 0, 0, "Firing in FinalizeForm Batch Event");
end-method;