Form Type Build
With the introduction of 3.50 Helium comes a new process that enables the 3.50 Helium framework to improve an end user's experience. This process involves moving the time to map out a form’s behavior from running when an end-user opens a form to run the process as the form is developed. Think of it as publishing changes made to the form to be viewed when testing a form. That means a form builder needs to run the Form Build Process whenever changes are made to the form type configuration or code. Please note, this process is only applicable to 3.50 Helium forms and not for 3.50 Standard forms (which is controlled by the Use Helium Performance checkbox on the General tab of Form Setup). A form builder can choose how and when this Form Build Process is run. This document will review the two main places where the forms can be built. The first is on the General Tab in Form Setup. The second is on the Form Type Build page.
The build process does the following:
- Processes all the custom code for a form type
- Note: This replaces the Load Custom Parts process. That process is deprecated and not used for 3.50 Helium.
- Builds the form type’s Dependency Network using the code and configuration
- Calculates and stores what needs to happen for every user interaction on a form
Form Build Option
Navigation: Manage GT eForms 3.X > Form Setup (General tab)
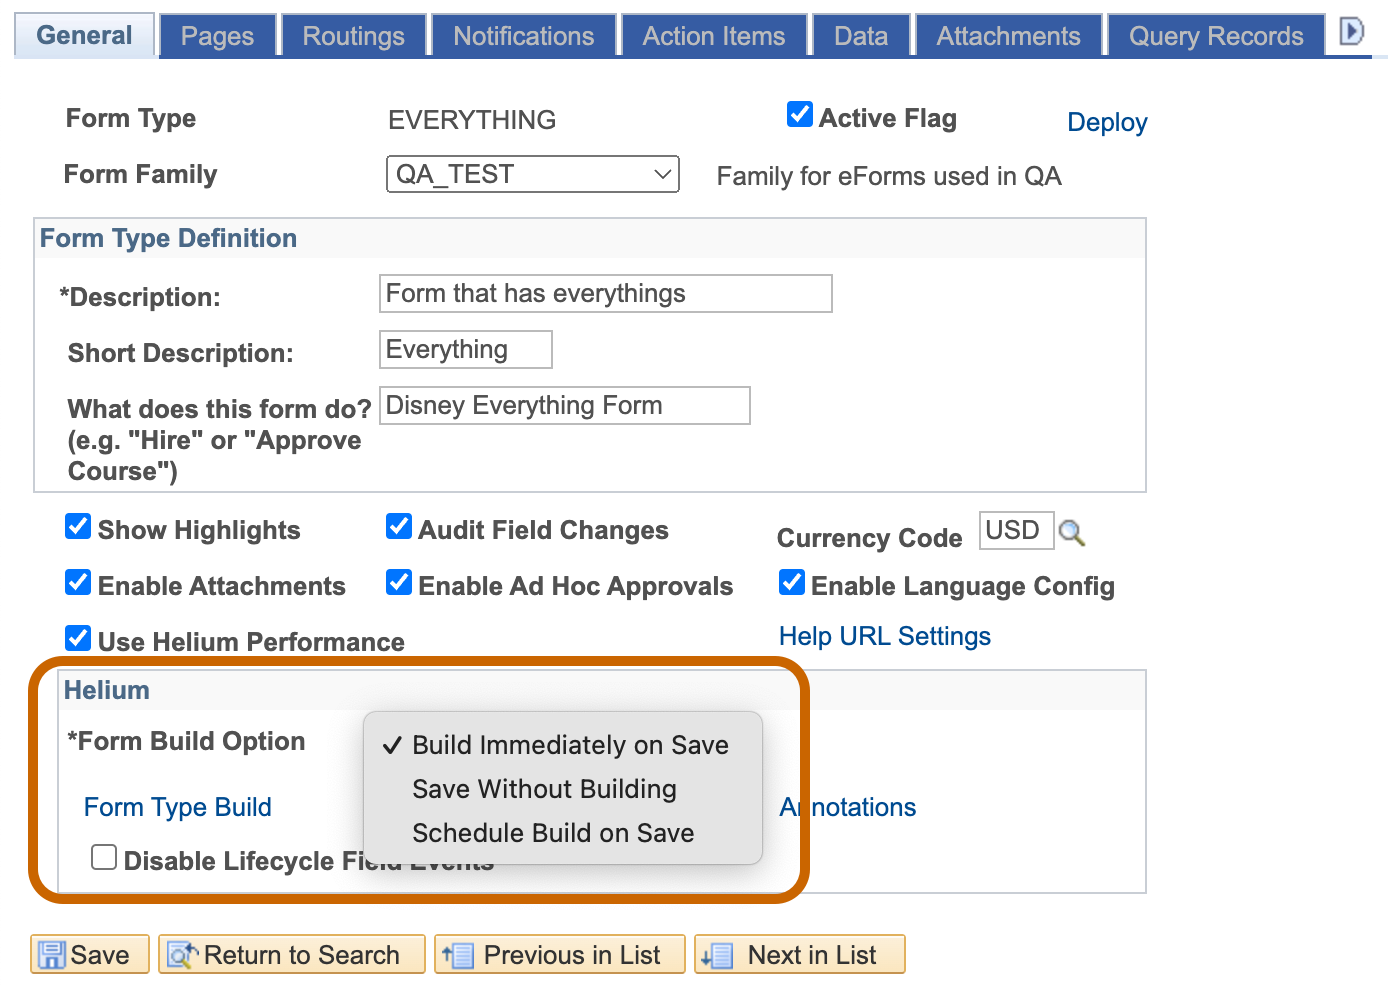
When the Use Helium Performance box is checked, the Helium section will appear, which contains the Form Build Option field.
Form Build Options
Form Build Options allow you to determine how and when the form build process is run.
Build Immediately on Save
The default for new forms will be Build Immediately on Save. This option means that every time the Form Setup page is saved, a form build will start and finish before indicating the Form Setup page changes have been saved. The status of the build will appear in a message box after it is completed, indicating if the build was successful or failed due to errors. If the build was successful, no further action is needed, and you can test your form and see your new form behavior. If your build failed, you can click the “Form Type Build” link on the General tab to open the Form Type Build page in a new tab to review any error and/or warning messages.
Schedule Build on Save
If you do not want to wait for your form to finish building in your user session but still would like the build process to run each time you save, you can change the Form Build Option to Schedule Build on Save. When this option is selected, saving the Form Setup page will kick off the build via the Process Scheduler. A “Build Details” link will appear above the save button on all tabs for a form builder to view the status of the build in the process monitor. The process will run to success or show an error. If the build failed, you can click the “Form Type Build” link on the General tab to open the Form Type Build page in a new tab to review any error and/or warning messages.
Save Without Building
If you are in the initial stages of configuring your form and do not wish to kick off the build process each time you save, you can change the Form Build Option to Save Without Building. This means the build process will never automatically kick off. When this option is selected, a “Run Form Build” link will appear above the Save button on every tab of Form Setup to remind you to kick off the build when you are ready. Clicking that link will open the Form Type Build page in a modal window where you can choose to run the build process in your user session or via the Process Scheduler. If there is an error during the build process, consult the Build Log tab after clicking the “Run Form Build” link. If you forget to run the Form Build and go to test your form, you may encounter errors when opening or the form may not behave as configured. Therefore, it is best to only choose this option when you run into issues with the form build kicking off too frequently or taking up time when rapidly developing.
Form Type Build Page
Navigation: Manage GT eForms 3.x > Form Type Build
Search
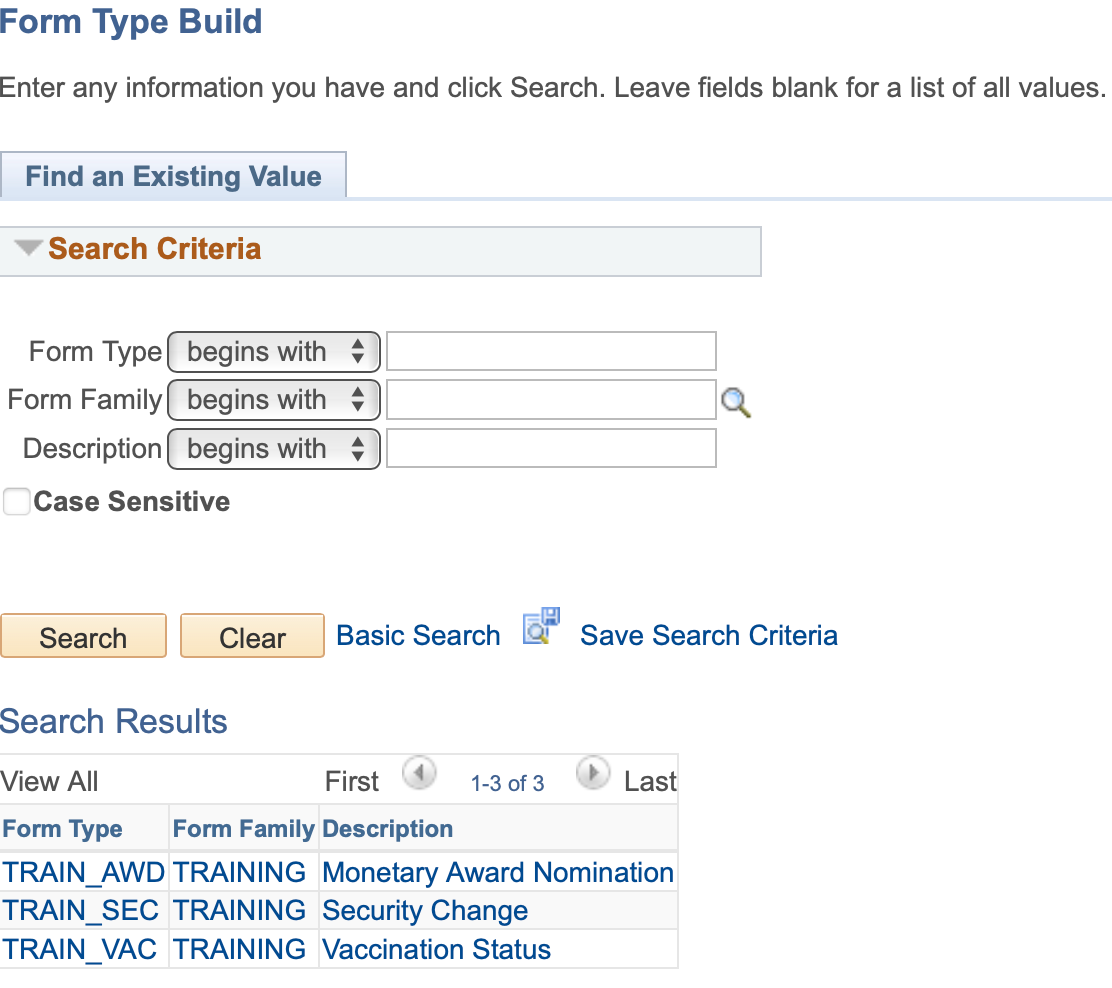
Clicking the Search button will return all form types that exist in the environment. Select a form type to open the Form Type Build page. You may click on the Advanced Search link to search by Form Family or Description. This tool should only be used on forms with the Use Helium Performance button checked on the General tab in Form Setup.
Basic Tab

The appearance of the Basic tab is tied to the Form Build Option field on the General tab in Form Setup, meaning certain options will only be visible when the Form Build Option has a certain value. The Visibility column below says what form build options that make a field appear.
| FIELD | FUNCTIONALITY | VISIBILITY |
|---|---|---|
| Form Type | Indicates which form type will be built | - Build Immediately on Save - Save Without Building - Schedule Build on Save |
| Form Build Option | Indicates which build option was selected on Form Setup for the selected Form Type | - Build Immediately on Save - Save Without Building - Schedule Build on Save |
| Open Form Setup (link) | Link that opens Form Setup in a new tab/window for the selected Form Type | - Build Immediately on Save - Save Without Building - Schedule Build on Save |
| Build Form | Starts the build process. Build will either be in the user’s session or via the Process Scheduler, depending on what Form Build Option is selected Note: If a form build was already in process in the Process Scheduler, it will be canceled, and a new build will start | - Build Immediately on Save - Save Without Building - Schedule Build on Save |
| Use Process Scheduler | Determines if build process will run via the Process Scheduler. If checked, builds via the Process Scheduler, if not checked, builds in the user’s session. | - Save Without Building |
| Form Build Status | Displays the status of the form build (see below) | - Schedule Build on Save - Save Without Building (If Use Process Scheduler = Y) |
| Refresh (icon) | Refreshes the Form Build Status to reflect the current status of the build in the Process Scheduler | - Schedule Build on Save - Save Without Building (If Use Process Scheduler = Y) |
| Process Monitor (link) | Opens the Process Scheduler page in a modal window | - Schedule Build on Save - Save Without Building (If Use Process Scheduler = Y) |
Form Build Status Options
- Build Needed: changes to the configuration or code have been detected and running the form build is recommended
- Queued: the form build has been sent to the Process Scheduler to be run
- In Progress: the form build process is currently running
- Success: the last form build completed successfully
- Note: even if the form build was successful, there may be warnings found. Warnings mean ends users will still be able to open the form, but there may be configuration and/or code issues to address, such as orphaned parts or configuration improperly set up.
- Not Successful: the form build failed to complete due to errors. The errors will be displayed in the Build Messages table below. Those errors must be addressed before opening the form to test as an end user.
Build Log Tab
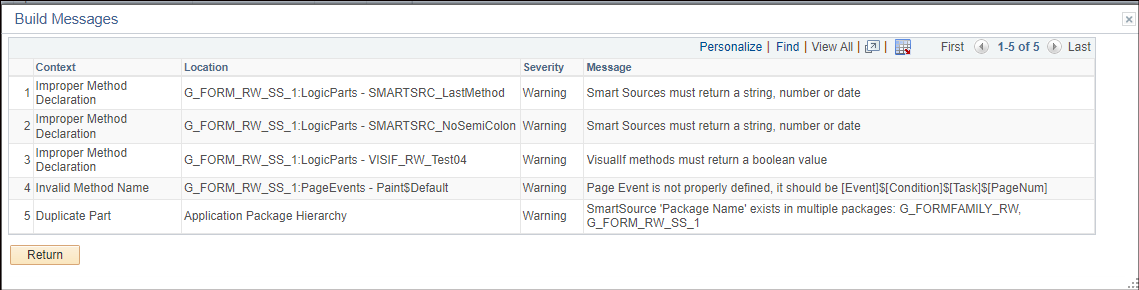
If there are any errors, warning, or information messages that return from the form build process, the following table will appear on the build Log tab.

| FIELD | FUNCTIONALITY |
|---|---|
| Location | Where the build error/warning happened |
| Context | High level description of message |
| Severity | Advises either Warning, Info or Error |
| Message | Actual message description of what happened during the form build |
Advanced Tab
This tab shows the individual steps that constitute the Form Build process. From this page individual steps can be run, or the entire build can be run in the same manner as found on the Basic tab. This tab will mostly be used by technical resources for troubleshooting. For example, troubleshooting why a newly created custom part does not appear in the dependency network or within form configuration.
The page has two grids, Form Build Tasks and Optional Tasks. The former are the steps used when creating a form, the same ones used from the Basic tab. Optional tasks are not necessary for a functioning form; these vary in purpose.
Form Type Build Header

| FIELD | FUNCTIONALITY |
|---|---|
| Debugging On? | When enabled provides technical information regarding each step run. Generally used for troubleshooting. |
| Expand All | Expand or collapse all steps |
| Run All | Runs all steps, equivalent to the Form Build on the basic page |
| Reset | Clears all log messages and timings |
Form Build Tasks
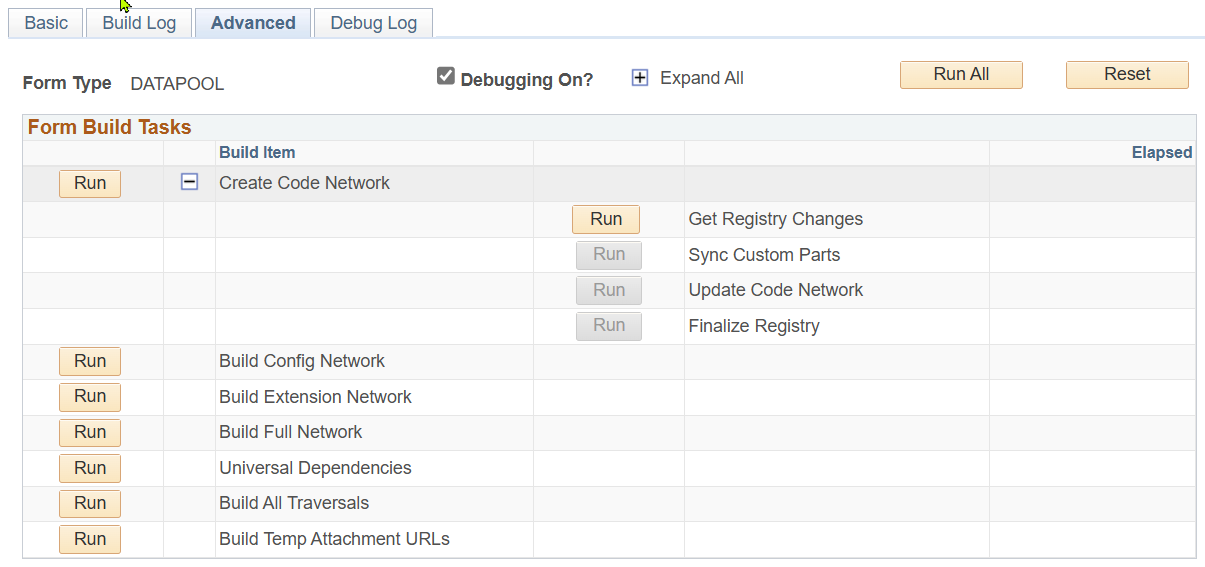
| FIELD | FUNCTIONALITY |
|---|---|
| Run | Run an individual step |
| Plus / Minus (Button) | The plus button expands the Build Item and the minus button contracts them. |
| Build Item | Step description |
| Elapsed | Execution time of a step, in seconds (Appears when “Run”) |
| Log Button | View debug log messages for a step (Appears when “Run”) |
| Log | View all log messages combined (Appears when “Run”) |
| Critical Error | Click this image to display a critical error. This is uncommon and generally caused by a framework bug. |
Build Items / Steps
| BUILD ITEM | FUNCTIONALITY |
|---|---|
| Create Code Network | Runs the following four steps listed below. |
| Get Registry Changes | Examines the form’s application package hierarchy for new or removed custom code extensions and updates a code registry |
| Sync Custom Parts | Creates or removes custom parts based on registry changes |
| Update Code Network | Creates or updates a code network based on registry changes |
| Finalize Registry | Marks the registry as complete after changes processed |
| Build Config Network | Create a configuration-based dependency network |
| Build Extension Network | Adds dependencies to the network for extended features outside of form setup, such as robot setup and bolt-ons |
| Build Full Network | Combines the code and configuration networks |
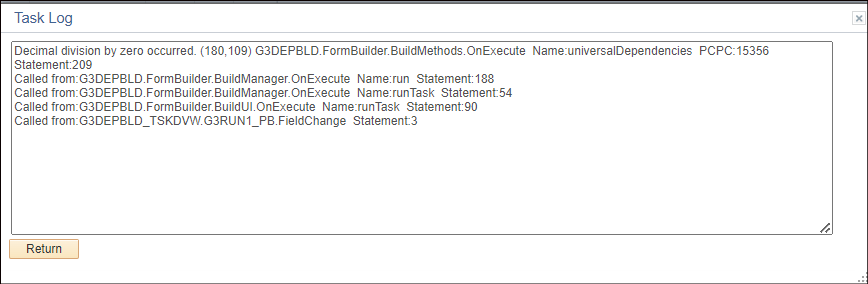
| Universal Dependencies | Not used |
| Build Temp Attachment URLs | If necessary, creates a Temporary Attachment Storage URL to accommodate a unique File Extension List present on the Form Type |
| Build All Traversals | Creates all traversals, which are used in deciding what gets processed for all events that occur during the lifespan of a form. These are individually listed in the Optional section. |
Step Log and Messages
Each step that is “Run” has a button for examining the log related to it. Some steps may include additional messages.

| Step Log and Messages | |
|---|---|
| Click this icon to view a step’s log information | |
 | |
| Click this icon to display informative build messages | |
 | |
| Click this icon to display a critical error. This is uncommon and generally caused by a framework bug. | |
 |
Optional Tasks
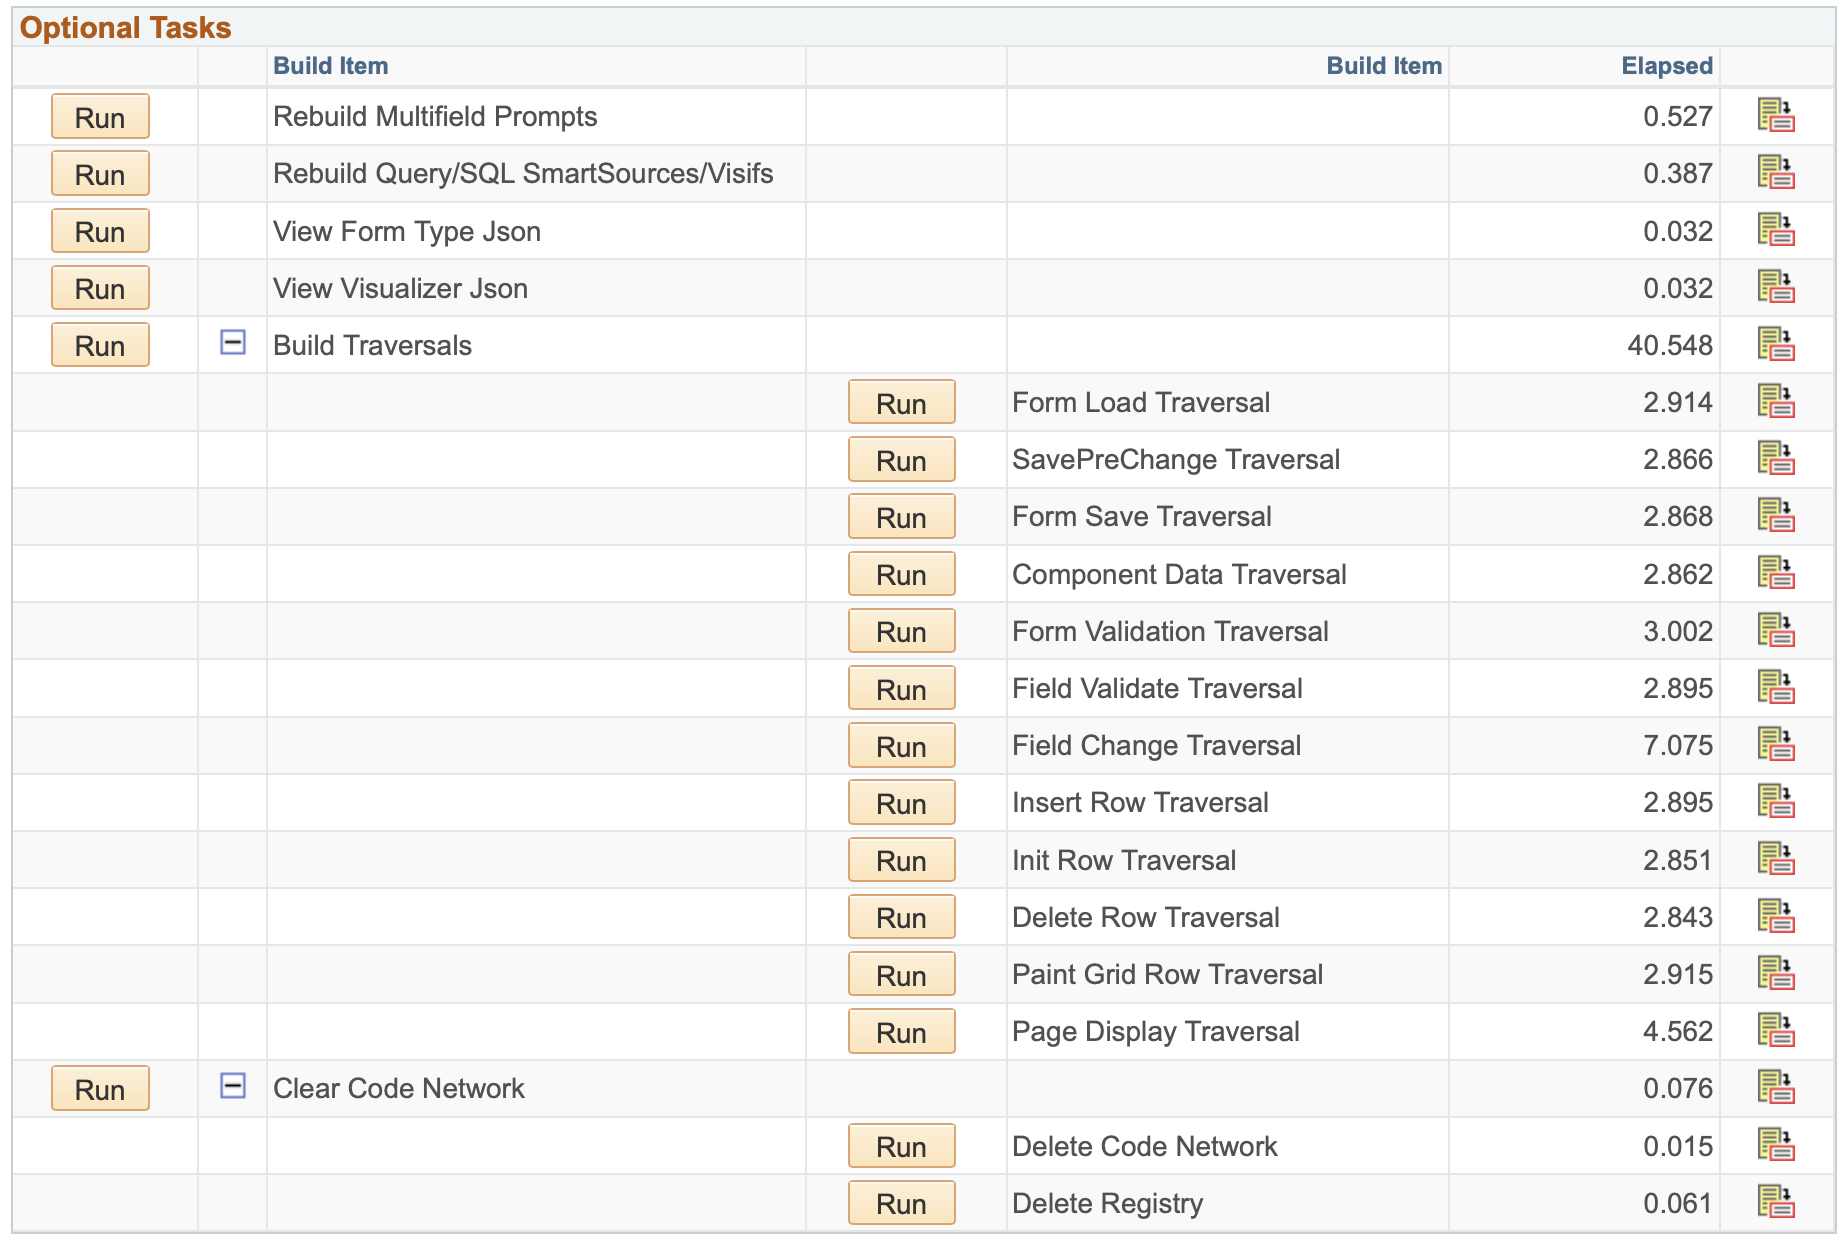
| BUILD ITEM | FUNCTIONALITY |
|---|---|
| Rebuild Multifield Prompts | Recreate all multifield prompts for a form. For example, a PeopleSoft record associated with a data pool record has a new key added; this step will rebuild the prompt table. |
| Rebuild Query/SQL/SmartSources/Visual Ifs - | Creates all SmartSource and Visual Ifs that are based on PeopleSoft Query or SQL objects. These types of objects are not form specific therefore this is applicable system wide. |
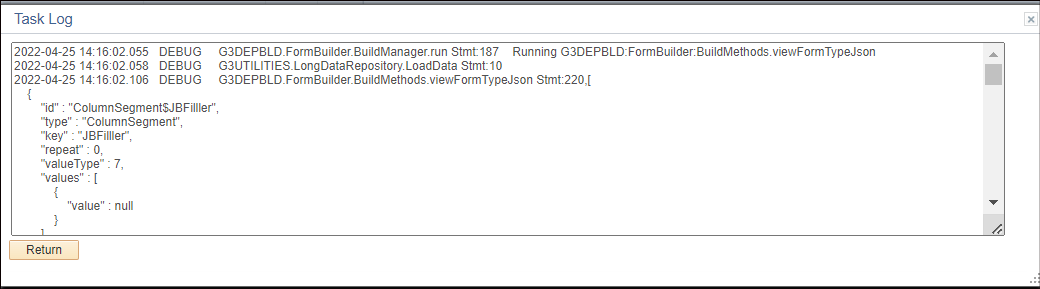
| View Form Type JSON | The run-time representation of a form is managed using a JSON data structure. This step displays in the log the JSON structure of the form. It is typically used only for technical troubleshooting. |
| View Visualizer JSON | The visual representation of the form that is used by the Visualizer is stored as JSON. This step displays the JSON in the log. This is typically used only for technical troubleshooting. |
| Build Traversals | This step expands to show specific traversal steps. Traversals are used in form build to determine what needs to occur during the lifespan of a form (initialization, changing field data, saving the form, etc.). The individual traversal steps relate to the different types of events. Running these individually is for technical analysis. |
| Form Load Traversal | Builds traversal for what should occur when a form is opened |
| Component Data Traversal | Builds traversal for any custom component that needs to load data into the form |
| Form Validation Traversal | Build a traversal for what should be validated when a form is opened |
| Field Change Traversal | Builds traversals for each field tag for deciding what should occur when the user changes the field. |
| Insert Row Traversal | Builds a traversal for what should occur when a rowsetTag (grid) has a new row inserted. |
| Delete Row Traversal | Builds a traversal for what should occur when a rowsetTag (grid) has a new row deleted. |
| Paint Grid Row Traversal | Builds a traversal for what should occur when a grid is displayed (painted) |
| Page Display Traversal | Builds a traversal for what should occur when a specific page is displayed. |
SavePreChange Traversal | Builds a traversal for all SavePreChange events |
| Form Save Traversal | Builds a traversal for all items involved in the saving of form data. |
| Clear Code Network | Runs the two steps below it, Delete Code Network and Delete Registry |
| Delete Code Network | Removes dependency network used form managing code-related extensions |
| Delete Registry | Removes custom objects found in the code registry |
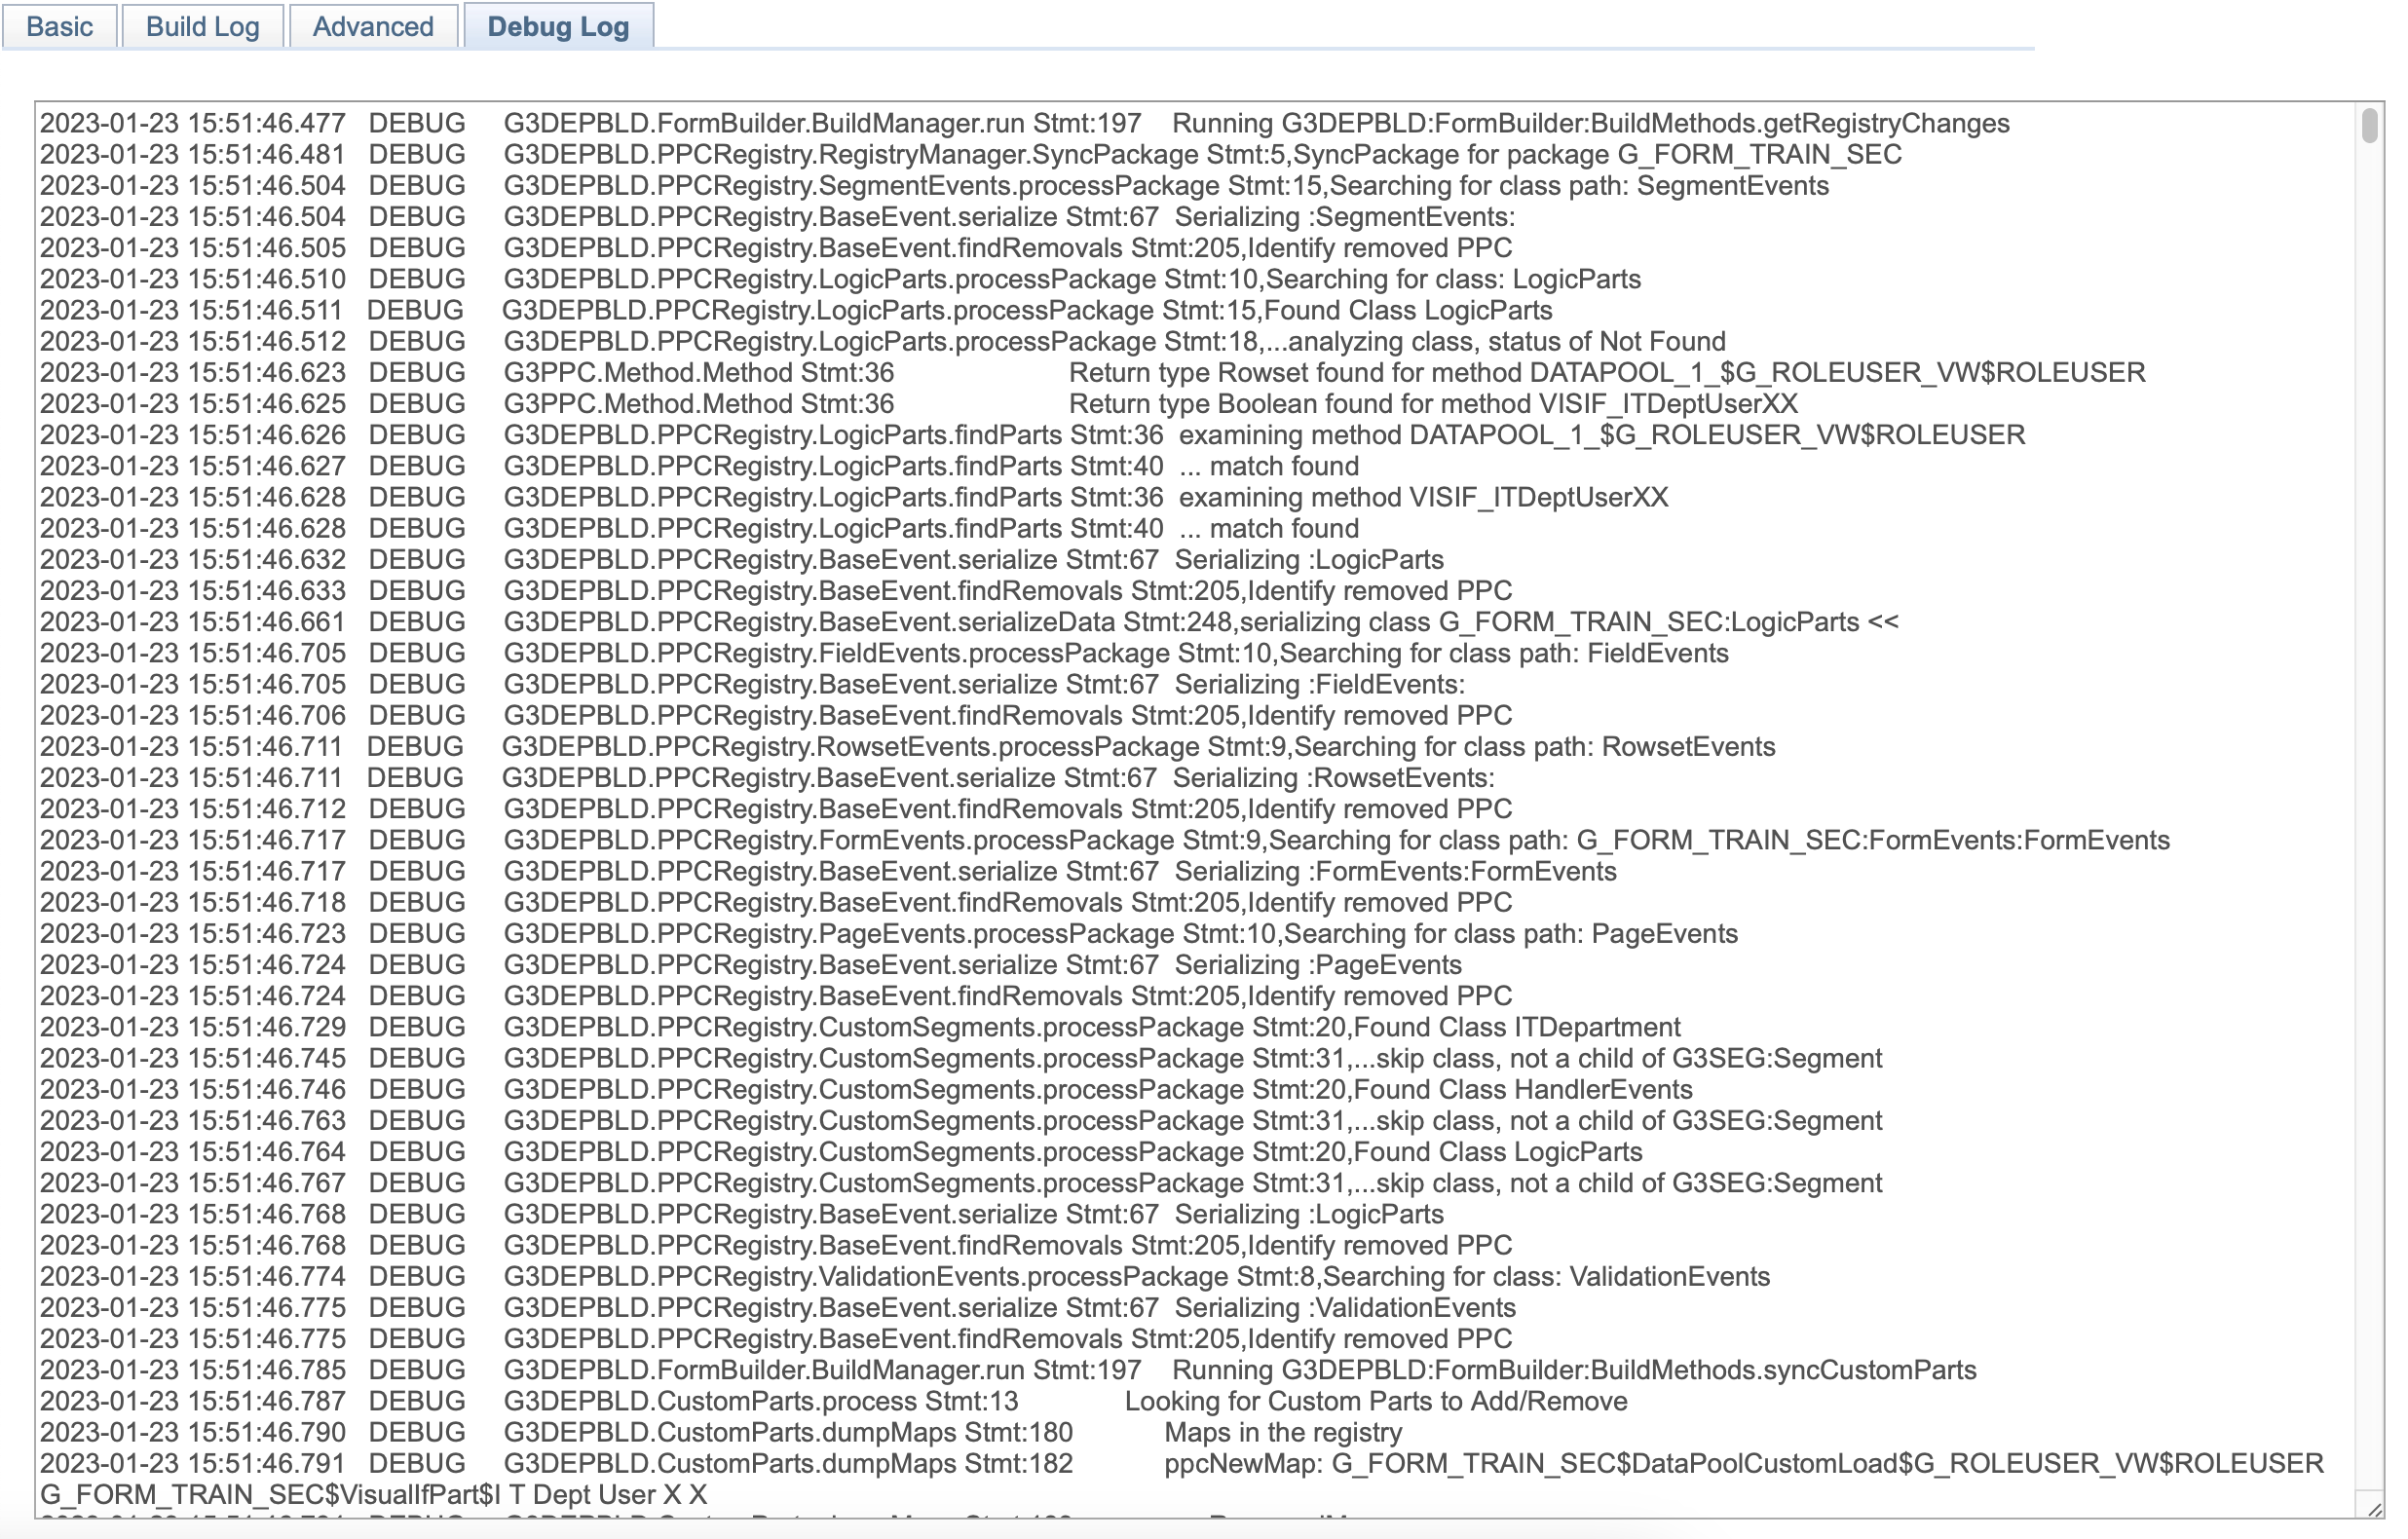
Debug Log Tab
While you can view the log for each individual task, if “Debugging On?” is checked, then an overall log is generated and appears on this tab. The overall log in this tab will always hold information from the last item run. If several steps are run at once, then the log will contain information from each step.