Form Options for Form Designers
Classic Form Options
GT eForms 3.x includes powerful configuration tools directly on the form itself. While viewing classic forms in GT eForms WorkCenter, users with the GT eForms Designer role will see a gear icon in the upper right corner of the form. This makes it easy to preview and test settings as they are implemented.
| Tools |
|---|
 |
Repopulate Form
You can use this link to force the form to repopulate data as configuration changes are made. This option mimics an initial form load without having to manually reload the form for testing.
Design/User Mode
This option toggles between design and user mode. User Mode is what most users will see when they open a form to complete. Design mode enables administrative edits directly in the form.
Moving Fields
| Fields in Design Mode |
|---|
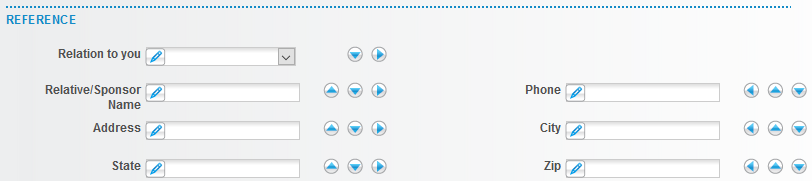 |
In design mode, field layout within a segment can be manipulated with the directional arrows.
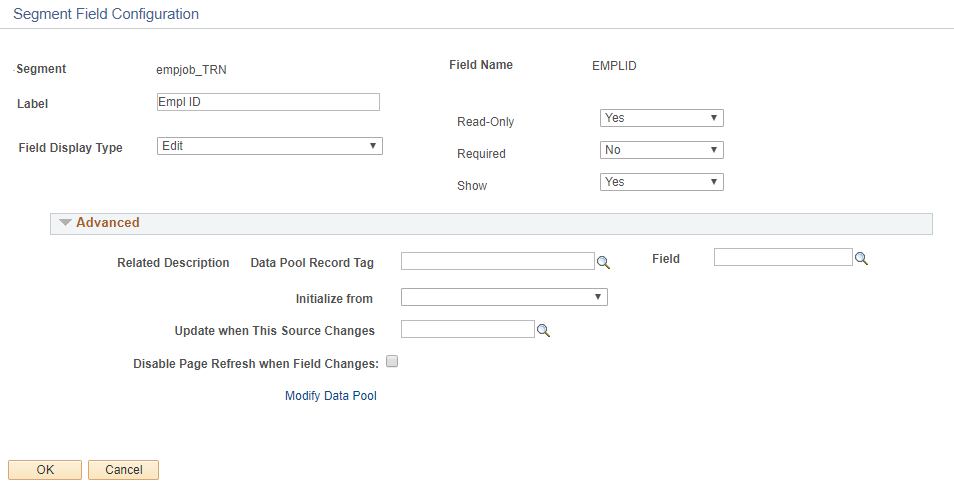
Updating Field Settings
In design mode, clicking the pencil icon will open the Segment Field Configuration. This is the same configuration page available from the Form Type Table.
Data Pool Related Content
The Data Pool link under the Related Information section will open the Data Pool that is configured for this form in a related content window at the bottom of the page. The related content window can be expanded or collapsed, which is an easy way to make changes to setup and test without leaving the page. This will not work unless a Data Pool has been linked on the Form Type Table. See the Data Pool feature document for more information on using this feature.
Fluid Form Options
Run Trigger Button
The Run Trigger button in 3.50 is used for both Helium and Standard forms. To have this button show, the user must have the GT eForms Designer role.

There will be 3 options in the dropdown next to the Run Trigger button:
- Form Type: will show the name of the Form Type for the form the user is in. In the example above, the user is in the
TRAIN_AWDForm Type. The first option would be “Form Type: TRAIN_AWD”. This can be helpful when a user is in a form and is not sure what Form Type it is. - Initial Paint: Refreshes the display of the page. To use this option, set the Initial Paint, and then click the Run Trigger button to execute the Paint. This can be helpful during testing to have the formatting of the page recycle without having to click out of certain fields to look for formatting changes.
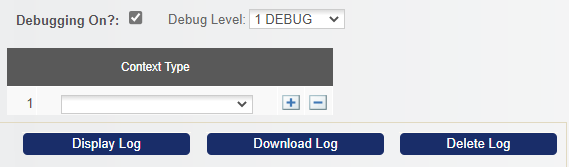
- Log JSON: Used to help technical users troubleshoot a form. This should only be used in 3.50 Helium. Here are the steps to use this option:
-
Navigate to Manage GT eForms 3.x > GT Utilities > GT Dev Debug Tool
-
Click on the “Debugging on?:” checkbox and set the Debug Level to “1 DEBUG”.
-
In a new window, open the desired form to debug and set Run Trigger to Log JSON.

-
Click the Run Trigger button.
-
Click the Display Log button on your GT Dev Debug Tool.
-
Copy the log information into a text editor and review the JSON from the initial form load.
-
If you want to compare the initial form load to what it looks like after a field is changed, click off the “Debugging on?:” checkbox.
-
Go back to the form window and change a field on the form.
-
Click the Delete Log button on your GT Dev Debug Tool.
-
Click on the “Debugging on?:” checkbox and set the Debug Level to “1 DEBUG”.
-
In the form window, open the form you want to debug and set the Run Trigger to Log JSON.
-
Click the Run Trigger button.
-
Click the Display Log button on your GT Dev Debug Tool.
-
Copy the log information into a text editor and compare the JSON from the field change to the initial form load to compare the data differences.
-