Robot Setup
If you have a situation that requires a human user to keep forms in a queue and periodically check if they can be acted upon, then configuring a robot approver can help you! The Robot Setup page is used to configure an automated evaluator where the rules for taking action (approve, deny, etc) can be defined through GT’s Visual Ifs. We lovingly refer to our robot as Rosie the Robot. Rosie can do anything if a form is routed to her user ID and a visual if is configured for her to know when to act on the form. She can be the only user the form routes to, or she can be included among other users in the form’s workflow roster. Below are some sample use cases when you might want to have forms routed to Rosie and wait for her to take action on your forms.
- Approve a referral form once all referrals are complete
- Approve a security form once the user profile is created
- Withdraw a form if no action has been taken on the form after 30 days
Navigation: Manage GT eForms 3.x > GT Functional Setup > GT System Setup > Robot Setup
Initial PeopleSoft Setup
The robot process uses an App Engine program that is configured as a daemon, which runs in the background. For this to work, you will need to configure the daemon (through standard PeopleSoft setup) and you must have a user with access to GT eForms to route to as an approver. See Appendix A for a walkthrough of the setup.
Robot Users Tab
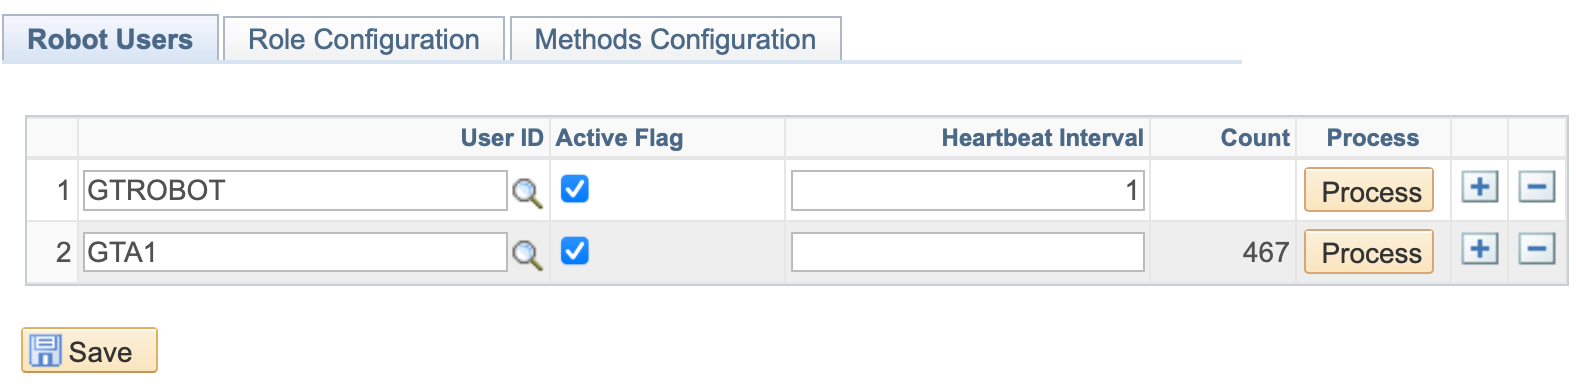
On this tab, you’ll want to identify any users you want automated rules to run for. If you set up an actual user, and one of the rules you set up resolves as true, it will take the action you’ve defined. You may also create a user, such as GTROBOT, that is only used to process automated rules.
| FIELD | VALUE |
|---|---|
| User ID | Use the lookup to select the User ID of any user to run automated rules for. |
| Active Flag | Check box to mark the user as active for automated rules processing |
| Heartbeat Interval | Enter the number of minutes you want between re-checking the same form. Note: This is similar to the sleep time that is set on the server (see Appendix A). The robot will track which forms it has processed, and only re-process once the number of minutes set has passed. The daemon process may run every 15 minutes, but if no action is taken on a form, it will get reprocessed every 15 minutes, which may be unnecessary. The intent of the heartbeat interval is to define a longer time period, such as “240” and the same form will only be processed every 4 hours to see if the form is ready for the robot to act on it. |
| Count | Shows the number of forms in a user's queue waiting for a heartbeat interval to finish before reprocessing. In the screenshot above, this indicates there are 467 forms in GTA1’s queue that would not be considered if the daemon process was kicked off or the Process button (discussed below) was clicked. |
| Process (button) | Manually evaluates all forms in the user’s queue to check if the interval has passed yet and if so, checks if the automated rule is true and the robot can act on the form. |
| Add Row (button) | Adds a row for additional User IDs |
| Delete Row (button) | Removes the row where the button is clicked |
Role Configuration Tab
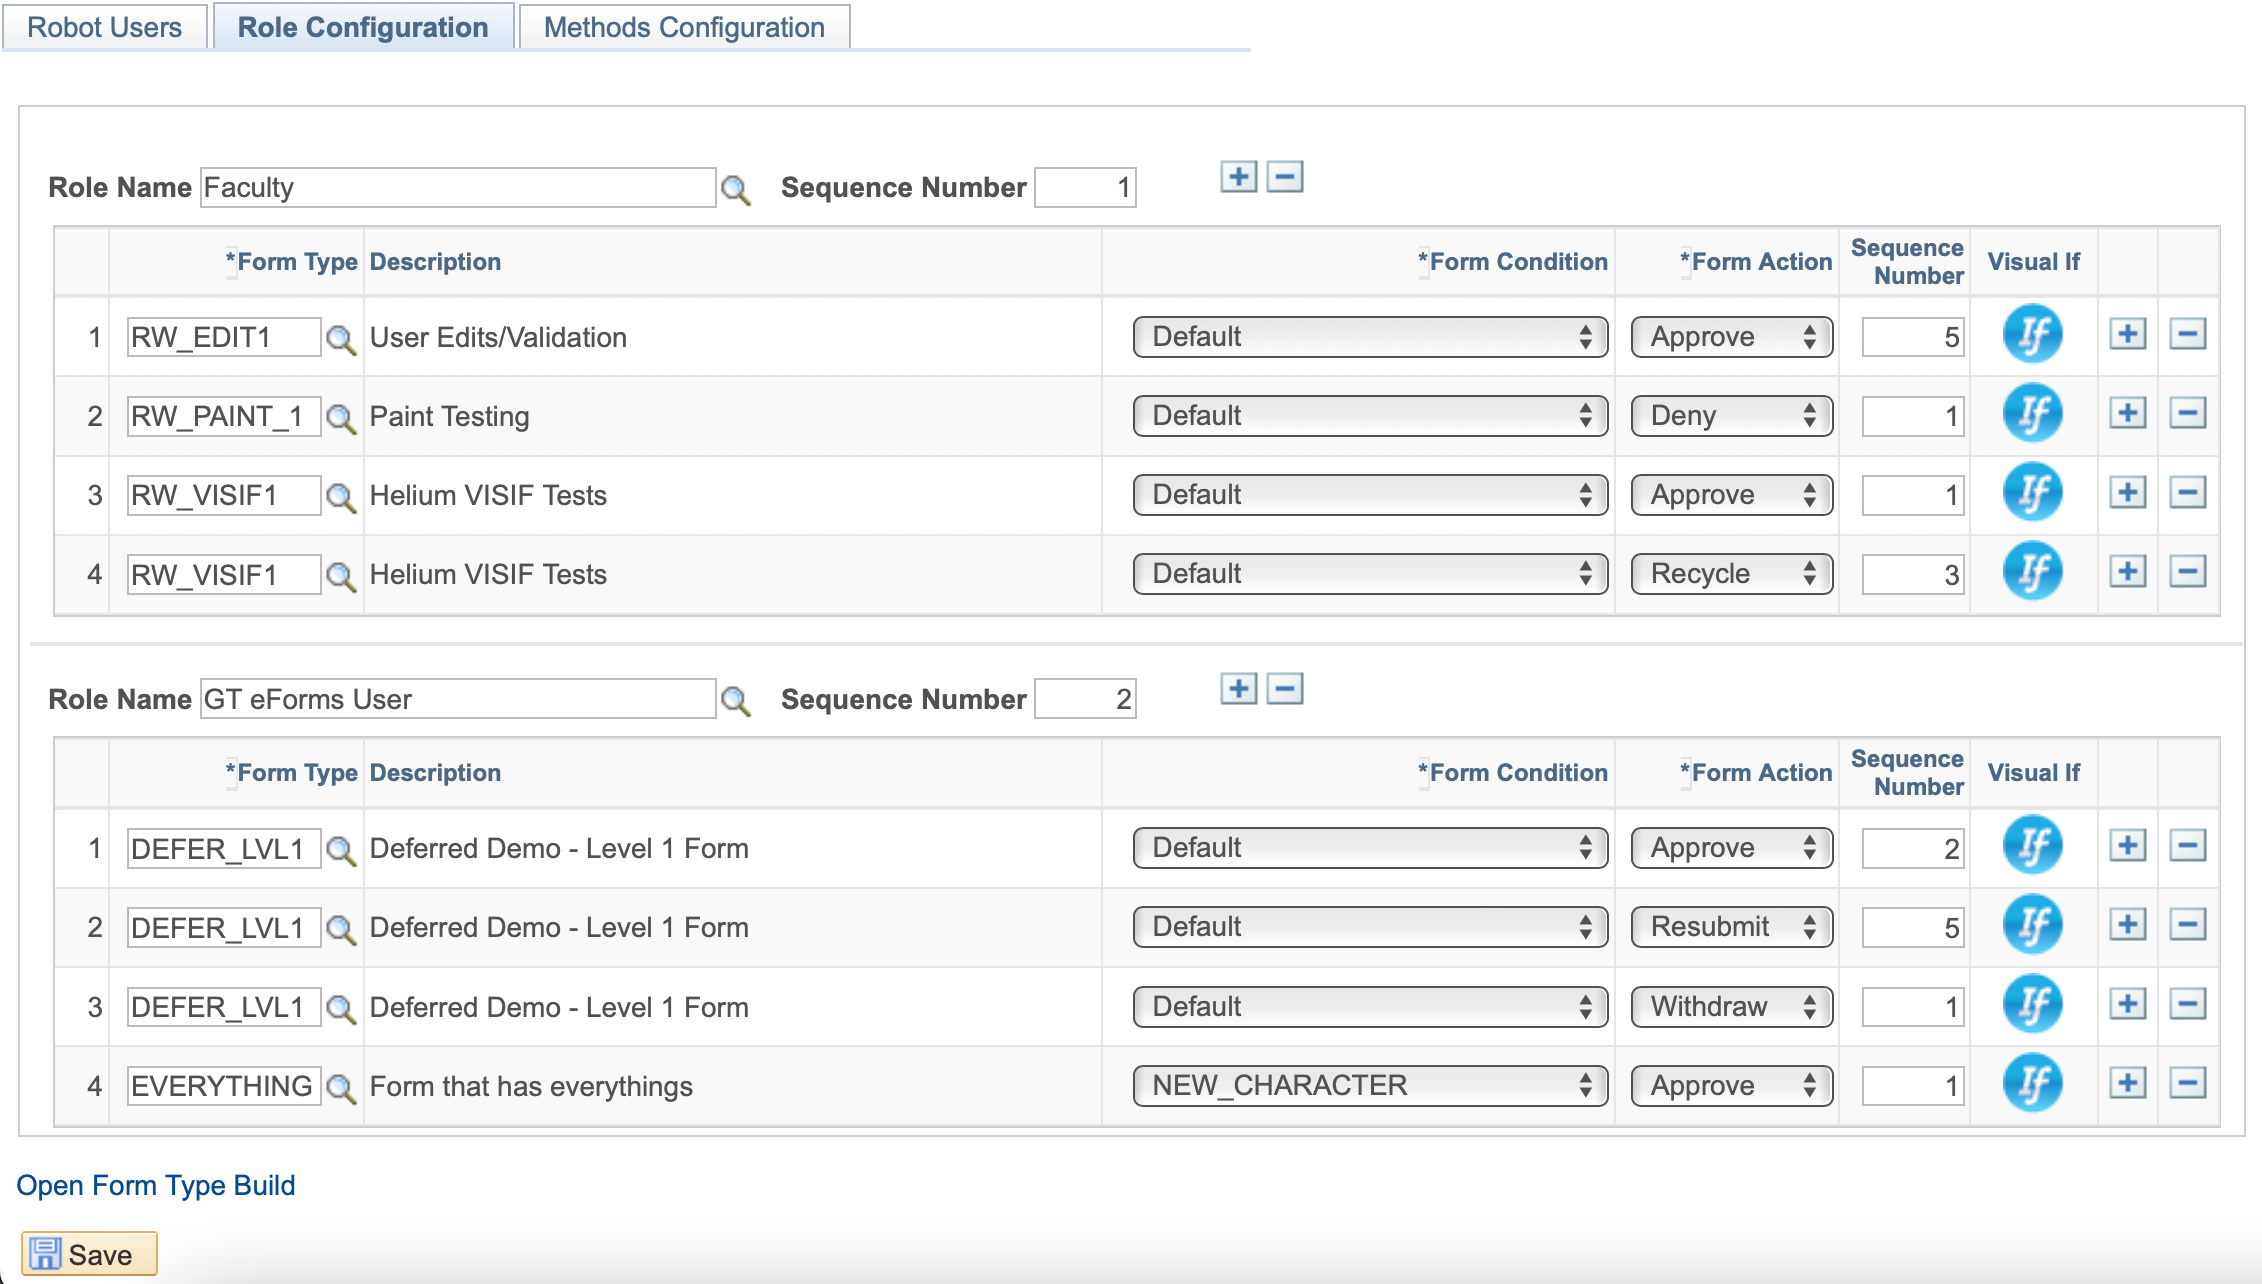
On this tab, you will configure the roles, forms, and logic that determine when the robot user should act. Just as you can add multiple robot users, you can have multiple roles, forms, and actions per robot user.
This tab functions similarly to rules in Microsoft Outlook. You can define rules (in our case, visual ifs) which will perform automated actions on your form, like how those rules take actions on your emails. You can apply multiple rules for the same form type in the order you want them to apply. These rules can apply to different actions -- or the same actions in different circumstances -- depending on the criteria you set through the visual ifs.
For Helium Performance forms, every time you add or update a visual if, you will need to run the form build process for the visual if logic to be added to the dependency network. For convenience, a link to the Form Type Build page has been added to the bottom of this tab.
| FIELD | VALUE |
|---|---|
| Role Name | Enter the role the robot user has and that you want them to act as |
| Sequence Number | Enter the sequence for the order in which the rules should be processed |
| Add (button) | Adds a row to add additional roles |
| Delete (button) | Removes the current role configuration |
| Form Type | Select the form type for the robot to act on |
| Description | Read-only field that populates with the description of the selected form type |
| Form Condition | Select the form condition for the robot to act on |
| Form Action | Select the form action for the robot user to take |
| Sequence Number | Enter the number for the order in which you want the visual ifs to run for the same form type |
| Visual If | Enter the logic for the scenario where the robot user should take the selected form action on the selected form type/condition |
| Add Row (button) | Adds a row to add additional form actions |
| Delete Row (button) | Removes the corresponding form action row |
| Open Form Type Build (link) | Click to open the Form Type Build page in a new tab/window Note: The form build process needs to be run every time a new visual if is added or a change is made to an existing visual if for a form type that is using Helium Performance. |
Methods Configuration Tab
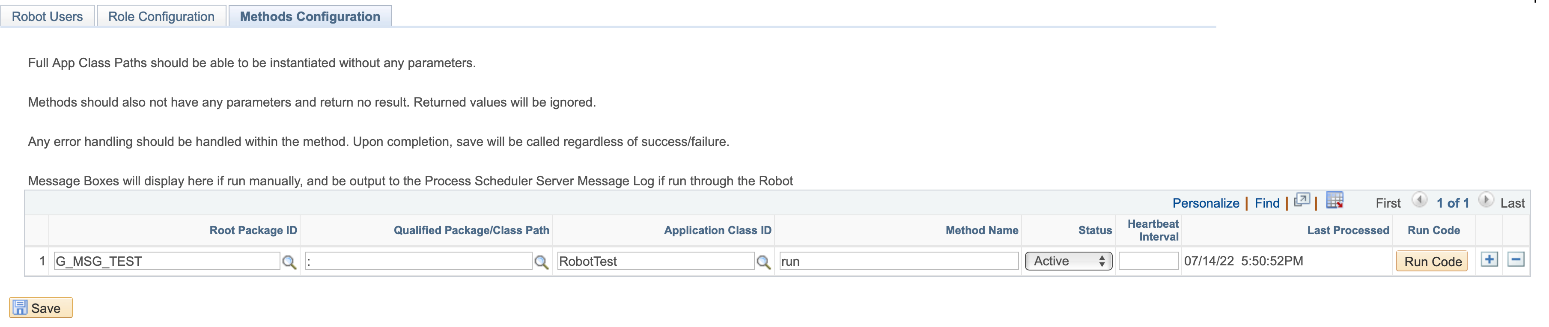
What happens if you have processes that you want to run automatically outside of the form context? The Methods Configuration tab is the place for you! This table allows you to automate anything, like automatically running the bolt-on Batch Tool to create forms, using code in an App Package. Once you set it to active, you can also set a Heartbeat Interval for how often you want the process to run.
| FIELD | VALUE |
|---|---|
| Root Package ID | Enter the Application Package that contains the code |
| Qualified Package/ Class Path | Enter the Path used in the code |
| Application Class ID | Enter the Class ID used in the code |
| Method Name | Enter the Method used in the Code |
| Status | Set to “Active” to turn on processing or “Inactive” to stop processing |
| Heartbeat Interval | Enter the number of minutes you want to pass between re-running the same process. This is similar to the Heartbeat Interval on the Robot Users tab. See above for details. |
| Last Processed | Read-only field that displays the last time the method was processed |
| Run Code (button) | Manually runs the process for the tasks in the queue to check if the heartbeat interval has passed yet and if so, runs the processes defined in the method |
| Add Row (button) | Adds a row to add additional methods |
| Delete Row (button) | Removes the current row |
Appendix A – Initial PeopleSoft Setup
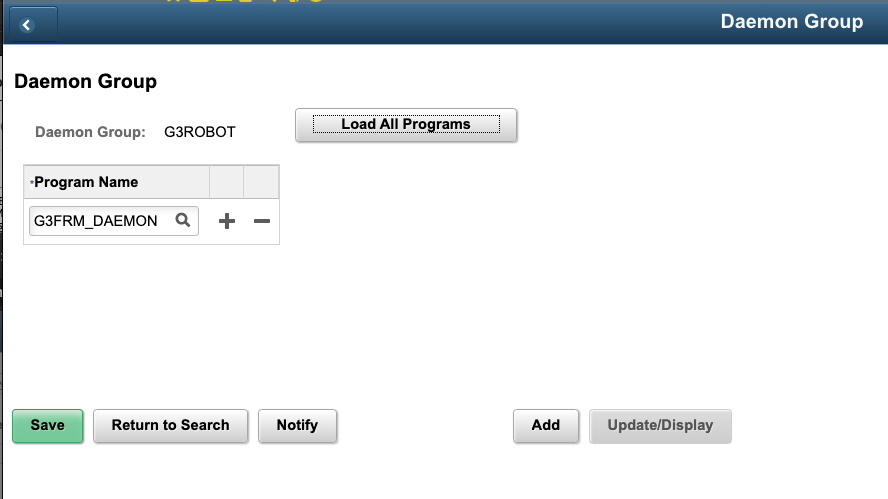
Create a Daemon Group
If you are using a Daemon group already, you may choose to add the process to that existing group. If not, follow the steps below to create a new group.
-
Navigate to PeopleTools > Process Scheduler > Daemon Group
-
Add a new value, such as G3ROBOT
-
Add Program:
G3FRM_DAEMON -
Save
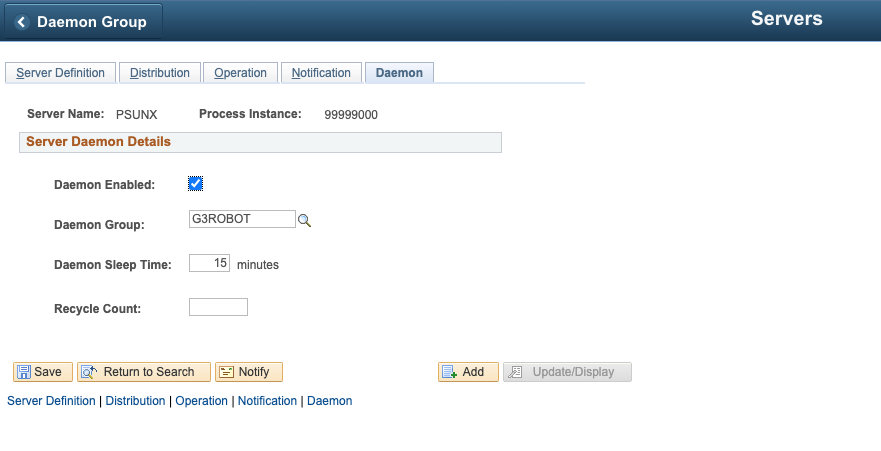
Attach Daemon Group to Process Scheduler Server Definition
-
Navigate to PeopleTools > Process Scheduler > Servers
-
Select your Process Scheduler Server
-
On the Daemon tab
- Select
Daemon Enabled - Type or Select the Daemon Group you created/modified earlier (G3ROBOT)
- Set sleep time
- This time will be how often the process runs
- Select
-
Save
-
Before this change will take place, the process scheduler must be restarted by an admin
Robot User Setup
Optionally Create Robot User
You could use an actual user as a robot (the forms will route to and look like that person approved them) or you can create a standalone user in PeopleSoft which will approve and show on the transaction log. Create this user as you would any other.
- Navigate to PeopleTools > Security > User Profiles > User Profiles
- Add a new value (i.e.GTROBOT)
- Assign roles that will be associated later for the rules setup (i.e. GT eForms User)