Transporter Tool
GT eForms features an API to enable web service integration for the GT eForms Transporter. This makes it possible to automate the migration of a GT eForm from one Peoplesoft environment to another. The Transporter Tool presented in this document is a front-end to this API providing the same features. It is also used to monitor transporter API requests instigated by web services.
If the migration does not need to be automated, users should use the standard tool by navigating to Manage GT eForms 3.x > GT Form Transporter.
This tool is only accessible to users with the G3FORMTECH or G3FORMADMIN permission list, and some items may require additional PeopleSoft security. Please refer to PeopleBooks, if needed.
Navigation: Manage GT eForms 3.x > GT Utilities > Transporter Tool
'Transporter Request' Tab
'Export via Attachment' Option
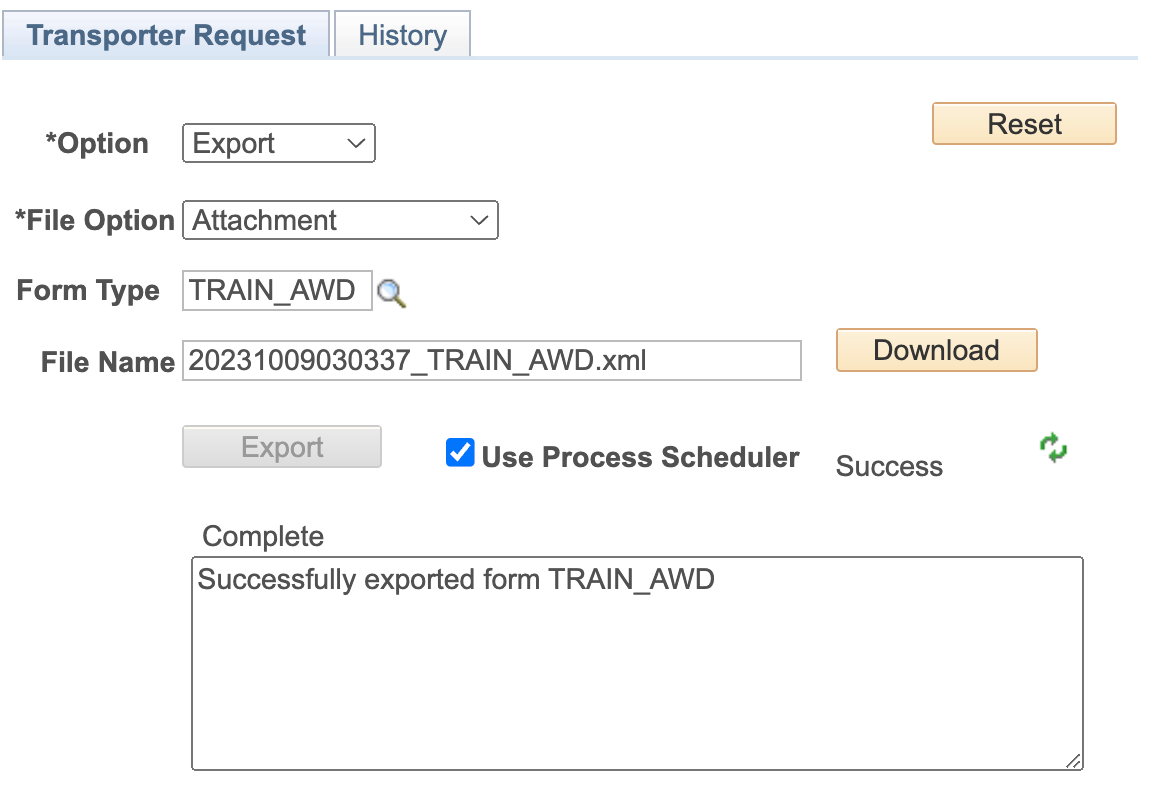
| Field | Value/Use |
|---|---|
| Reset (button) | Resets the tool to take another action and clears out the Form Type, File Name, and Log fields |
| Option | Dropdown: Export or Import Select desired action |
| File Option | Dropdown: Attachment, Path/Address, URL ID Select the desired location to store the file |
| Form Type | Use the lookup to select the desired form type in the environment to export |
| File Name | *Hidden Until Export Complete* Displays the name of the file created |
| Download (button) | *Hidden Until Export Complete* Click to download the file |
| Export (button) | Click to export the selected Form Type to the configured file location. Note: The button will be disabled until the Form Type is provided. Once the export is complete, the button will be disabled again and can be reenabled after clicking the “Reset” button. |
| Use Process Scheduler (button) | If you wish to run the process via the process scheduler, check this box prior to clicking the “Export” button. If checked, once the export is started, users can use the green arrows to refresh and see the process status. |
| Log (message box) | After the Export button is clicked, displays the results of the process and any messages returned about the process |
Export via Path/Address Option
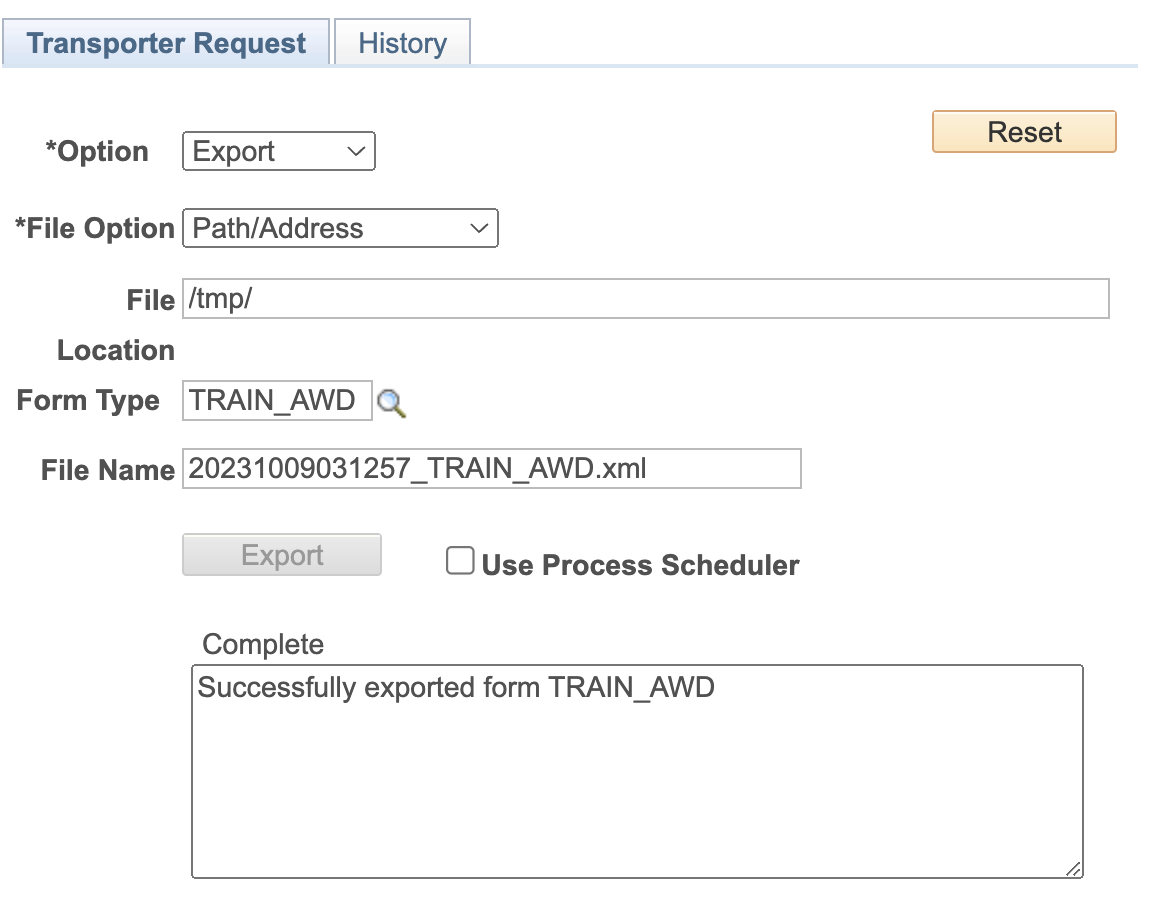
| Field | Value/Use |
|---|---|
| Reset (button) | Resets the tool to take another action and clears out the Form Type, File Name, and Log fields |
| Option | Dropdown: Export or Import Select desired action |
| File Option | Dropdown: Attachment, Path/Address, URL ID Select the desired location to store the file |
| File Location | Manually enter the address for the file to be stored |
| Form Type | Use the lookup to select the desired form in the environment to export |
| File Name | *Hidden Until Export Complete* Displays the name of the file created |
| Export (button) | Click to export the selected Form Type to the configured file location. Note: The button will be disabled until the File Location and Form Type are provided. Once the export is complete, the button will be disabled again and can be reenabled after clicking the “Reset” button. |
| Use Process Scheduler (button) | If you wish to run the process via the process scheduler, check this box prior to clicking the “Export” button. If checked, once the export is started, users can use the green arrows to refresh and see the process status. |
| Log (message box) | After the Export button is clicked, displays the results of the process and any messages returned about the process |
Export via URL ID Option
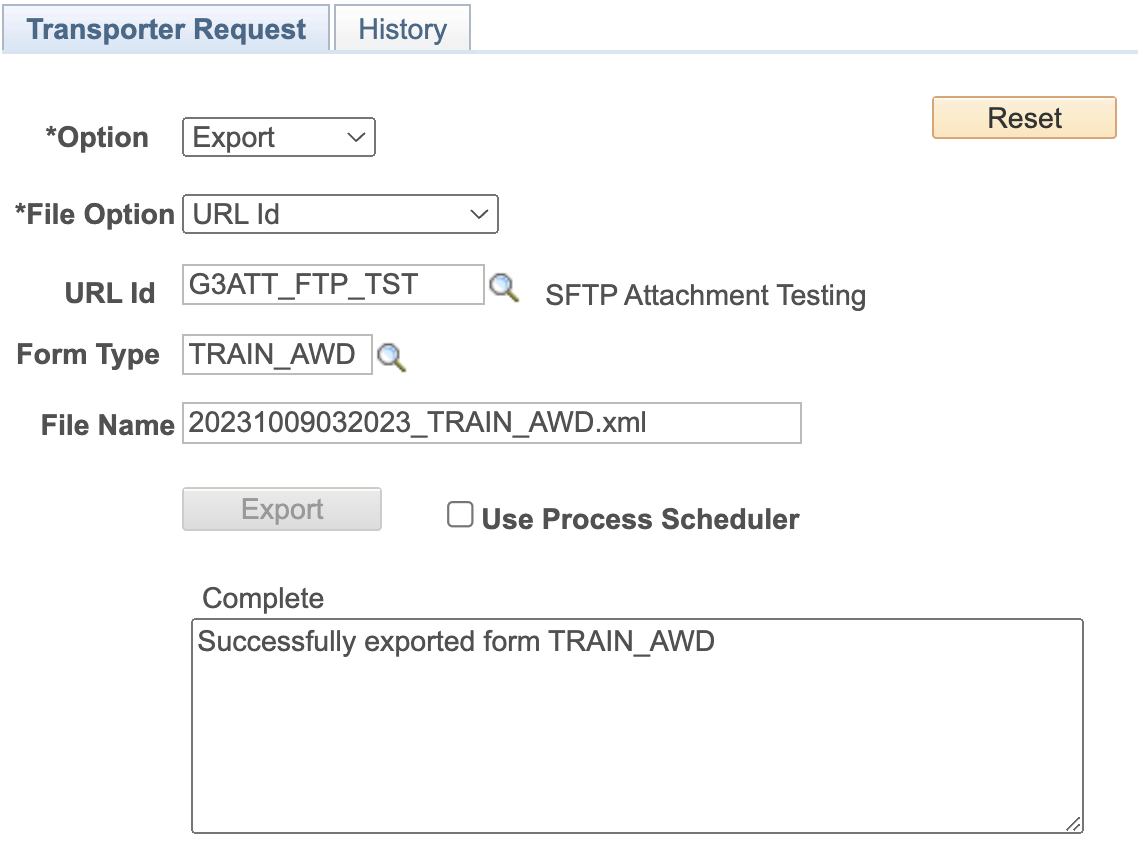
| Field | Value/Use |
|---|---|
| Reset (button) | Resets the tool to take another action and clears out the Form Type, File Name, and Log fields |
| Option | Dropdown: Export or Import Select desired action |
| File Option | Dropdown: Attachment, Path/Address, URL ID Select the desired location to store the file |
| URL ID | Use the lookup to select the desired URL where you wish the file to be stored. To create a new URL ID in PeopleSoft, please review PeopleBooks. |
| Form Type | Use the lookup to select the desired form in the environment to export |
| File Name | *Hidden Until Export Complete* Displays the name of the file created |
| Export (button) | Click to export the selected Form Type to the configured file location. Note: The button will be disabled until the URL ID and Form Type are provided. Once the export is complete, the button will be disabled again and can be reenabled after clicking the “Reset” button. |
| Use Process Scheduler (button) | If you wish to run the process via the process scheduler, check this box prior to clicking the “Export” button. If checked, once the export is started, users can use the green arrows to refresh and see the process status. |
| Log (message box) | After the Export button is clicked, displays the results of the process and any messages returned about the process |
Import via Attachment Option
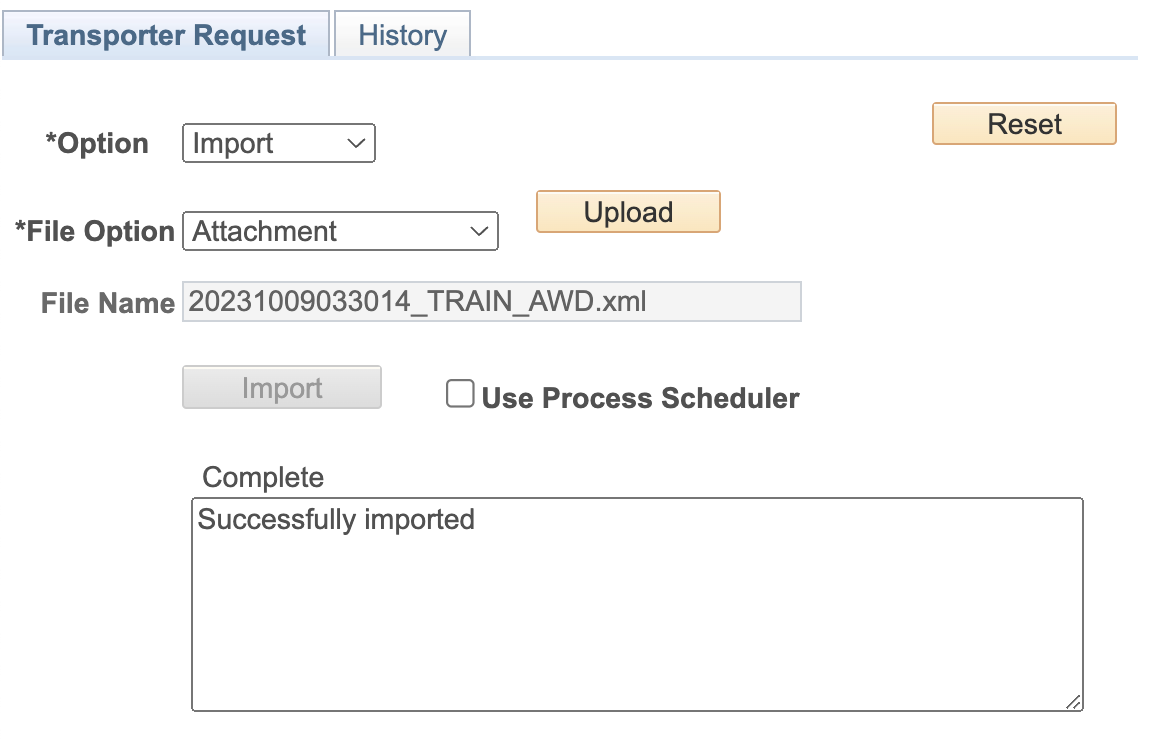
| Field | Value/Use |
|---|---|
| Reset (button) | Resets the tool to take another action and clears out the File Name and Log fields |
| Option | Dropdown: Export or Import Select desired action |
| File Option | Dropdown: Attachment, Path/Address, URL ID Select the desired location to retrieve the XML file |
| Upload (button) | *Hidden Until Attachment Option is Selected* Click to select the desired XML file to upload |
| File Name | *Hidden Until File is Uploaded * Displays the name of the XML file uploaded |
| Import (button) | Click to import the selected XML file from the configured file location. Note: The button will be disabled until the File Name is provided. Once the import is complete, the button will be disabled again and can be reenabled after clicking the “Reset” button. |
| Use Process Scheduler (button) | If you wish to run the process via the process scheduler, check this box prior to clicking the “Import” button. If checked, once the import is started, users can use the green arrows to refresh and see the process status. |
| Log (message box) | After the Import button is clicked, displays the results of the process and any messages returned about the process |
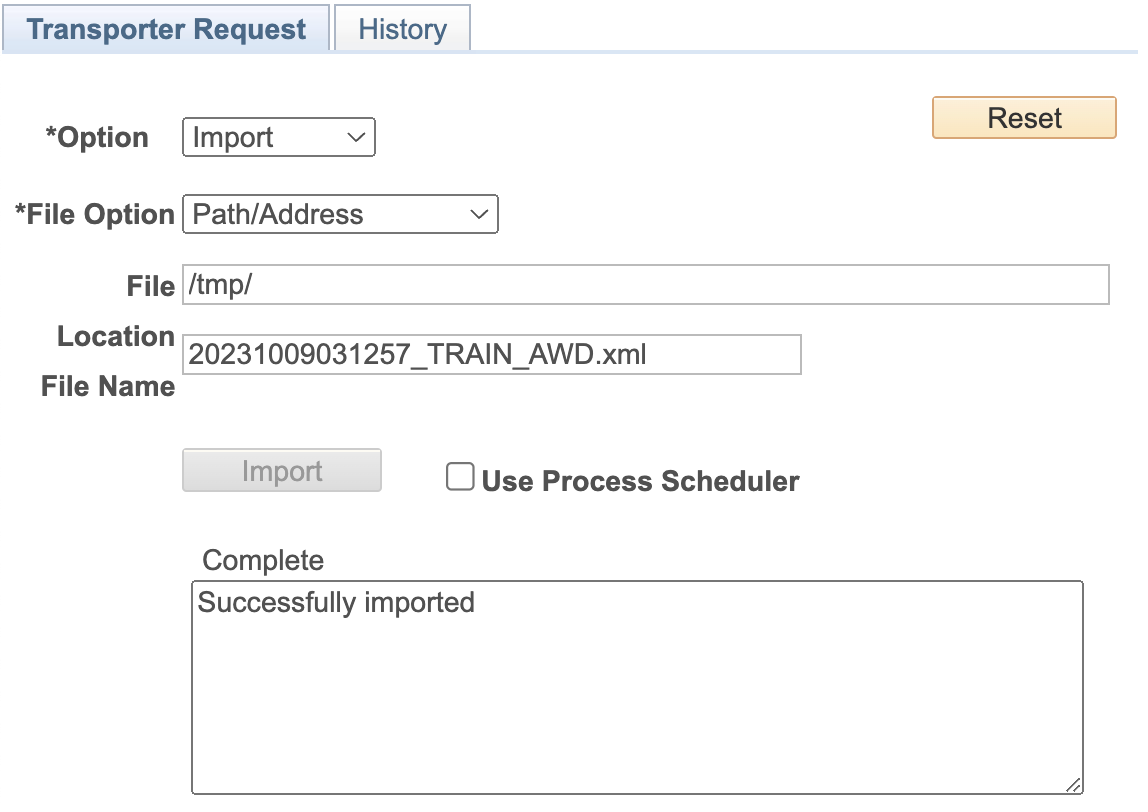
Import via Path/Address Option
| Field | Value/Use |
|---|---|
| Reset (button) | Resets the tool to take another action and clears out the File Location, File Name, and Log fields |
| Option | Dropdown: Export or Import Select desired action |
| File Option | Dropdown: Attachment, Path/Address, URL ID Select the desired location to retrieve the XML file |
| File Location | *Hidden Until Path/Address Option is Selected* Manually enter the address for the XML file to be retrieved |
| File Name | *Hidden Until Path/Address Option is Selected* Manually enter the name of the XML file to be retrieved |
| Import (button) | Click to import the XML file from the configured file location. Note: The button will be disabled until the File Name is provided. Once the import is complete, the button will be disabled again and can be reenabled after clicking the “Reset” button. |
| Use Process Scheduler (button) | If you wish to run the process via the process scheduler, check this box prior to clicking the “Import” button. If checked, once the import is started, users can use the green arrows to refresh and see the process status. |
| Log (message box) | After the Import button is clicked, displays the results of the process and any messages returned about the process |
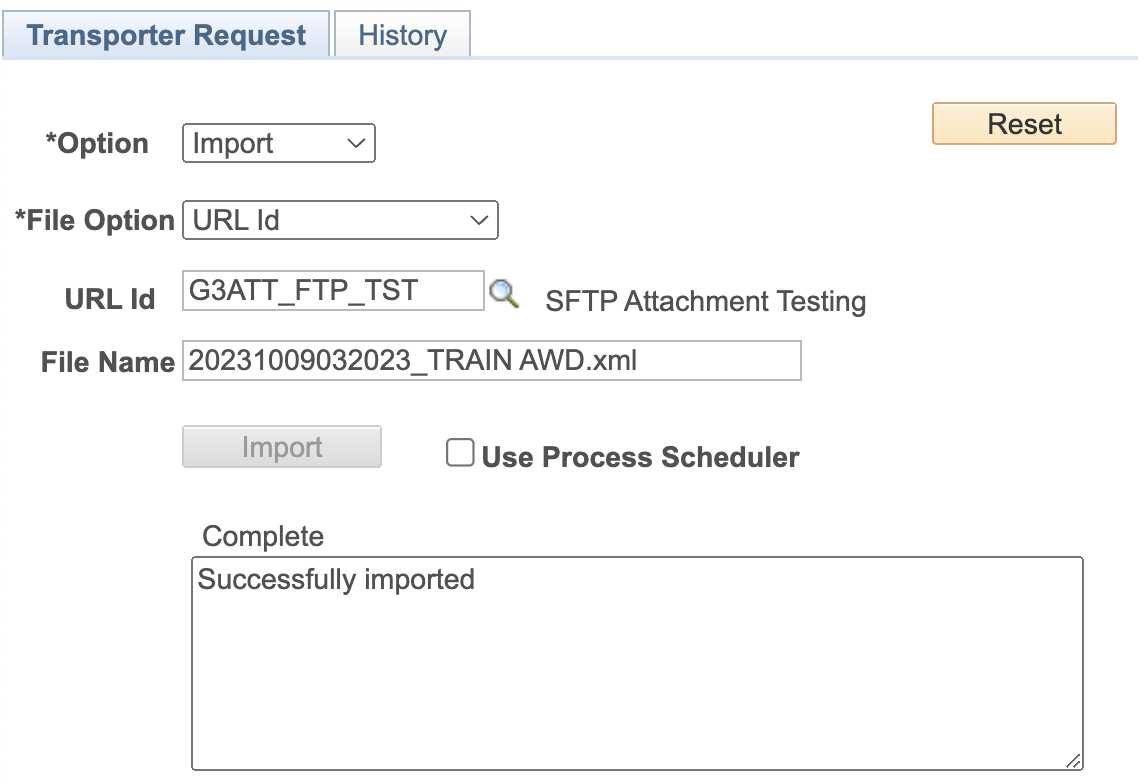
Import via URL ID Option
| Field | Value/Use |
|---|---|
| Reset (button) | Resets the tool to take another action and clears out the File Name and Log fields |
| Option | Dropdown: Export or Import Select desired action |
| File Option | Dropdown: Attachment, Path/Address, URL ID Select the desired location to retrieve the XML file |
| URL ID | *Hidden Until URL ID Option is Selected* Use the lookup to select the desired URL where the XML file can be retrieved. To create a new URL ID in PeopleSoft, please review PeopleBooks. |
| File Name | *Hidden Until Path/Address Option is Selected* Manually enter the name of the XML file to be retrieved |
| Import (button) | Click to import the XML file from the configured file location. Note: The button will be disabled until the File Name is provided. Once the import is complete, the button will be disabled again and can be reenabled after clicking the “Reset” button. |
| Use Process Scheduler (button) | If you wish to run the process via the process scheduler, check this box prior to clicking the “Import” button. If checked, once the import is started, users can use the green arrows to refresh and see the process status. |
| Log (message box) | After the Import button is clicked, displays the results of the process and any messages returned about the process |
'History' Tab

| Field | Value/Use |
|---|---|
| Reset (button) | Clears out the Action and Form Type search fields |
| Action | Dropdown: Export or Import Filter search results by the selected action |
| Form Type | Filter search results by selected form type |
| Search (button) | Click to search for transporter requests which are displayed below. The search is filtered by any supplied parameters. Note: Only the last 300 requests will be displayed. |
| Action | Displays if the transaction was for an export or import request |
| ID | Displays the unique identifier for the request |
| Request Status | Displays if the request was either successful or errored |
| File Name | Displays the name of the file used in the request |
| Request Date | Displays the date and time the request was made |
| Form Type | Displays the form type that was used in the request |
| Re-Import (button) | *Only visible if Import request fails* Click to rerun the import process |
| Export Details (link) | *Only visible for Import requests* Opens a modal window and displays the Database, Exported Date, Exported By, and eForms Version of the XML retrieved that was imported |
| Instance (grid) | Displays a row for each time the request was run, and any messages returned from the process |
| Request Results (message box) | Displays the last messages returned about the request |