GT eForms 3.14.15 Release Notes
February is for lovers, and we love you, our clients. We decided to celebrate this love for you by releasing our next service pack. We had a busy 2018. It was full of projects that lead to framework enhancements, and we also made sure to carve out some time to work on those top enhancement requests coming in from you. See how many you recognize as you read through the notes below.
Are you thinking what I am thinking?
A new service pack release means we are taking requests for what will make it into the next service pack!!!

Err…. maybe that isn’t exactly what you were thinking, but maybe you should be. If you do have any suggestions you want to vote for, send them on in through the support channel (support@gideontaylor.com). Now is the perfect time.
Okay I will get back to what most people were probably thinking. The hope that this service pack release is crammed full of new, awesome features that will make your job easier. We share that hope and make it the goal of each release. We hope as you read through the release notes below, that you find at least one new thing that makes you a bit giddy. I know I have my favorites.
I will stop stalling and get on with it already. Our story begins on a very snowy day in Utah as the GTers begin their preparations… (oooooohhhhhhh, queue the dark, mystical, and intriguing music)
Installation Prep
How should you prepare to install this Service Pack?
- Review these Release Notes and make notes along the way of any items that might require special testing or End-User communication.
- Visit the GT Self Service portal to review updated product documentation and tips’n’tricks.
- Carefully review all Installation Instructions (IMPORTANT, very important).
- Complete regression testing for your forms prior to moving to production.
- Contact the GT Support Center with any questions. We are here to help.
Important Note
There are some new features that require additional steps to implement, beyond installing the provided installation package. The Installation Instructions should take you through step-by-step, but please make sure you pay special attention to the following:
- ALTER Records when building the project. DO NOT RUN A DESTRUCTIVE ALTER OR BUILD or you will lose all your form data!!!
- Prompt functionality is improved, but this also means changed. More details are below, but make sure you test the prompts in your form before going live.
- A few menu items changed locations. It is a secret test to see if you read the release notes or not. Not really, but really, you should read the notes below.
Favorite New Features
I told you that I had my favorite things in this release, and being my favorite means that you get more air time in the release notes.
The Headliner – Form Migration
Creating a quick, easy, and efficient process that will move the form configuration has been a work in progress. A labor of love. And sadly, a bit of a cluster. We started with the Data Migration page. We killed it and changed to the GT Copy Tool. The Copy Tool had so much cool functionality and promise in its younger years. However, lately, it picked up some terrible habits. Habits like killing forms completely, deleting stuff, forgetting stuff, and being a big jerk! So, we killed it too.
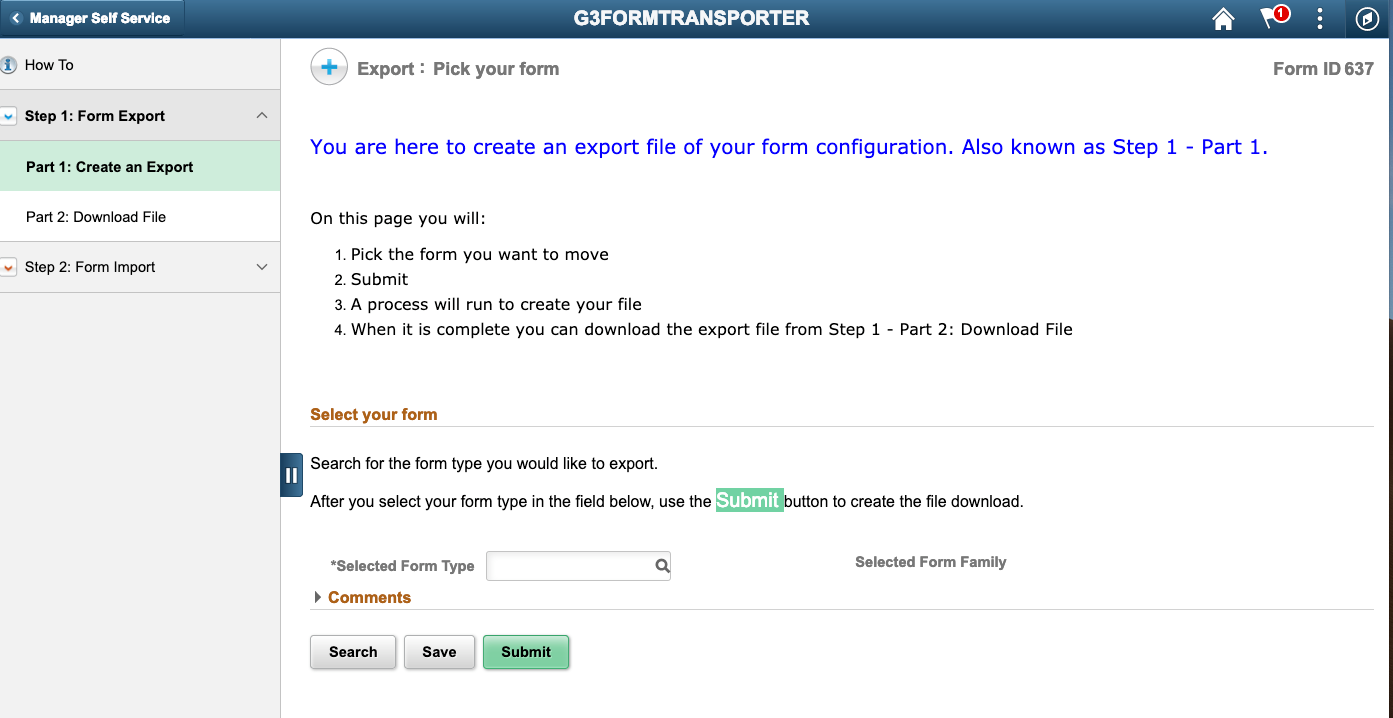
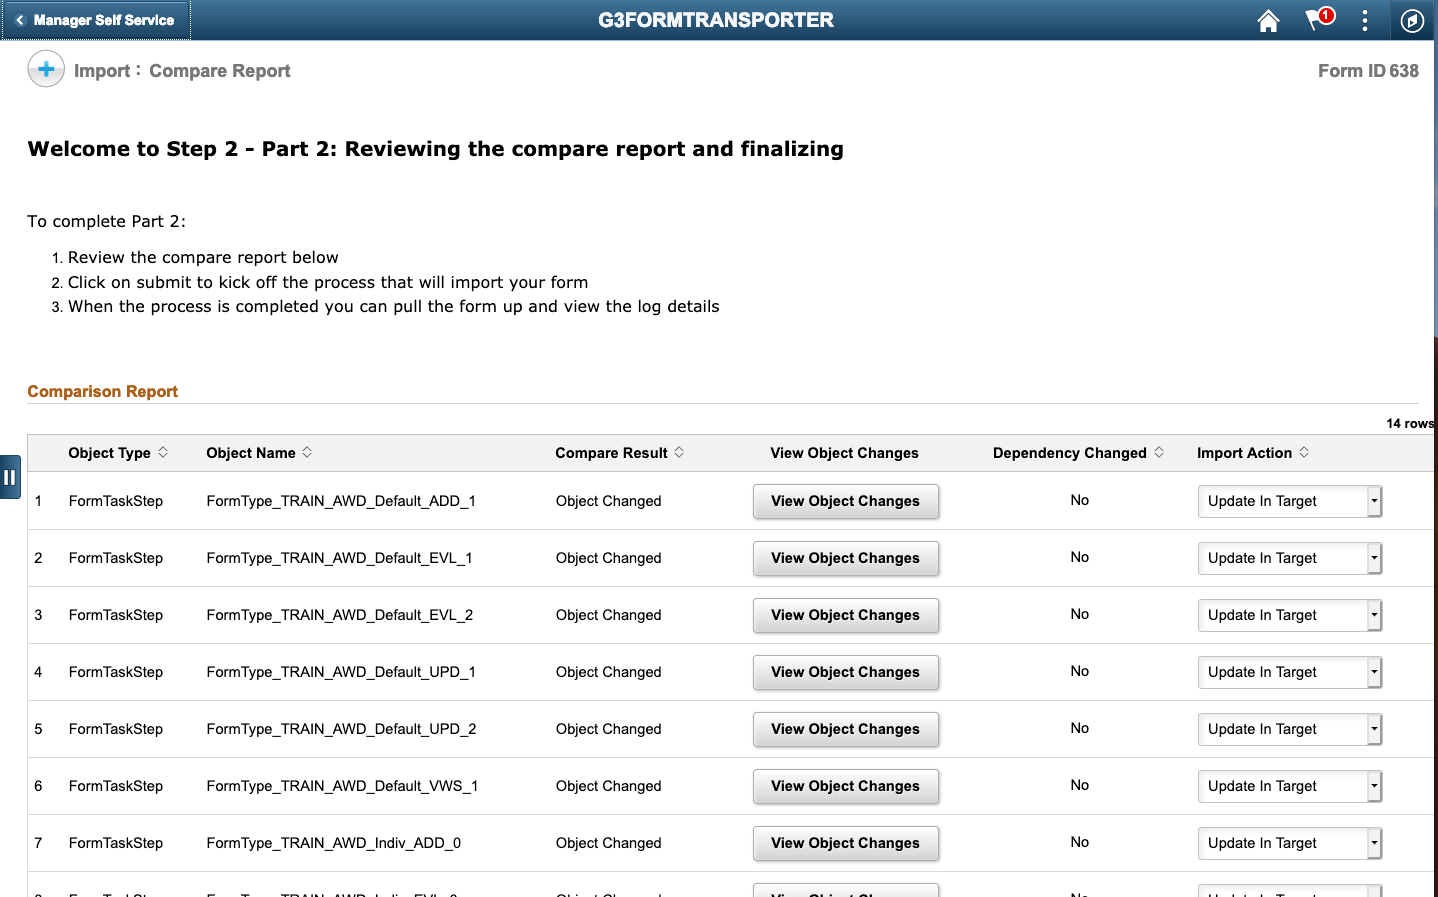
Introducing the much-improved GT Transporter. The code has been revamped. The user interface is all new and full of instructions as you work your way through the steps (it is actually built with 3 GT eForms, so cool). Most of all, we are hoping that moving forms will be a delightful experience…finally. Thank you to all of the clients who have provided feedback (even the bad stuff). You are helping us improve through your feedback and we are grateful.
Navigation: Main Menu > Manage GT eForms 3.x > Form Transporter
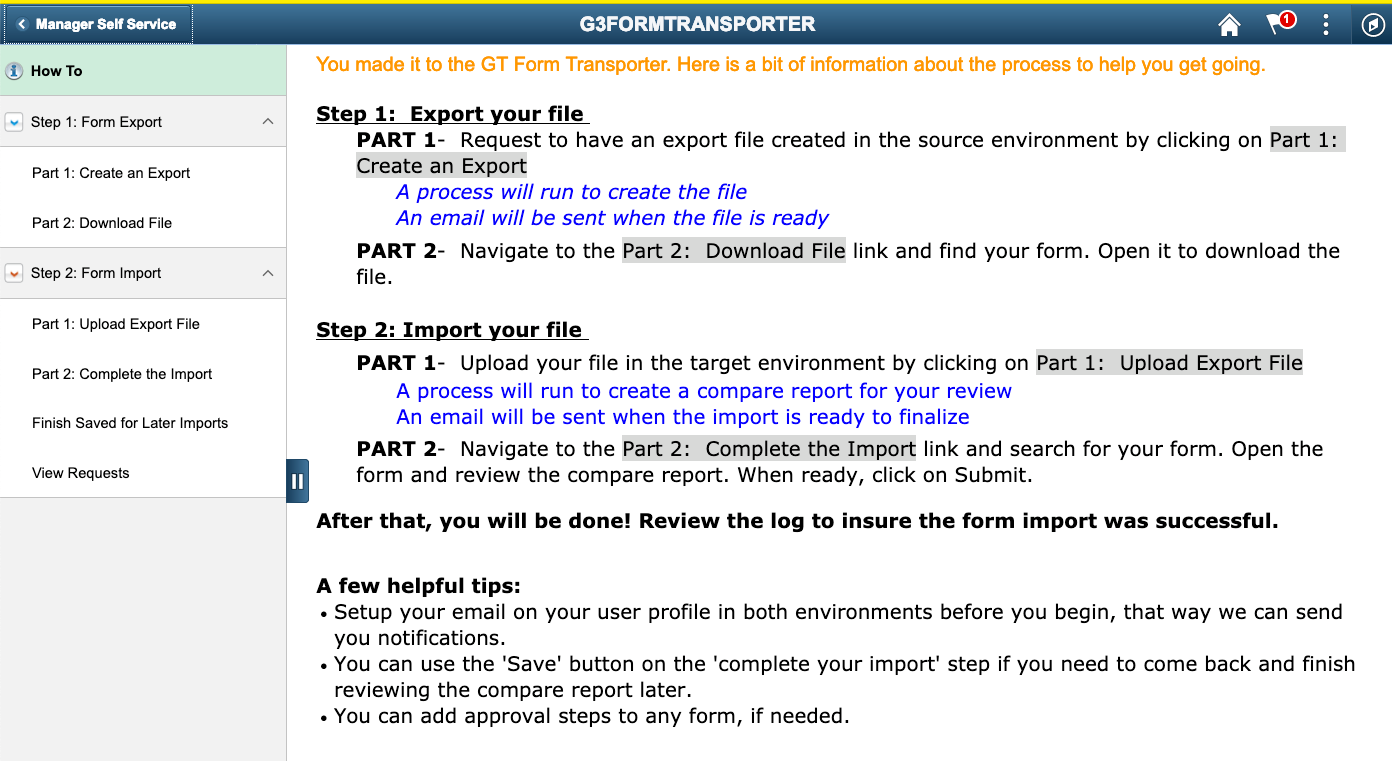
There are two main steps to move a form. Step 1, obtain a download file export of all your setup. Step 2, upload that file into your target environment and import. Yes, you are right. It is a bit more complex than that but there are friendly instructions to help you through the process as you go. We also have a document ready for your enjoyment. Here are a couple more images for your enjoyment.
Navigation Changes
I mentioned it a bit in the Installation Instructions that we changed a couple things up. These items are frequently used so you will want to hang in through this first section at least.
Setting Up a Form
We used to call it Create/Update an eForm. We were endlessly informed that the name was confusing, and we couldn’t disagree, so we changed. The location didn’t change, but the label did. It is now called boring old Form Setup. There is beauty in simplicity.
GT Admin Tool
You will now find the powerful GT Admin Tool in the main GT eForms folder. No more digging through the GT Utilities folder to find this powerhouse.
Form Engine
We picked a few themes to focus on when it came to the form engine: prompts, tracking changes, and enabling those with a desire to be verbose.
Prompts
Multiple Fields on Prompt Lookup
This one has been on the wish list for so long I nearly gave up hope (some might say I am a bit dramatic, cough, cough, Mr. Taylor, cough). Then this handsome feature came my way, and it sure is pretty.
Here is the state of prompts you have been living with:
- You add a prompt field on your form.
- You pick the record that contains the valid values.
- You pick the one, single, solitary, and lonely field to display next to that value.
- You get what you get and you don’t throw a fit (or you move up the scale of complexity to have a developer build out a custom prompt).
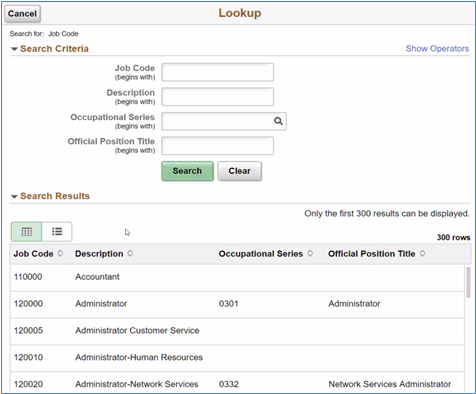
- You get something like what is shown below.
But what if you want more? What if you want options? What if you need to have more than one column in your prompt lookup to help users find the perfect value to select?
You got it!!!
Fear not. For those who aren’t ready for change or liked the simplicity of the original prompt setup, you can stick with it. We aren’t taking it away. Now there is a second option to pick “Show multifield prompt”. When this is selected, the prompt will show the keys and search keys set up on the record you select.
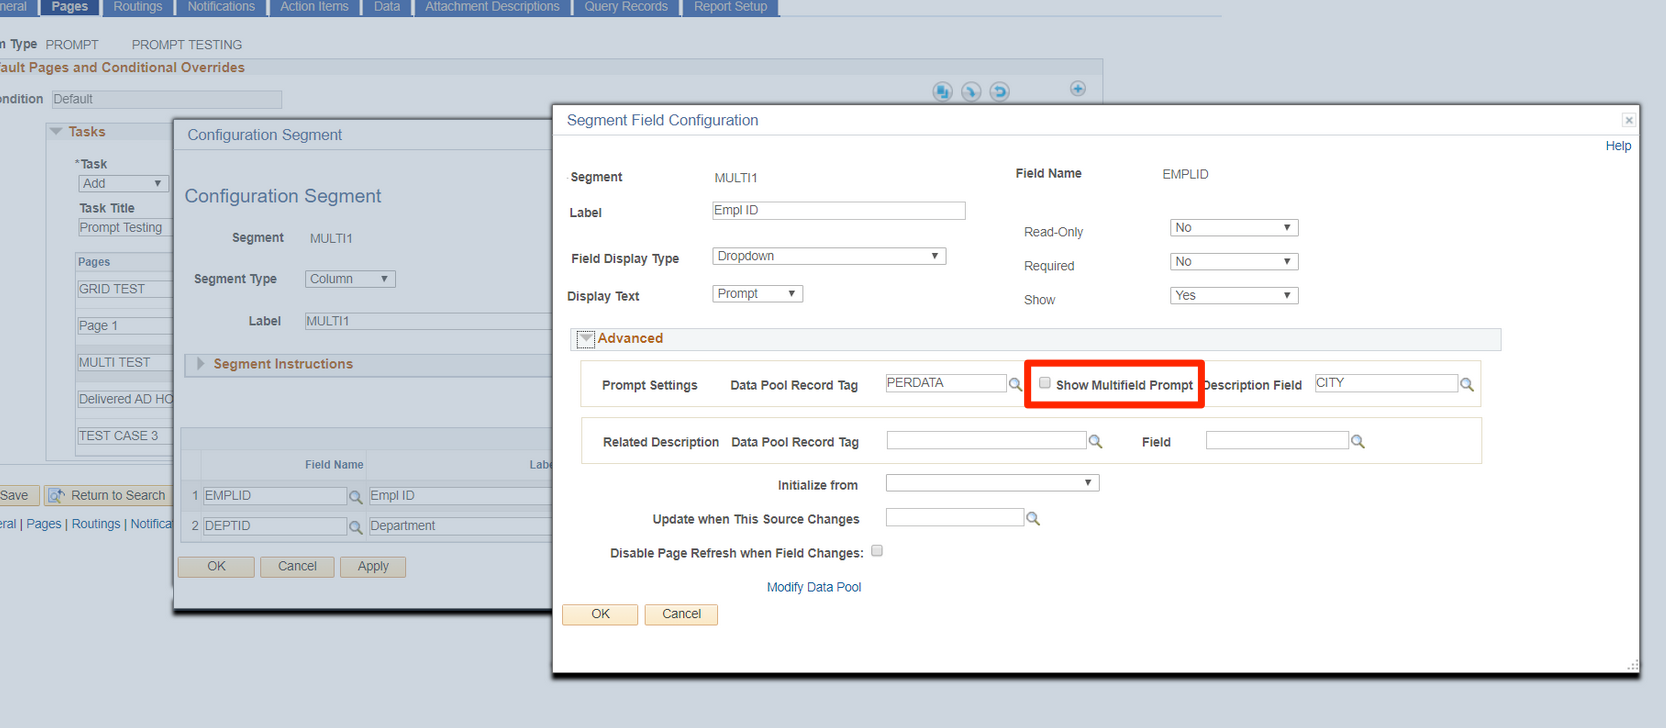
The result of clicking that checkbox looks a little something like this on the form.
Cascading Lookups
What is a cascading lookup? Field 1 controls the valid values for Field 2. Field 2 controls the valid values for Field 3. (It can go several levels deep, but you get the idea). In summary, valid values are defined based on previously selected values. If a higher-level value changes, then the valid values might not be valid anymore. If it isn’t valid, then the value must be cleared out.
This is where the complexity happens and why we had to change our approach. The good news is that the forms will now function in the same way other PeopleSoft cascading prompts work. The bad news is that it is possible your users might notice this change. You might want to adjust your form setup a bit to align with best practices (more below).
Pre-Change:
A user could skip over the higher-level key and go to the lower-level fields. They would see all values with no filtering, because the higher-level key is still blank. The user could select a value for the lower-level field then go populate the higher-level key field. This caused some issues and instigated a change.
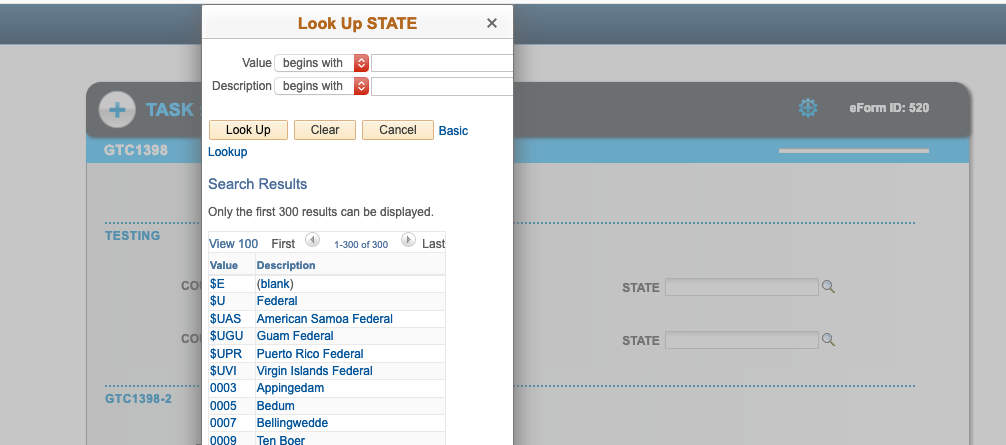
Post-Change:
Any fields that have a higher-level key will not show any prompt values until the higher-level key fields are populated. For example, if you have a State lookup that filters based on Country, then Country must be populated first in order to see prompt values in the State lookup.
| Sample Dropdown Where Lower-Level Field Opened First but is Blank |
|---|
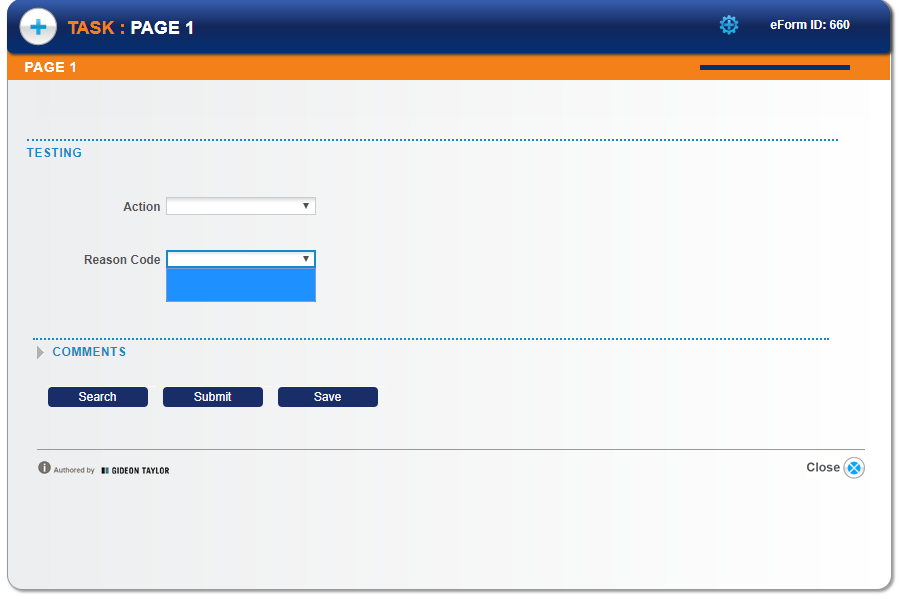 |
| Sample Prompt Where Lower-Level Field is Opened First but is Blank |
|---|
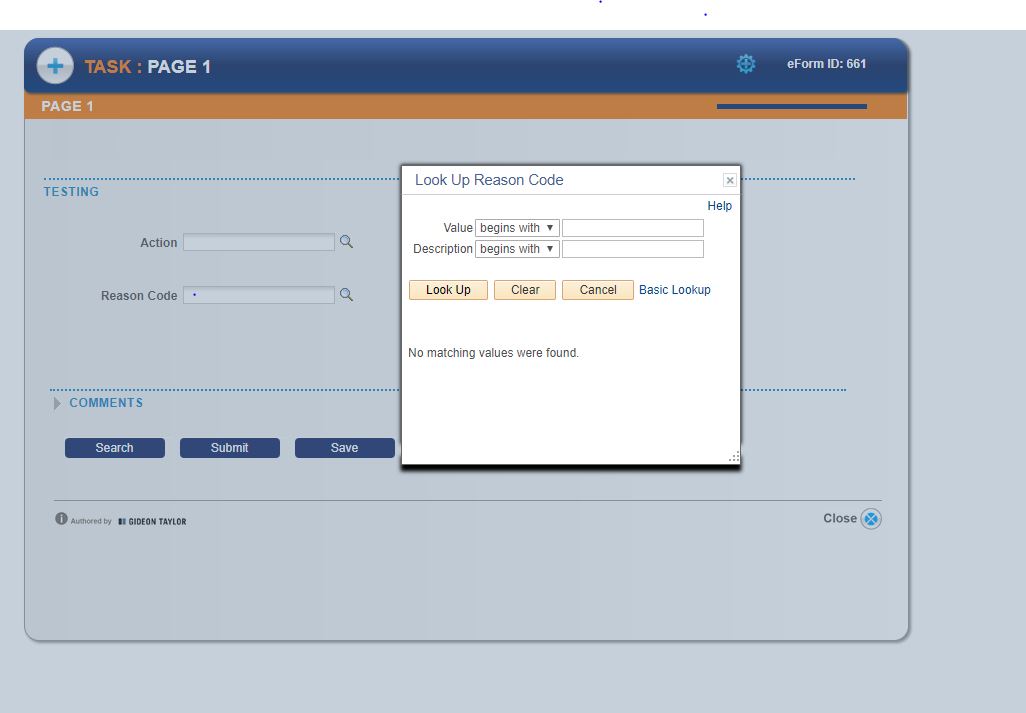 |
| Sample Prompt Where Higher-Level Key is Populated First so Lower-Level Field Appropriately Filters List of Values |
|---|
 |
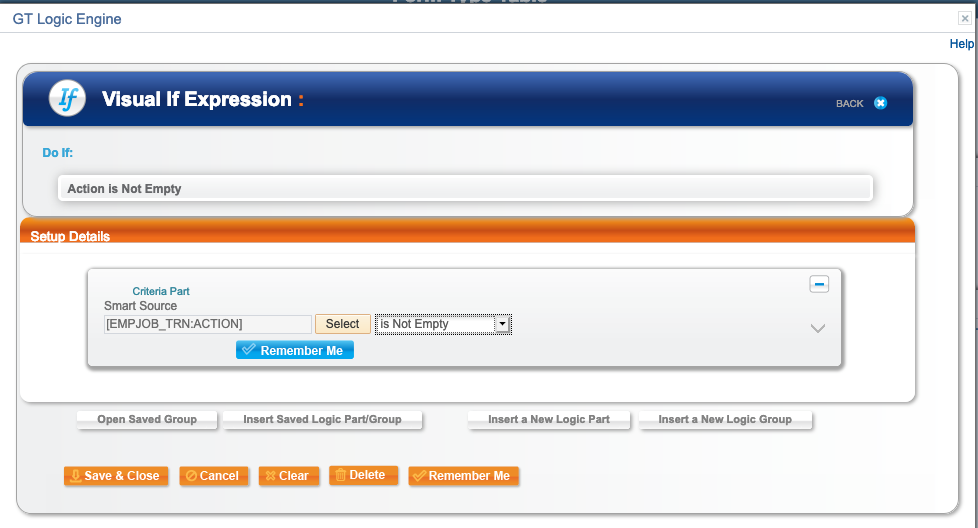
Best practice suggestion!
Best practice is to make lower key value fields display only or hide until the higher-level keys are populated using a quickly configured visual if. This will help the user logically walk through the fields in the right order and minimize confusion. An example of the visual if set up is shown below.
Dynamic Prompts
You can now use dynamic SQL in our field prompts just like in standard PeopleSoft development. Below is a sample business requirement that will benefit from this feature.
Create a prompt where the values in that prompt are based on two levels of dynamic logic that changes based on who is logged in:
1st - Security:
- Admin users can see everything in a list
- Managers can see only the stuff that pertains to them
- Regular users can only see one result
2nd - Supervisors vs Reports To:
- Almost all of the org does reports to
- A small portion of the org does supervisors
Which means the lookup will need to account for both kinds of security all the time in the SQL. This is a bit more technical. If you are on the functional side of the house, your takeaway is that developers have more power to create prompt views that meet your complex business requirements. Developers you can be excited that you can code prompts in GT the same way you are doing it in standard PS.
Track Changes
Highlight Changes and Version Control
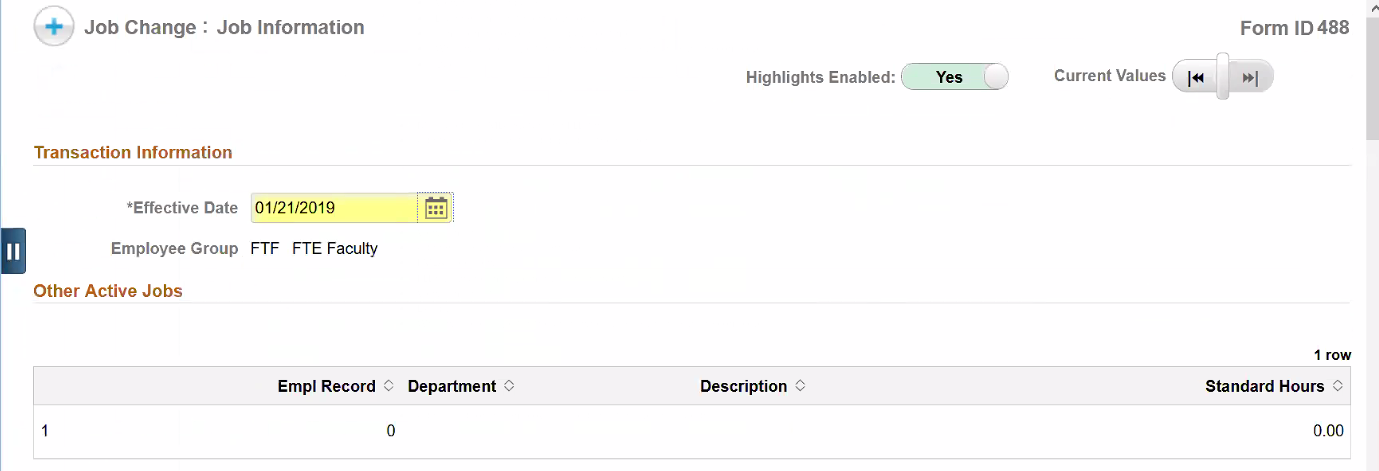
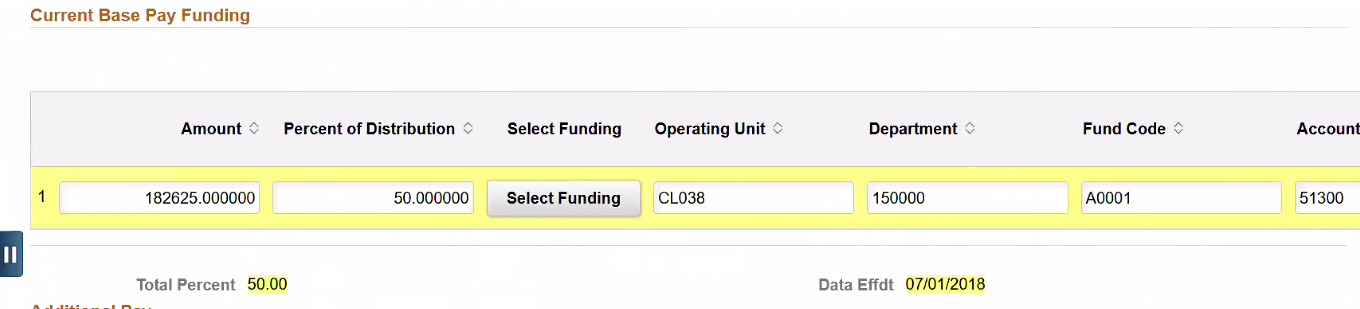
You can now see version history and track highlights on a fluid form (pretty similar to what was possible in classic). It looks pretty fancy and should be handy for those forms when you are initializing values and want to track changes. The toggle to turn it on and off at the form level is in the same place (General tab of Form Setup). Now it works when you check the Enable Highlights box and set the form style to fluid.
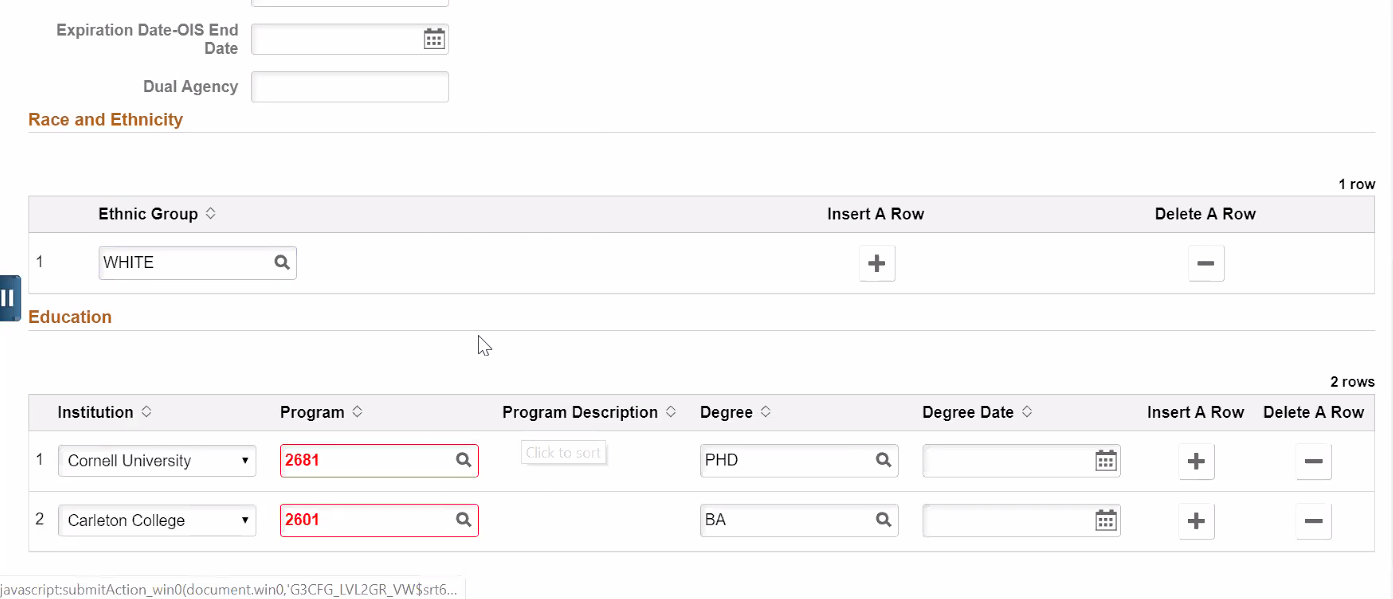
Invalid Value Highlighting on Initialize (Fluid Feature)
Just like the last one, this feature is for those forms that initialize with data. Ever load an invalid value into a form field only to realize that value was not valid?
Wait! How would an invalid value get into a form? By:
- Creating the form with code from another form
- Creating a form with code from a system integration
- Setting the initialize value using a smart source or constant value
Have you noticed an invalid value loaded during initialize? Yeah, probably not. Or if you did it took you and/or your users a while to figure out what was going on. Fear not, now those invalid values will show in the field in a lovely russet red color to attract attention without being offensive.
We are really excited about this one, because many of our clients are bringing data from other systems into Peoplesoft via an integration. These other systems are generally prone to having invalid values. Here is an idea of how you can use this feature to build forms that enhance your business processes. You can quickly create a form that initializes all the values you plan to pass through the integration. You can route the form to an appropriate approver who will be able to quickly identify the invalid values that are trying to be passed in, fix the values, and then approve the form to push it through to update the system. Let us know if you find an innovative new way to improve your business processes using this feature.
| Initialized Position Number is Not Valid |
|---|
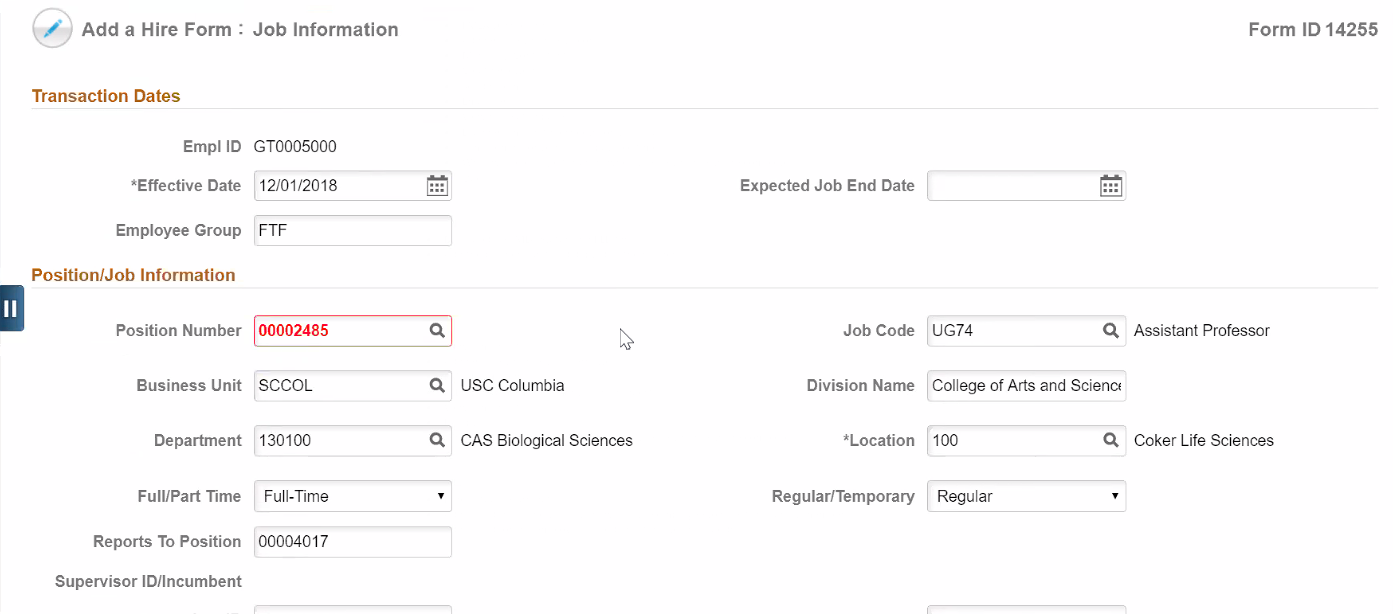 |
| Initialized Program Values Not Valid for Both Rows in Grid |
|---|
 |
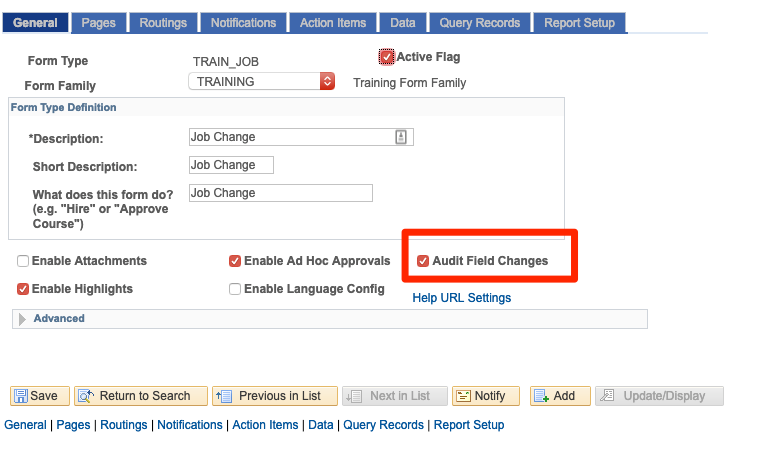
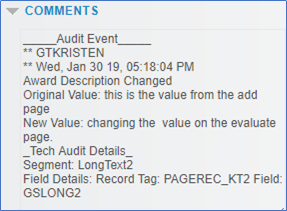
Audit Field Changes
And still…you want more. You want an audit history each time a field is changed. You want to be able to see what the value was, what did it change to, who did it, and when. You sure want a lot. You are smart and love the idea (thanks to the client who requested this one, you know who you are).
A checkbox is added to the General tab on Form Setup. This turns on field auditing for the given form type. If a field is changed in a task other than ADD, then it will create a system comment on the form to note the changes that were made. Yes, you read that right. It will track all the many versions throughout the lifecycle of the form and display those changes in the Comments section.
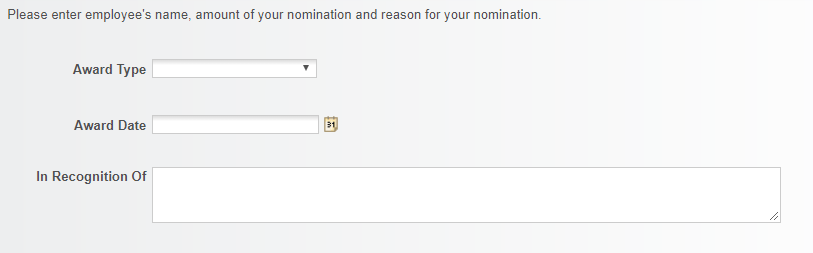
Big Fields, Big Labels
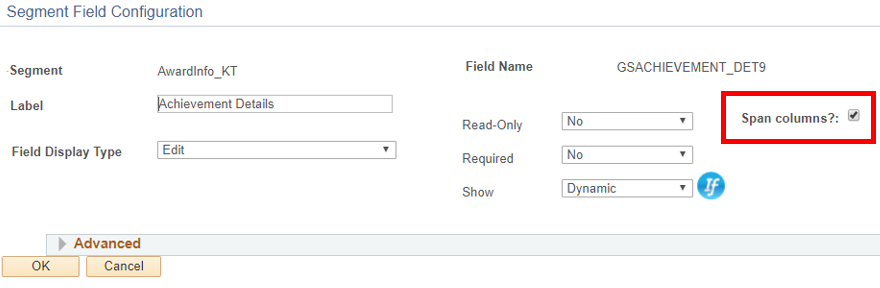
Long Text Field
Do you ever need a big ole text box where your form user can submit a short story? You are in luck. An "essay" field or “Span columns” option has been added for long text edit fields. You pick the type of long text and a checkbox magically appears on the field details page. If you check it, then this box will stretch right across your page. We are loving this new feature already.
Increased Field Label Length Limit
Field labels used to be limited to 30 characters, but it was difficult to say all the words that needed to be said. We increased the limit to 254 characters. However, the real limit is NOT 254 characters!!!
The limit is the number of characters you can fit in the space available before it starts to wrap over the top of something else. If you start to see wrapping then we suggest:
- Shorten your label.
- Switch to a fluid form. It does a much better job adjusting dynamically to the content that you throw at it.
- Apply a custom stylesheet to this form that can specifically handle the label length for your field.
- Create a custom page for this field in App Designer where you can have custom formatting to meet your design needs.
| Fluid Grid and Column Segments with Long Field Labels |
|---|
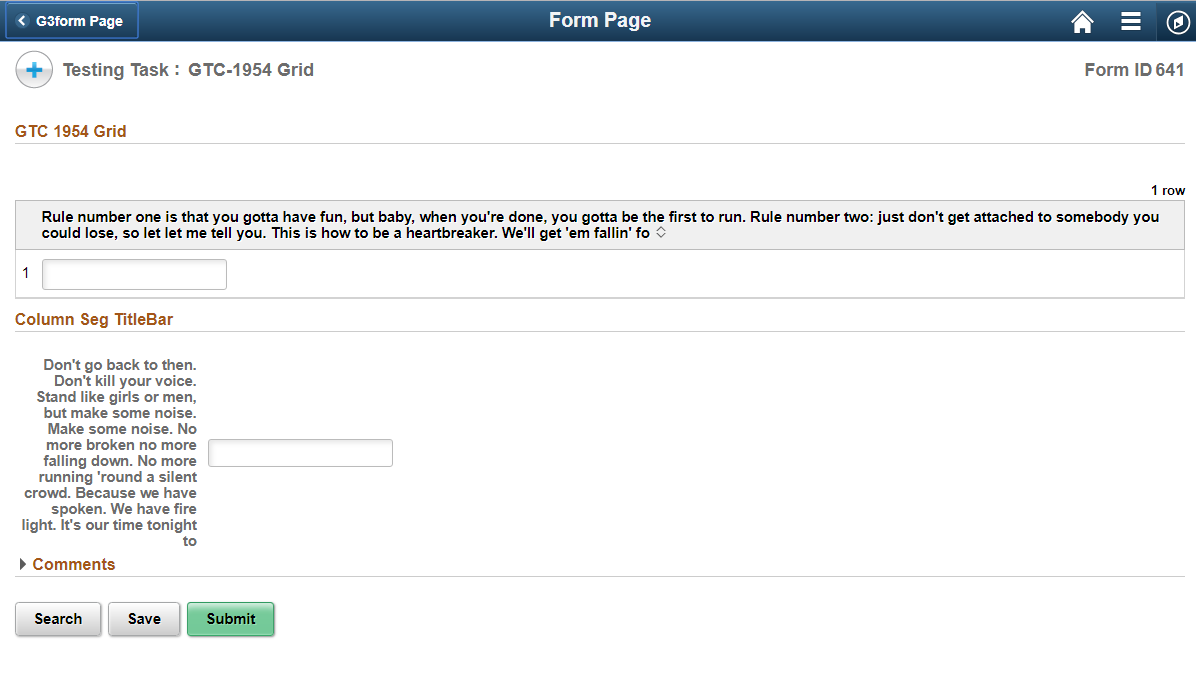 |
| Classic Grid and Column Segments with Long Field Labels (Notice Character Limit is Much Shorter in Classic) |
|---|
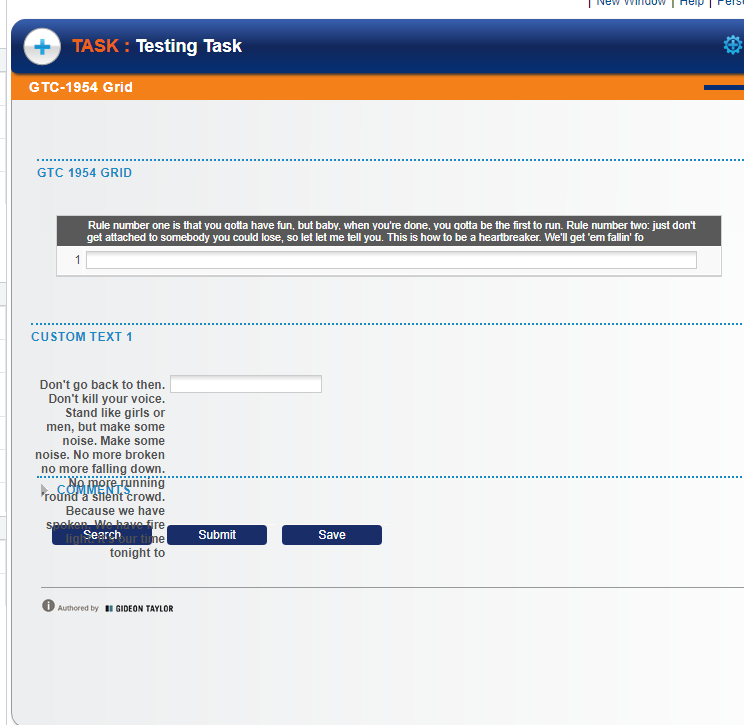 |
Workflow and Notifications
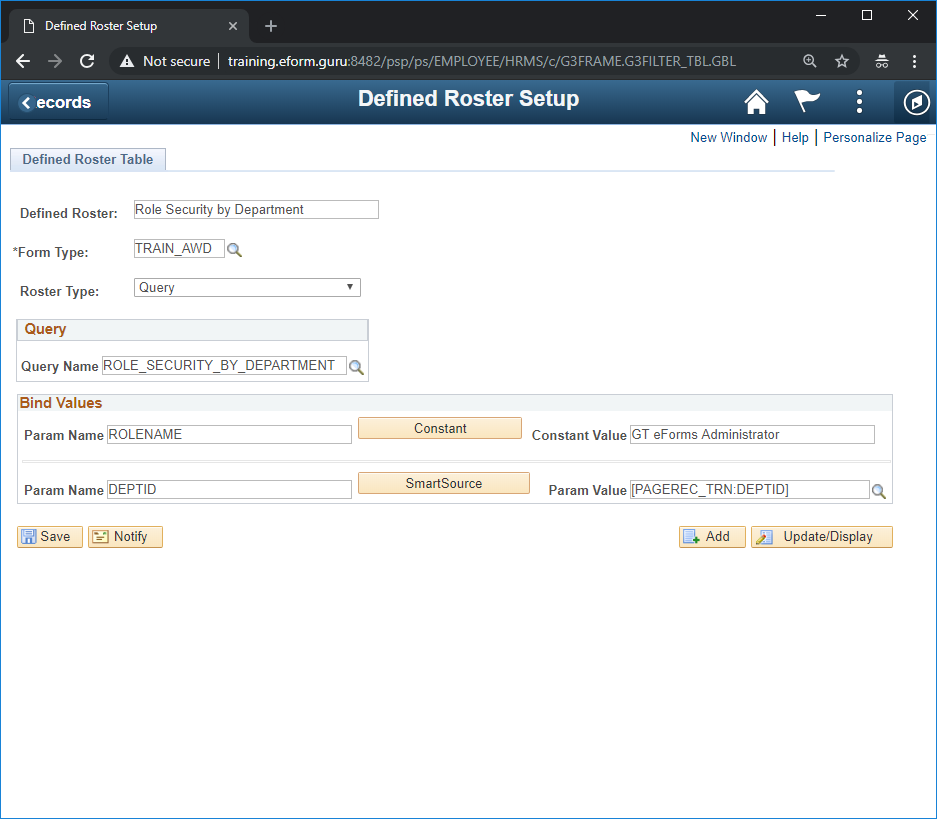
Defined Rosters with Binds
Oh, just the sound of this is music to my ears. If you have been a long time GTer (pre-GT3), then you might remember a little thing we called filters. The best part about filters (for the functional folks) was that you could create a PS query, add one or more prompts, then go to a setup page and link those prompts to smart sources. BAM!!!!! A list of users is returned. You did it with configuration. You accomplished complex logic thanks to a little tool we call PS Query, which most of us know how to use already.
Ladies and gentlemen, it is back! Defined Rosters with Binds give you the chance to do just what is described above. And for the technical folks, this feature has magic for you too. You can add binds into SQL and PPC rosters. Once you add the binds, you sit back and let the super BAs join it in with form smart sources to their hearts content.
There is product documentation. Read it! This feature is a time-saver. You will find a use for it.
Navigation: Main Menu > Manage GT eForms 3.x > GT Functional Setup > eForm Parts Gallery > Defined Roster Setup
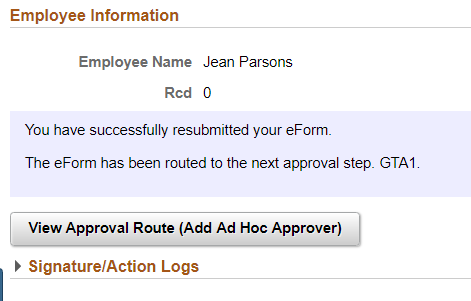
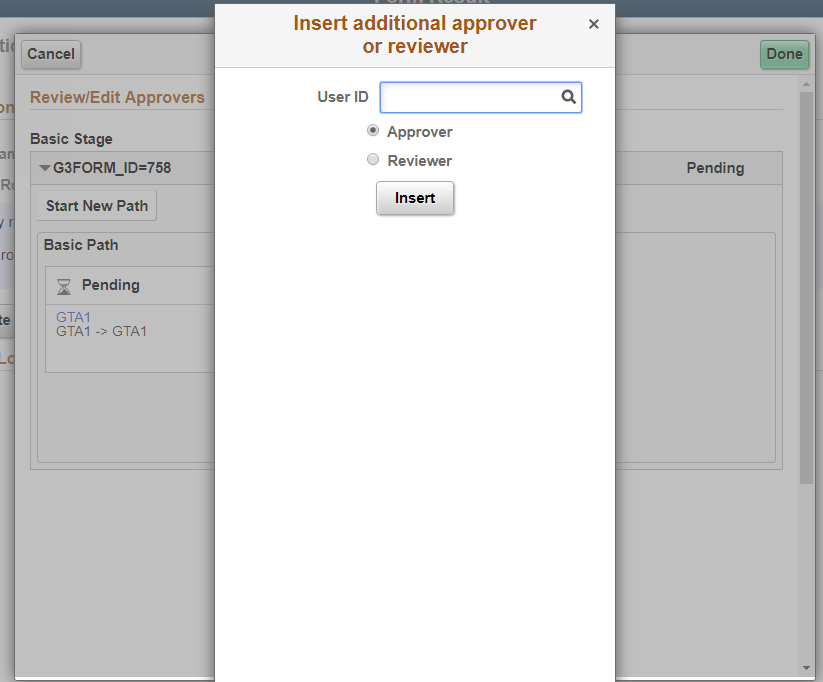
Ad Hoc Functionality (Now In Fluid)
This is another checkbox on the General tab that only worked in classic, but now fluid has the power too. If ad hoc is enabled in the form setup, the form results page will show "View Approval Route (Add Ad Hoc Approvers)”. The initiator can add ad hoc approvers after submitting using this button.
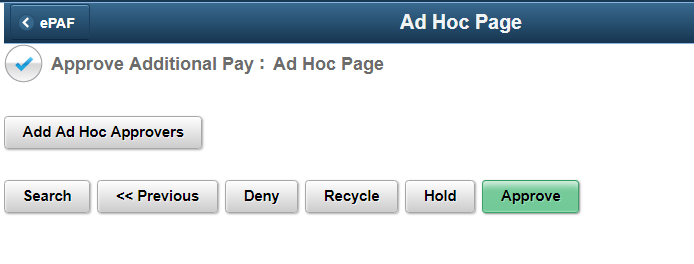
The Delivered AdHoc Page can also be added to the Evaluate task so approvers can add ad hoc approvers before approving the form.
And if you don’t like what the buttons say, you can update the message catalogs:
- 24842, 63 - View Approval Route
- 24842, 64 - View Approval Route (Add Ad Hoc Approver)
Nested Roster Groups
- You can create a Roster to define a list of users.
- You can name your Roster so it can be used in many other places in your setup.
- And now, it is about to get good so I hope you are sitting down for this…you can use a saved Roster group inside of a Roster.
Why?
This allows you to enforce order of operation inside of a Roster (think parenthesis). Prior to this feature, the order was purely a top down, no questions asked approach. Now a roster will resolve all saved group rosters first, then work top down.
GT Utilities
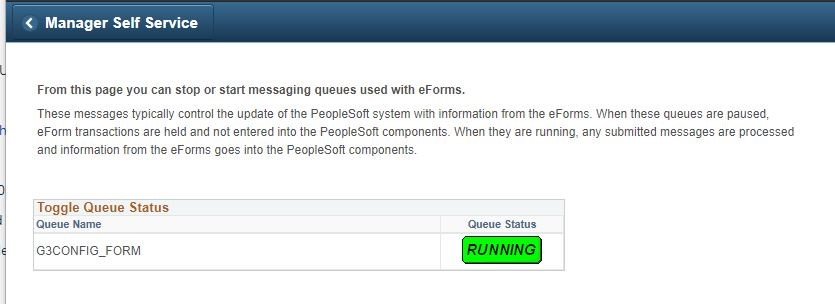
Pausing the Integration Broker Queue
Another one that the preGT3-er might recognize. It is a triumphant return for this feature that was a friend to many.
The Setting:
- You have a form and that form has a Component Interface (CI).
- This CI runs right after the last approval takes place.
- You want to let people continue on with their approving, but you want to pause forms so the CI doesn't run for a period of time.
Yes, this has always been possible as long as you know how to navigate to the deep dark corners of PeopleSoft. Now you have a pretty screen that will let you pause and unpause that queue with the push of a button. When you unpause a queue, sit back and watch as the forms flow right on in. We missed you, old friend. Glad you are back.
Modal Component Popups in a Config Form
There has increasingly been a need to create modal popup components/pages to meet design requirements as an extension of our config forms. This is not always very easy. Many clients have a need for a modal component that will pass through more than a dozen fields from the form to the modal component and back again. To meet this need, a developer package was added to the framework that gives a developer a quick path to add a modal popup component/page to a config form. If you are working on something similar, please check out the documentation to help you get there quicker. Work smarter not harder!
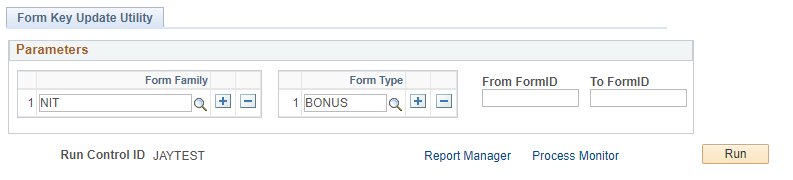
Utility to Update Form Keys
The GT Form Key Update Utility was created to provide an easy way to retroactively update form keys after changing form search configuration and/or form search records. Using the GT Form Key Update Utility after search setup changes are made, a user can specify certain form types, form families, and Form IDs to retroactively update their search keys so that they match the new search setup. Yep, there is documentation to read.
Navigation: Main Menu > Manage GT eForms 3.x > GT Functional Setup > GT System Setup > Form Key Update Utility
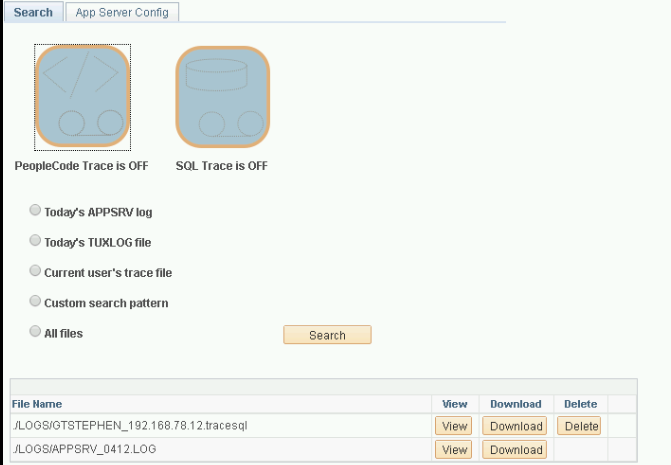
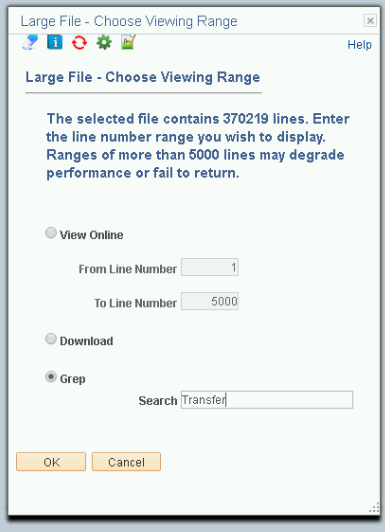
Log Viewer Enhancement
We’ve added some enhancements to Log Viewer including a new initial display, a “Grep” option, and a new tab that will display App Server Configuration that will make the Log View more convenient.
Features:
- Start on the Search tab, not the View Files page
- Turn on/off tracing (both SQL and PeopleCode) directly from the Log Viewer Page with convenient toggle buttons
- "Grep" through a file for a particular search expression
- Display App Server settings (to see trace mask/trace settings)
- Display which app server the page is looking to see if multiple are involved
- Delete files
Styling
CSS Classes to Support Client Styling (Fluid Only)
We added distinct CSS classes to the config segment groupbox to make fluid styling much easier. Using this tool, you can target individual segments with fancy requirements.
Other Changes
We are delivering a number of other changes with this release.
Forms Engine
Prompts
| Deliverable | Issue Description: |
|---|---|
| Resolved | Receiving a SQL error when changing a higher-level key for dropdown field |
Data Pool and Smart Sources
You now have another delivered PeopleCode smart source in your toolbox. This one will insert the 'Long Description' on Form Setup.
| Deliverable | Issue Description: |
|---|---|
| Now they work. | The three delivered URL smart sources (Update URL, Workflow URL, & View URL) were not working from the IB Handler context. This means that form links in email notifications for Executed and In Error would not work. |
| Completed performance tuning on the data pool load. | The data pool was acting a bit sluggish. |
| Added debug messages to the data pool that will help users identify what record is causing an issue if there is an issue with the way it is built. | Data pool records would occasionally have an issue during build, but it was very difficult to know that was the issue. |
Data Storage
| Deliverable | Issue Description: |
|---|---|
| We updated the key size and altered the records that contain the fields. | The key used on the long data repository is a GUID (36 char) that is being truncated down to the left 10 chars. This has the potential for form data loss in the event of a collision with the 10 chars. |
Grid
Added the ability to delete the last row of a grid with code without requiring additional code to repaint the page.
Segment and Page Setup
- In fluid, the header for the Signature Log will now hide if the Signature Log is configured to not show.
- Added the ability to hide the workflow visualizer on a fluid form. This functionality is similar to what is available for classic forms.
- Made some improvements on how the Notifications tab on the Form Setup table was working when using multiple conditions.
- All of the rich text editors in the form building tool should now match and include all of the valid options (meaning those that make sense in the context of form building).
| Deliverable | Issue Description: |
|---|---|
| Removed the "do you want to save" warning from the results page. | Receiving a warning about data not being saved on the results page. |
| Fixed. | "Signature" was spelled wrong in the form log details. |
| Updated to show 'saved' in the action column. | The form log was showing 'blank' when a form was saved. |
| You can now use a visual if to conditionally hide/show the first segment on a fluid form page. This matches the functionality of the classic forms, but was not working on fluid forms. | If the first segment was hidden on a fluid form, then all the segments would hide with it. |
| Fixed. | Users could not upload an attachment if a description was entered before clicking upload. |
Workflow and Notification Engine
Workflow Engine
- Improved the efficiency of the fluid visualizer relating to the 'multiple approvers' modal popup.
| Deliverable | Issue Description: |
|---|---|
| Fixed. | AWE was marking a step as approved even when auto-approval was not turned on using some databases. |
Notification Engine
Remember that awesome new Notifications tab in the GT Admin Tool that allows you to see all of the emails that were generated during the journey for each form? We added something new! Now there is also a long text field that will show you all of the recipients who received that email.
| Deliverable | Issue Description: |
|---|---|
| Email templates will now require a unique key. A duplicate value is not allowed (it also isn't needed). The current keys allow for duplicates, so clients should check to make sure they don't have duplicate before rebuilding this table and applying the fix. | The duplicate order key is keeping the Copy Tool from copying multiple rows for the email template. |
WorkCenter and Search
Search
- The search can now use passed-in integer values of 0.
| Deliverable | Issue Description: |
|---|---|
| This is the result of a known PeopleSoft issue. A temporary fix has been put in place to help speed this up. | In the fluid search there can be a lag time to open the form if there is only one result. |
GT Utilities
GT Admin Tool
- The Admin tool will now allow a user to search the date fields using the "between" feature. This used to be limited to exact matches.
- The GT Admin Tool can now be used to approve Ad Hoc steps that have been added into the workflow for a given form
Other
- Fixed typo in property name
G3SEARCH:Search. - STOMP Tool DB2 SQL fix
Styling
- Accessibility improvements
| Deliverable | Issue Description: |
|---|---|
| The headers (field labels) in a grid will all be left aligned. | In classic, the column headers where sometimes not aligned with the data below. |
We changed the width of the subpage G3HELP_URL_SBP to 550 pixels wide and fit the HTML area/groupbox in that width. It is looking better. | The Help segment was causing the form width to get pushed out on the right side. |
Developer Tools, Hooks and Methods
Methods
Introduced new helper methods for the RecordTag class for developers to use:
GetChangedFields- returns an array ofFieldTagswhere the array contains just the fields from therecordTagthat have had their value changed since pre-population completed.isChanged- returns true if any data on the rowset has been changed since pre-population completed.isEmpty- returns true if only one row and every field returns false forAll(field.Value).GetChangedRows- returns an array ofRecordTagobjects. The array only contains the rows where changes have occurred since pre-population completed. (We use this for Addl Pay which pre-populates current, but we only want to update if changes have occurred.)GetNewRow- this is simple, but code I find myself writing over and over. It uses theisEmptymethod above and returns row 1 ifisEmptyreturns true, otherwise inserts a new row at the end and returns that row.RollbackChanges- it loops through each row in the Rowset and reverts all fields back to theFieldTag's respectiveOrigValue.
Other Changes
- Broaden config form navigation to support placing the config form component on a custom menu.
- Component interface interaction mirrors the actions that a user would take when interacting with a component, all the way down to virtual button clicks. This is important because PeopleSoft has code that runs when the user clicks a button on a component, and neglecting to click buttons either misses an important step in integration, or the developer has to include the code manually, if it’s even possible.
- GT component interface wrappers (application classes) extend the
G3CI:CiParentclass, which now includes a Click() method. The developer adds a line of code that calls this method where the user would click a button when completing a transaction manually, as in the following example:%This.Click(“MyButton”);Not only does this take care of the button click needed to run anyFieldChangecode on the button, but it also includes debugging messaging needed for viewing the action in the Integration Broker log viewable through the GT Form Admin Tool. - A grid feature enhancement allows a developer to access the original values of the field in a grid. This ability was available in standard column fields but not on grid fields. This replicates default PS behavior.
| Deliverable | Issue Description: |
|---|---|
| A much more helpful message has been added to quickly identify the issue. | When a row index beyond the end of the current rowset is passed in to the form, the GetRow method of the Rowset class used to throw a very unhelpful .NULL error. |
Related Documentation
All documents are located on the Documentation channel of the new GT Customer Self Service Team unless otherwise noted. (Look for the Files tab)
| Deliverable | Location |
|---|---|
| 1.1.2 Roster Engine (updated) | GT eForms Feature Documentation > Section 1. Functional Setup |
| 1.1.4 Data Pool (updated) | GT eForms Feature Documentation > Section 1. Functional Setup |
| 1.2.3 Form Installation Table (updated) | GT eForms Feature Documentation > Section 1. Functional Setup |
| 1.2.4 Form Key Update Utility (NEW) | GT eForms Feature Documentation > Section 1. Functional Setup |
| 1.3 Form Configuration Report (updated) | GT eForms Feature Documentation > Section 1. Functional Setup |
| 3.0 Form Setup_General (updated) | GT eForms Feature Documentation > Section 3. Form Setup |
| 3.1 Form Setup_Pages (updated) | GT eForms Feature Documentation > Section 3. Form Setup |
| 3.2 Form Setup_Routings (updated) | GT eForms Feature Documentation > Section 3. Form Setup |
| 3.3 Form Setup_Notifications (updated) | GT eForms Feature Documentation > Section 3. Form Setup |
| 3.4 Form Setup_Action Items (updated) | GT eForms Feature Documentation > Section 3. Form Setup |
| 3.5 Form Setup_Data (updated) | GT eForms Feature Documentation > Section 3. Form Setup |
| 3.6 Form Setup_Attachment Descriptions (updated) | GT eForms Feature Documentation > Section 3. Form Setup |
| 3.7 Form Setup_Query Records (updated) | GT eForms Feature Documentation > Section 3. Form Setup |
| 3.8 Form Setup_Reports Setup (updated) | GT eForms Feature Documentation > Section 3. Form Setup |
| 3.9 Form Setup_Conditions (NEW) | GT eForms Feature Documentation > Section 3. Form Setup |
| 3.10 GT eForms Admin Tool (updated) | GT eForms Feature Documentation > Section 3. Form Setup |
| 3.11 GT Transporter (NEW) | GT eForms Feature Documentation > Section 3. Form Setup |
| 4.3 Search Record by Task (updated) | GT eForms Feature Documentation > Section 4. Forms Engine |
| 4.4 eForm Highlights (updated) | GT eForms Feature Documentation > Section 4. Forms Engine |
| 6.1 AWE Configuration Settings(updated) | GT eForms Feature Documentation > Section 6. Workflow Engine |
| 7.1.0 Workflow Tools (updated) | GT eForms Feature Documentation > Section 7. Technical Development |
| 7.1.5 View Log Files (updated) | GT eForms Feature Documentation > Section 7. Technical Development |
| 7.1.10 Control eForms IB Queues (NEW) | GT eForms Feature Documentation > Section 7. Technical Development |
| Cascading Lookups (NEW) | Tips 'N' Tricks > Functional |
| Configuring the Results Page (updated) | Tips 'N' Tricks > Functional |
| Delivered Smartsource Definitions (updated) | Tips 'N' Tricks > Functional |
| Email Templates Guide (updated) | Tips 'N' Tricks > Functional |
| GT Approval Framework Settings_AWE (updated) | Tips 'N' Tricks > Functional |
| Reports Setup How To (updated) | Tips 'N' Tricks > Functional |
| Modal Utility (NEW) | Tips 'N' Tricks > Technical |
| GT eForms CI Process (updated) | Tips 'N' Tricks > Technical |
| GT eForms Dev Process (updated) | Tips 'N' Tricks > Technical |
| Form Key Utility Update (NEW) | Tips 'N' Tricks > Technical |
| Dynamic Prompts (NEW) | Tips 'N' Tricks > Technical |