GT eForms 3.58.00 Feature Release Notes
GT eForms 3.58 is jam-packed with exciting new features. A primary objective for GT eForms has been to empower business analysts to automate business processes using robust, dynamic, and workflow-enabled forms. GT eForms 3.58 pushes the line of what business analysts can do using configuration much farther. Several requirements that could only be satisfied by a developer writing code or creating views can now be done with configuration. An exciting example is the ability to configure validations(!) that guide users to provide valid data. On top of that, validation error messages can be surfaced right next to the fields and segments where end users need to resolve issues.
When coding is required, this release continues pushing down the path of making development efficient, intuitive, reusable, and maintainable to meet complex business requirements.
Feature Summary
Most of these features (1-8 in the list below) depend on the new Helium form engine released in GT eForms 3.50 and are only available if on Form Types that have the "Use Helium Performance" checkbox checked on the General tab of Form Setup.
| eForm Requirement | With 3.58 | Before 3.58 | |
|---|---|---|---|
| 1 | Validate form data when changing a field, leaving a page, or submitting a form | Configuration: Add error messages, conditional logic using Visual Ifs, and validation triggers. | Ask a developer to write PeopleCode |
| 2 | Display validation error messages to users | Error messages can either show: On-page, meaning the fields/segments are highlighted in red and the error messages shows next to the field or segment they pertain to In a single pop-up with all the errors combined | A pop-up for each error |
| 3 | Pull data into an eForm | Configuration: You can now create a PeopleSoft Query and use it in your Data Pool to pull data into the eForm. For regular table/view records, you can now filter data using non-key fields and modify the SQL the Data Pool use. | If an existing table/view doesn't exist for the data need, ask a developer to create a new View to use in the Data Pool. |
| 4 | Populate an eForm grid with data | Configuration: Use a Data Pool Query or Record source to populate grid fields or an entire grid with data when the user starts a form or when the user makes changes on the form. | Ask a developer to write PeopleCode |
| 5 | Return a value based on conditional logic | Configuration: Anywhere a SmartSource can be used in the GT eForms configuration (a lot of places), a new LogicStack SmartSource can be configured and used. A LogicStack SmartSource is a stack of values and Visual Ifs that calculate which value to return. | Ask a developer to write PeopleCode |
| 6 | Changing which buttons show or the button label | Configuration: Specify labels for buttons and which buttons show using Visual Ifs | Ask a developer to write PeopleCode |
| 7 | Create a dropdown with custom values and/or custom sorting | Configuration: Create a Value List with values, descriptions, and the order they should show in a dropdown | Values: Create a new field and translates or ask a developer to create a new table for the values Sorting: Ask a developer to write PeopleCode |
| 8 | Show Attachments, Comments, or the AWE Visualizer on an earlier page of the eForm | Configuration: Specify which page Attachment, Comments, or the AWE Visualizer should show using a Visual If. Additional new Visual Ifs are available to require a comment on a page or to expand/collapse the comment segment. | Ask a developer to write PeopleCode |
| 9 | Add a workflow robot approver that automatically approves an eForm | Configuration: Specify conditional logic in a Visual If that tells a robot approver to take a specific action on a form transaction (approve, deny, resubmit, withdraw). | Ask a developer to write PeopleCode |
Additional Features:
Implementation Guidelines
GT eForms 3.58.00 must be applied as an update to 3.50.01. If you are on a release prior to 3.50.00, you will need to upgrade to 3.50.00 first. 3.50.00 was a significant release so please read the 3.50.00 release notes. After upgrading to 3.50.00, you will need to upgrade to 3.50.01. From 3.50.01 you can then upgrade to 3.58.00.
How to prepare to install GT eForms 3.58?
- Review this document
- Review the upgrade installation instructions in the Upgrade package (GTeForms_35800_Upgrade.docx)
- Plan to apply this upgrade and test your forms in a development and test environment prior to moving to production.
- Contact support@gideontaylor.com with any questions. We are here to help!
3.58.00 Features
The animated GIFs in the sections below transition to black at the end of the animation and then loop.
Validations
Calling all functional users … you’re going to love this feature! You know those validations you’ve asked your developer to code for you to enforce your business processes and get clean data? You now have the power to configure validation messages, logic, and triggers to let the user know. You can also easily see all the validations together on the new Validations page in Form Setup!
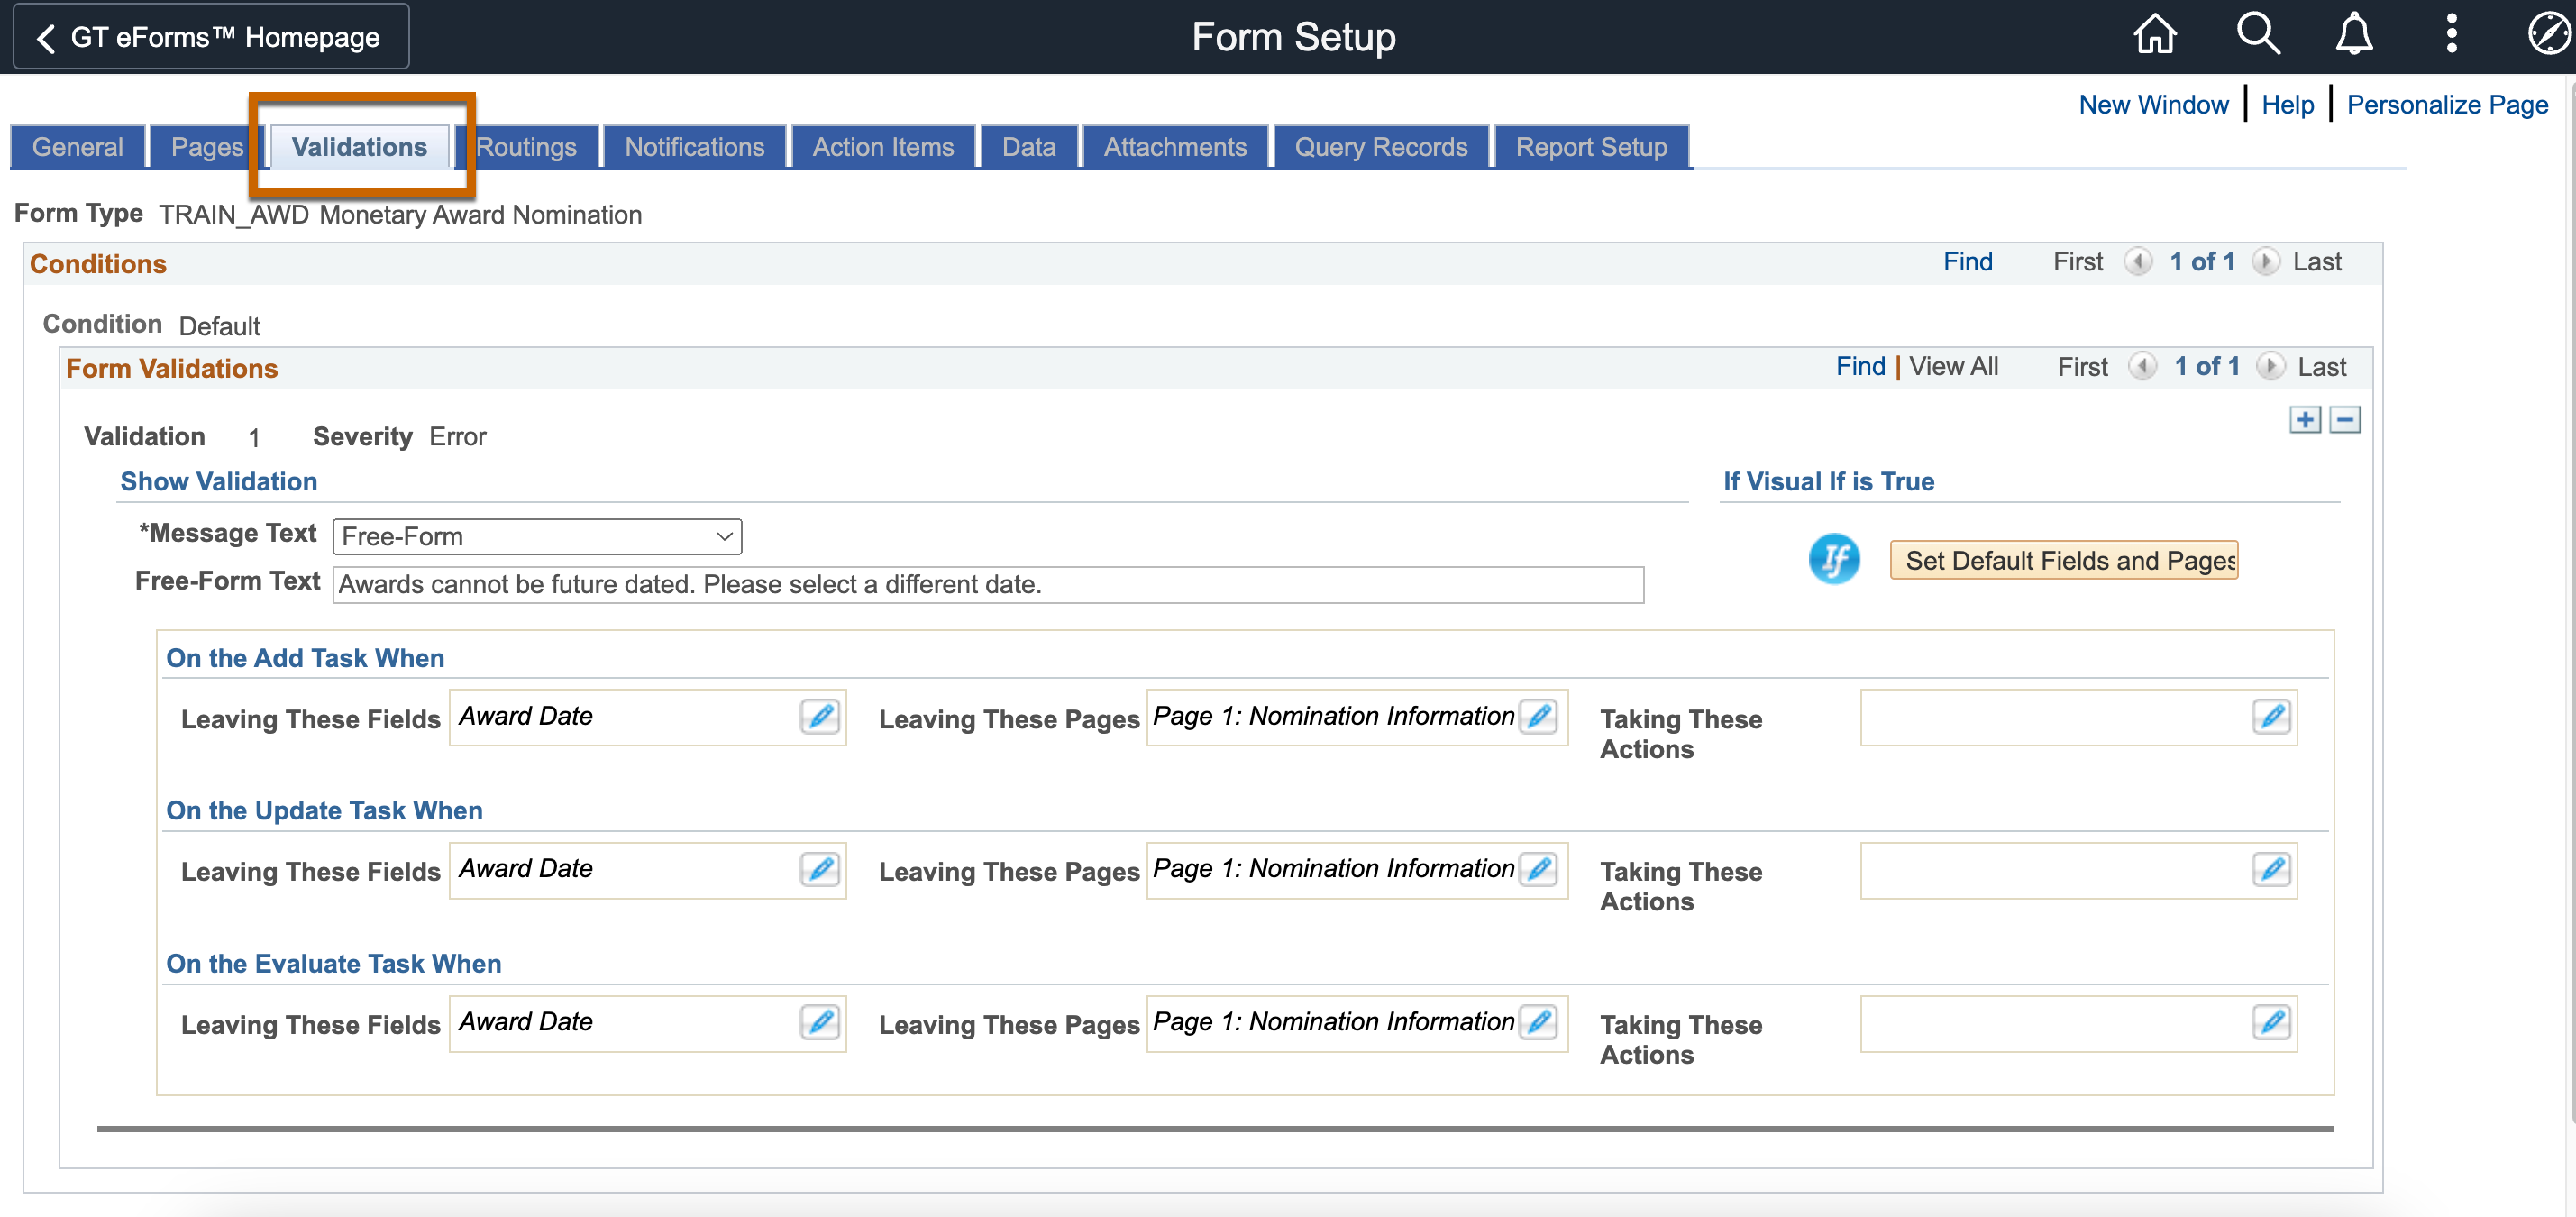
You can specify error message text using the Free-Form option, using a message catalog entry, or even pulling the text from a SmartSource.
Think of all the ways you could use this! Here are some example scenarios:
- On a Hire eForm, tell the user right after tabbing out of the "Date of Birth" field that the new hire is younger than 16 years old.
- On duration fields in an Additional Pay or Performance Review eForm, tell users the Start Date is greater than the End Date and require they correct the dates to go to the next page.
- On Finance forms where distribution percentages are calculated, tell the user the Total Distribution percent needs to equal 100% to go to the next page.
As part of this and the navigation button feature, we are delivering new PeopleSoft SmartSources and VisualIf Parts that can be used as part of validations like a Last Page Number SmartSource and an Is Last Page VisualIf. Information on these Visual If Parts and SmartSources will be released as part of the "Delivered SmartSource Definitions" and "Delivered Visual If Definition" documentation in the next few weeks.
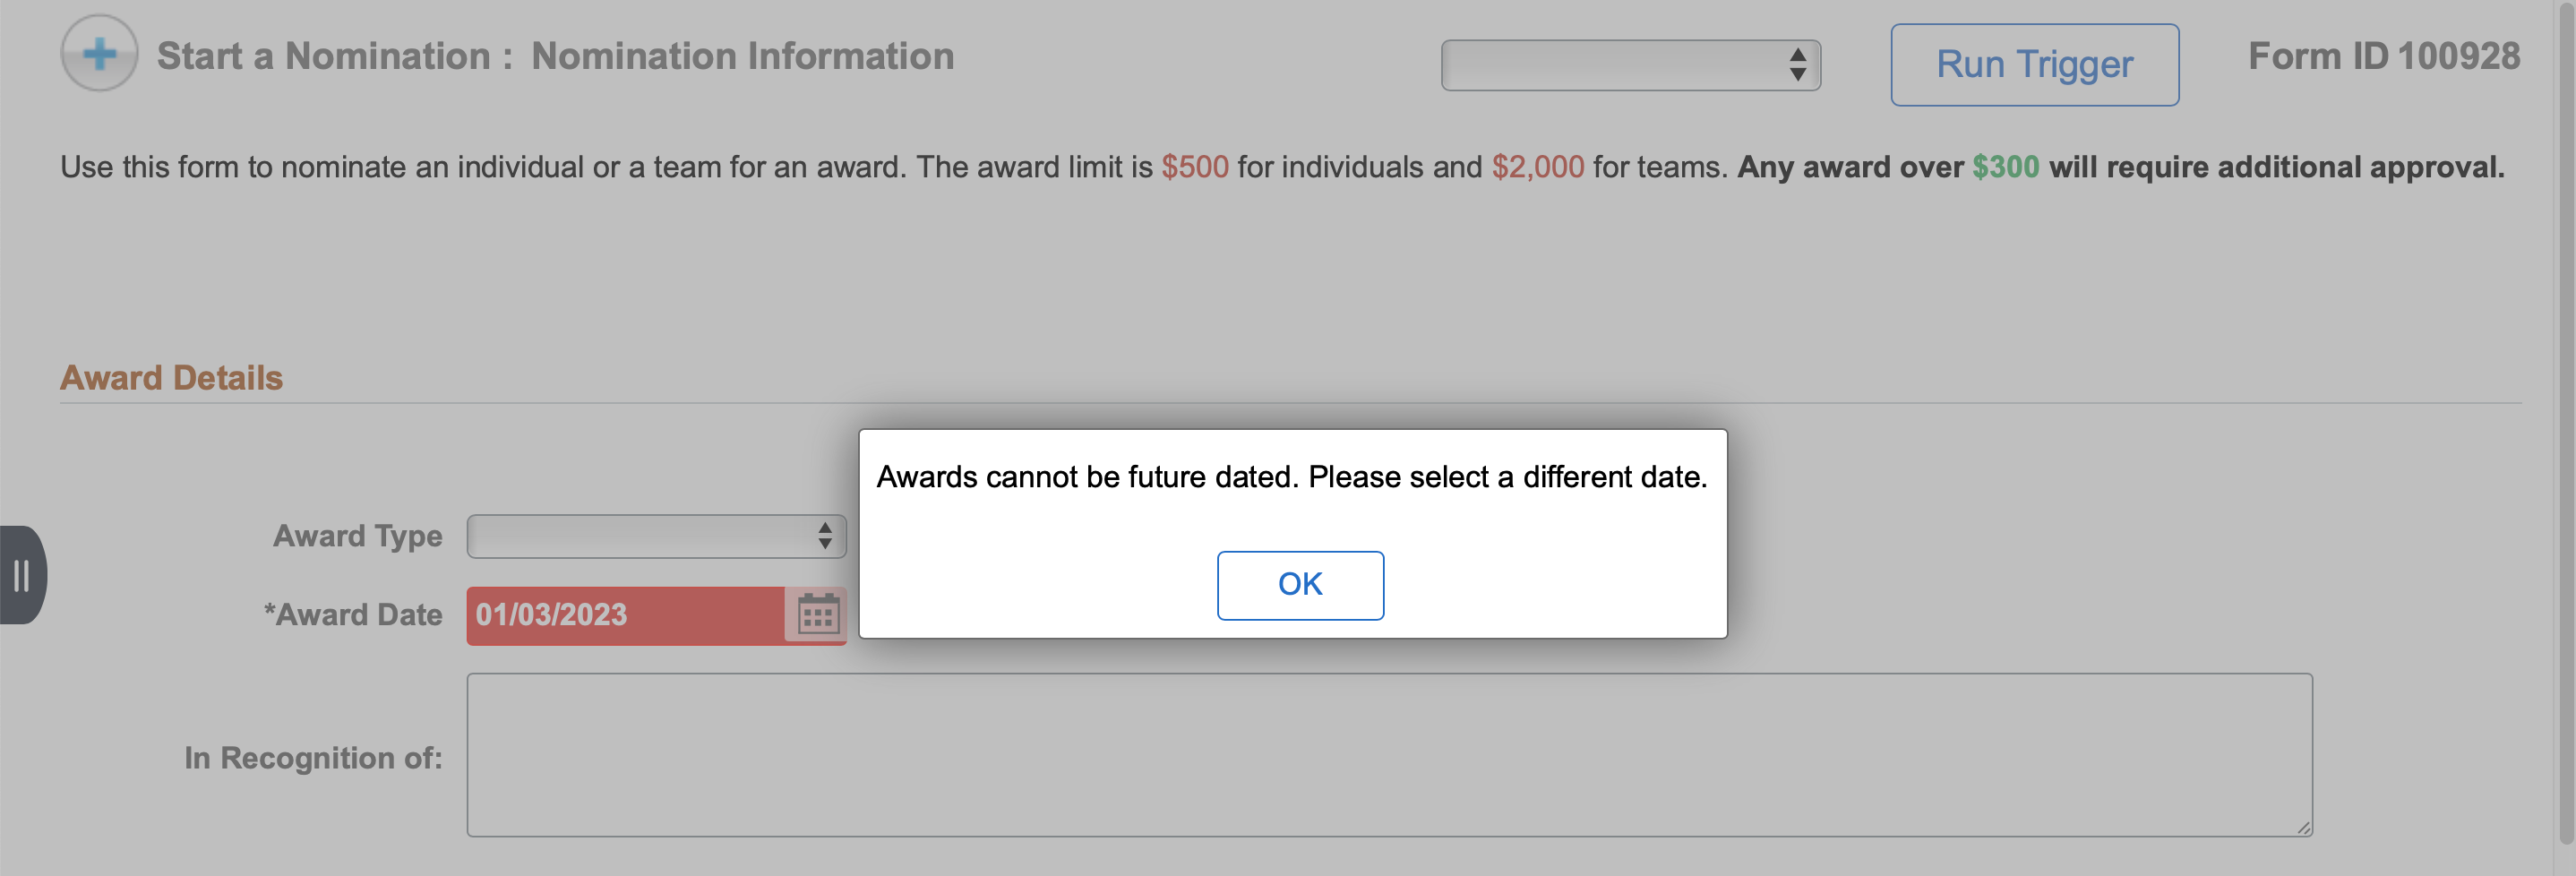
On-Page Validations (Beta)
If having a configuration option for validations wasn’t enough, we are also releasing a beta feature called on-page validations. Instead of having validation text appear in a pop-up window, you have the option to display your validation text on the page for your users to see in-line with fields. We have also created a collapsible “Validation Messages” segment that will remain visible at the top of the form that will list all the validations that need to be resolved before being able to leave the page.
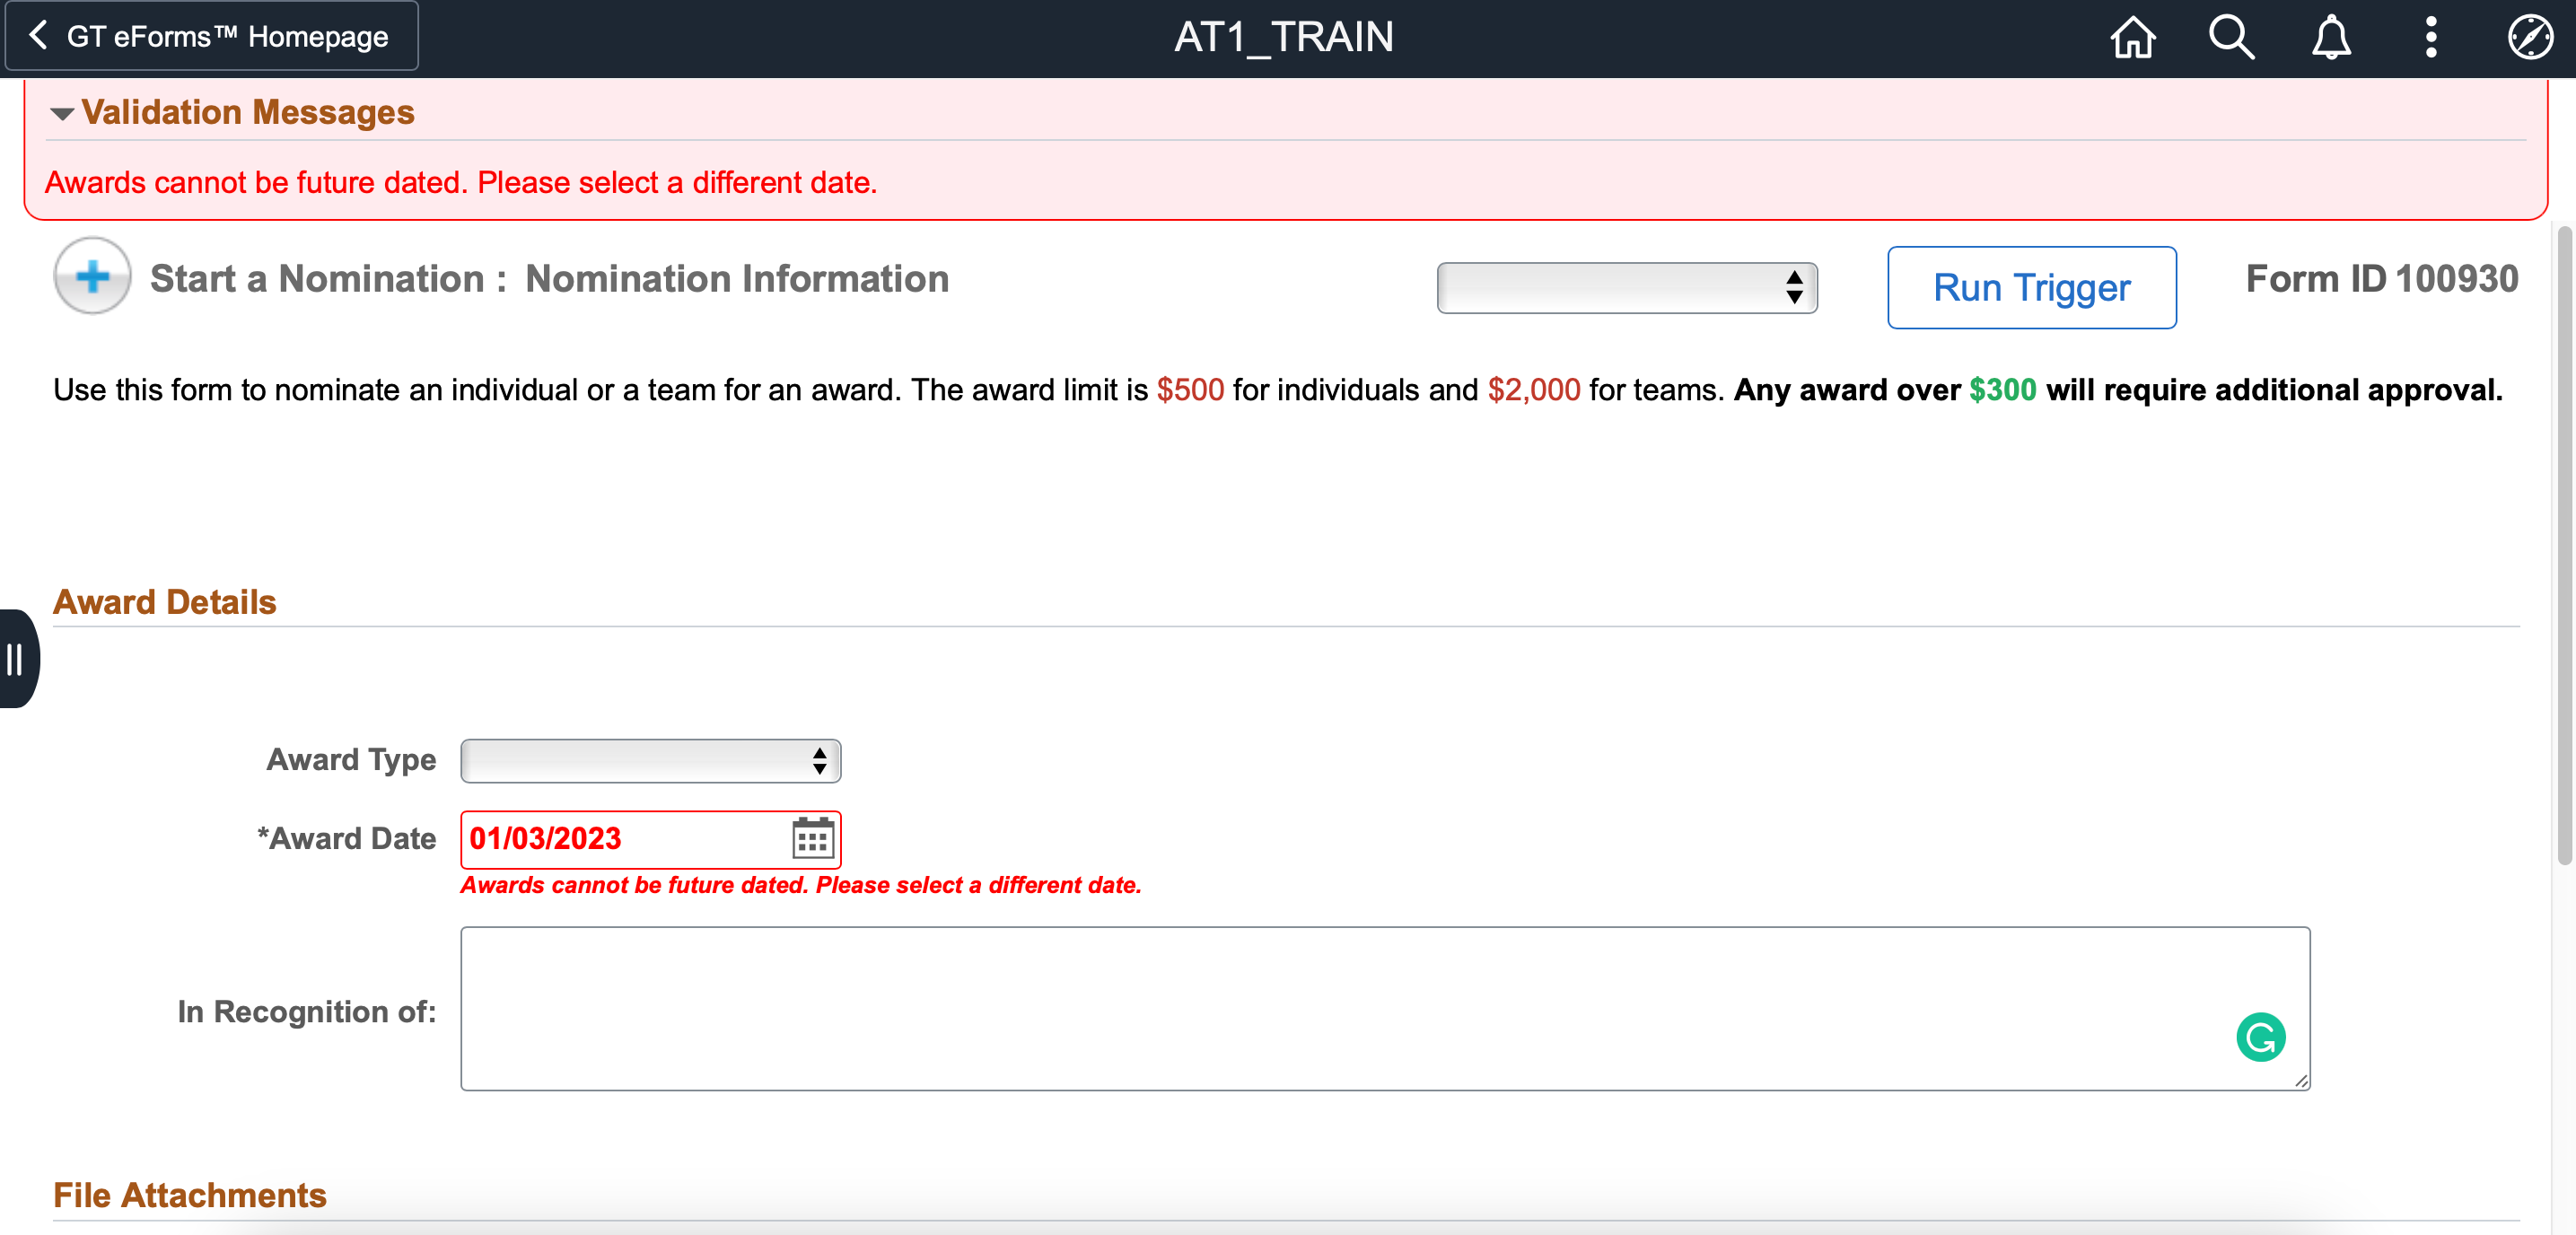
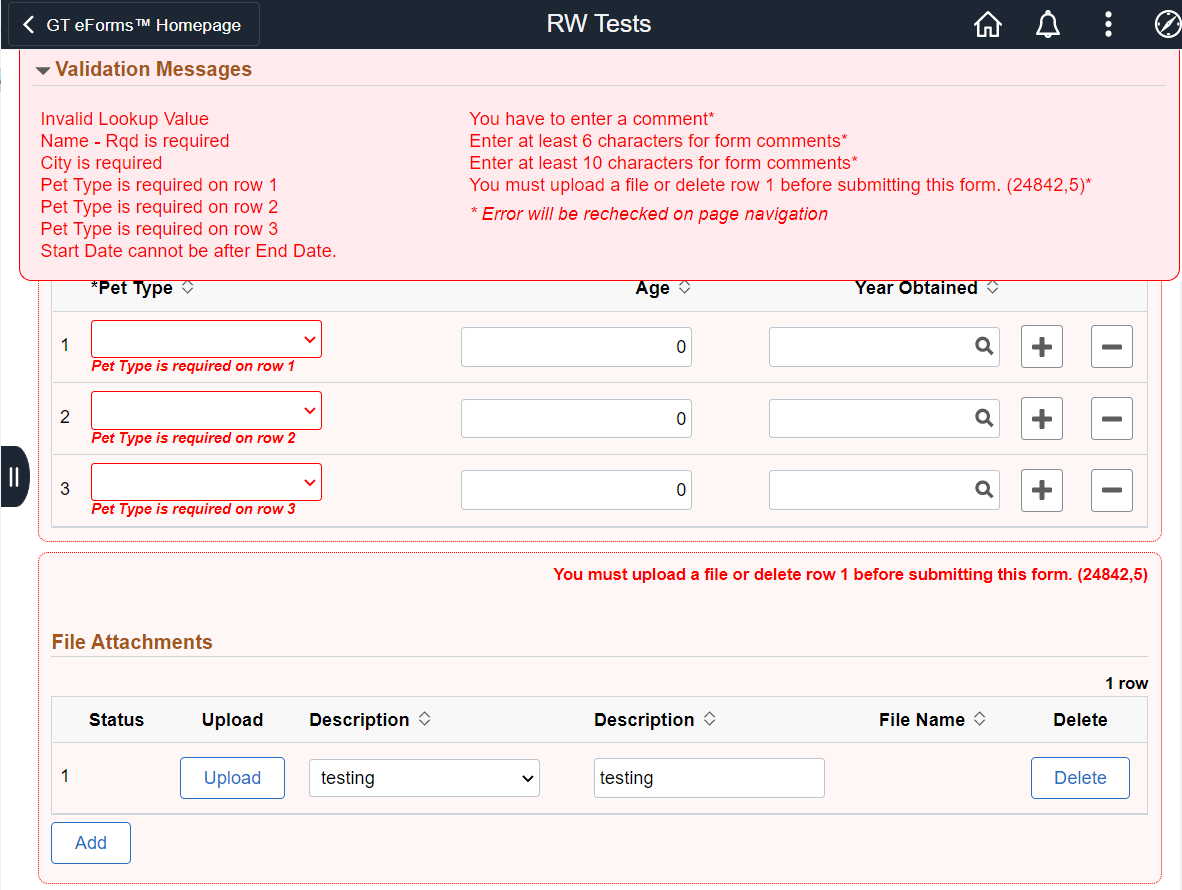
To try this feature, check the Display Validations On Page (Beta) checkbox on the General tab of the Form Setup. For more information about using on-page validations, please see our documentation.
Data Pool Enhancements
Have you ever wanted to pull data from a record in the Data Pool but found it wasn't quite right and you needed a developer to create a view or write code to get the data? We have added three new features to the Data Pool that in many cases will unshackle your dependence on creating new views.
These features can only be used on forms where “Use Helium Performance” is checked on the General tab of Form Setup.
For more details on these new Data Pool features, please see the Data Pool feature documentation on the GT Customer Self Service site.
Use Queries or Peoplesoft Records
The first feature is the ability to create public process queries which you can select as the source in the Data Pool instead of using a PeopleSoft record. Once you select a query data source, the "key" field that load will be the prompts on the query criteria. The key field(s) will need to be satisfied the same way PeopleSoft record keys are satisfied – by a form field, SmartSource, constant, or search field.
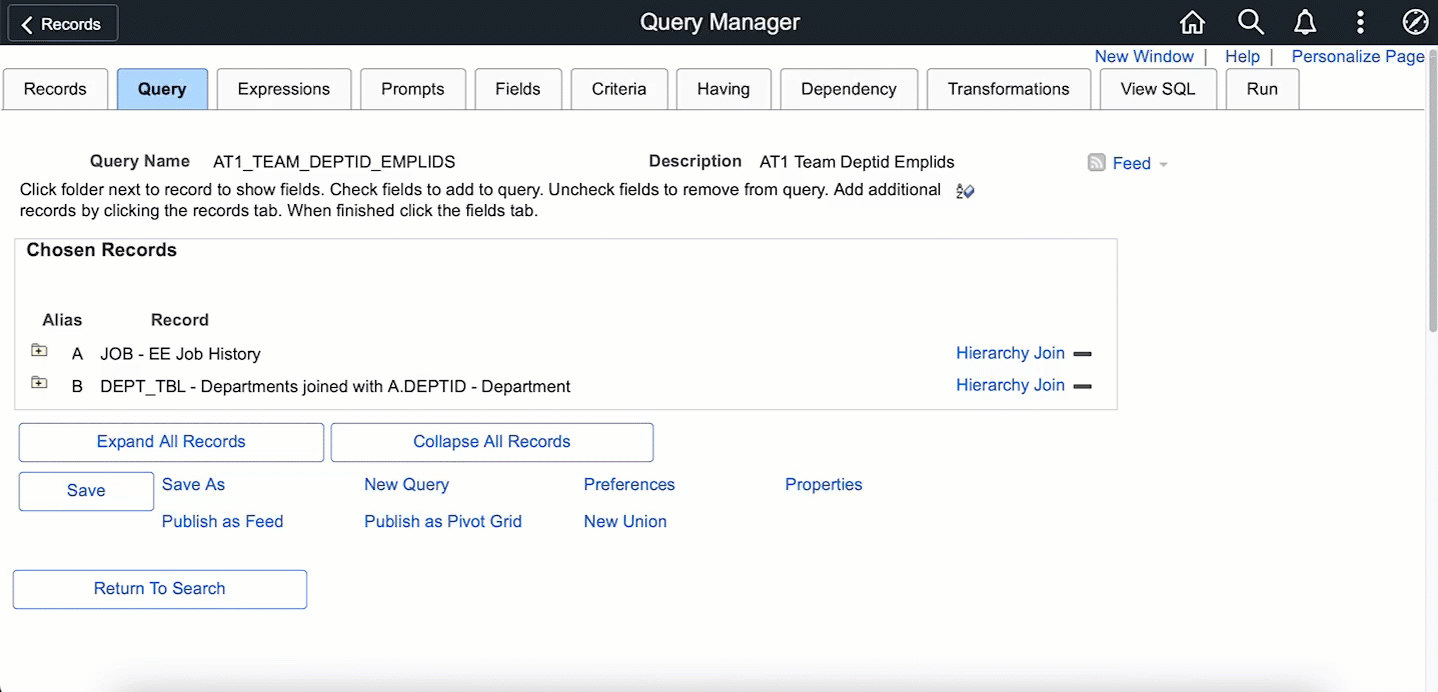

Once you save your Data Pool and generate the SmartSources, those query field SmartSources can be used anywhere SmartSources are used.
Query Data Pool Sources can not be used for lookups (Prompts/Dropdowns) as those require a record structure.
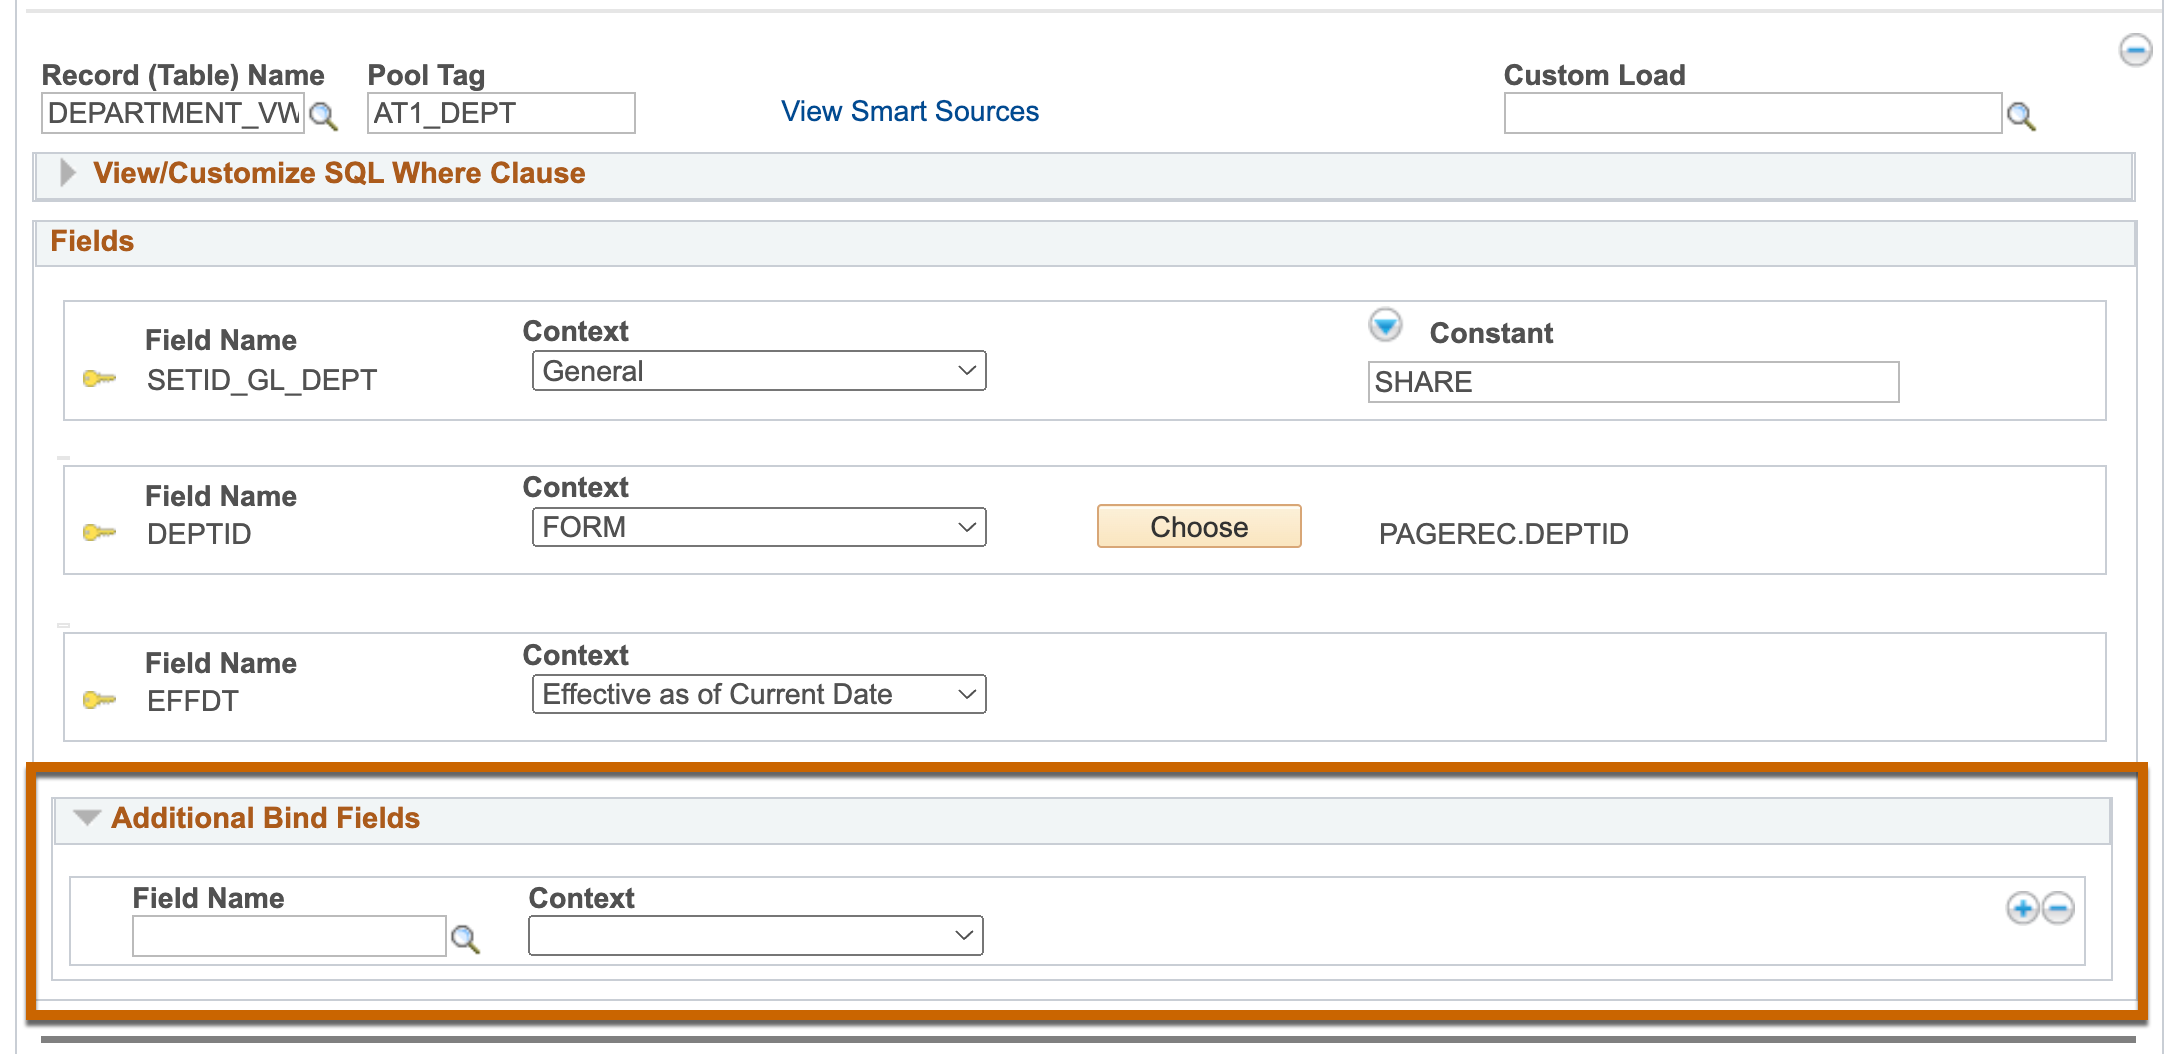
Additional Binds
The second new feature is the ability to configure additional binds to filter results by non-key fields. After specifying a record in the Data Pool, you will see a new "Additional Binds" section show where you can filter results by non-key fields on the record.
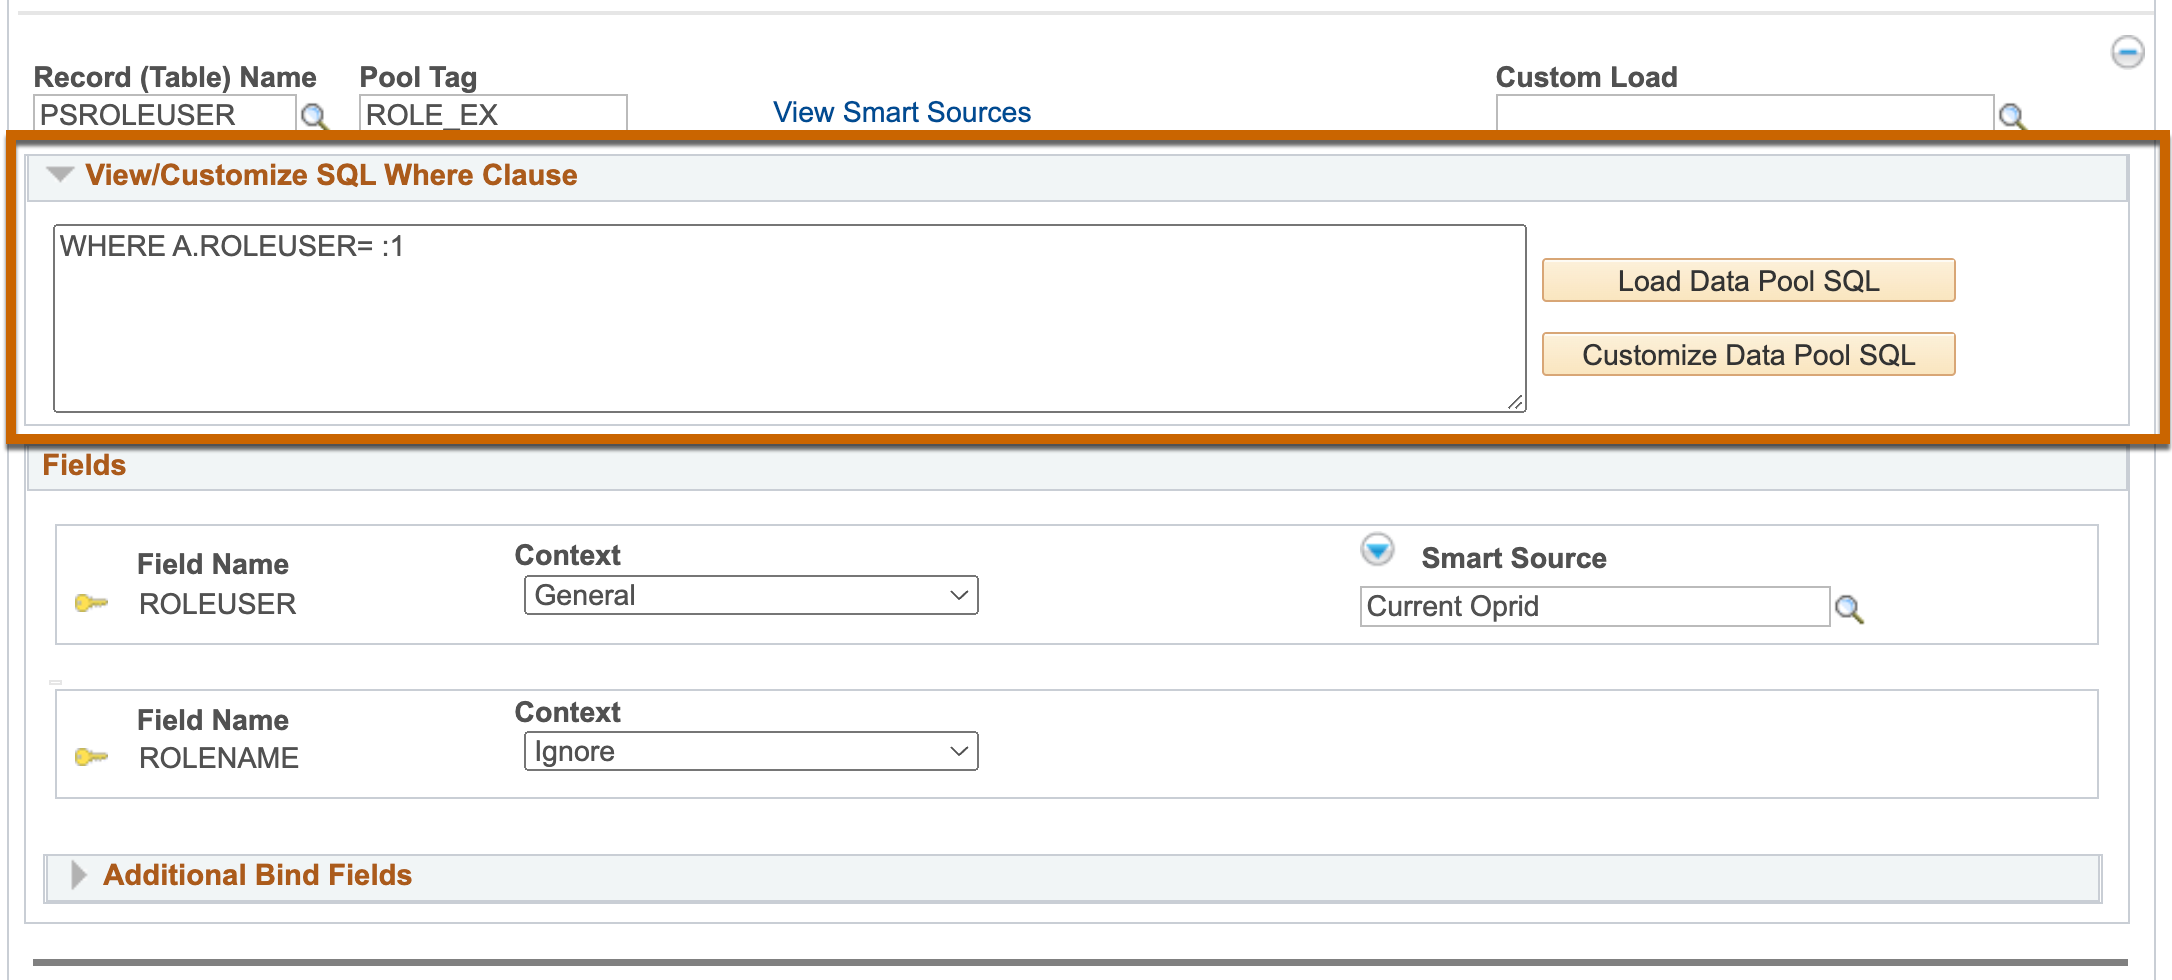
Customize SQL
The third feature is the ability to view and customize the Where clause of the SQL used the Data Pool uses to pull data from the database.
Populate Grids with Data
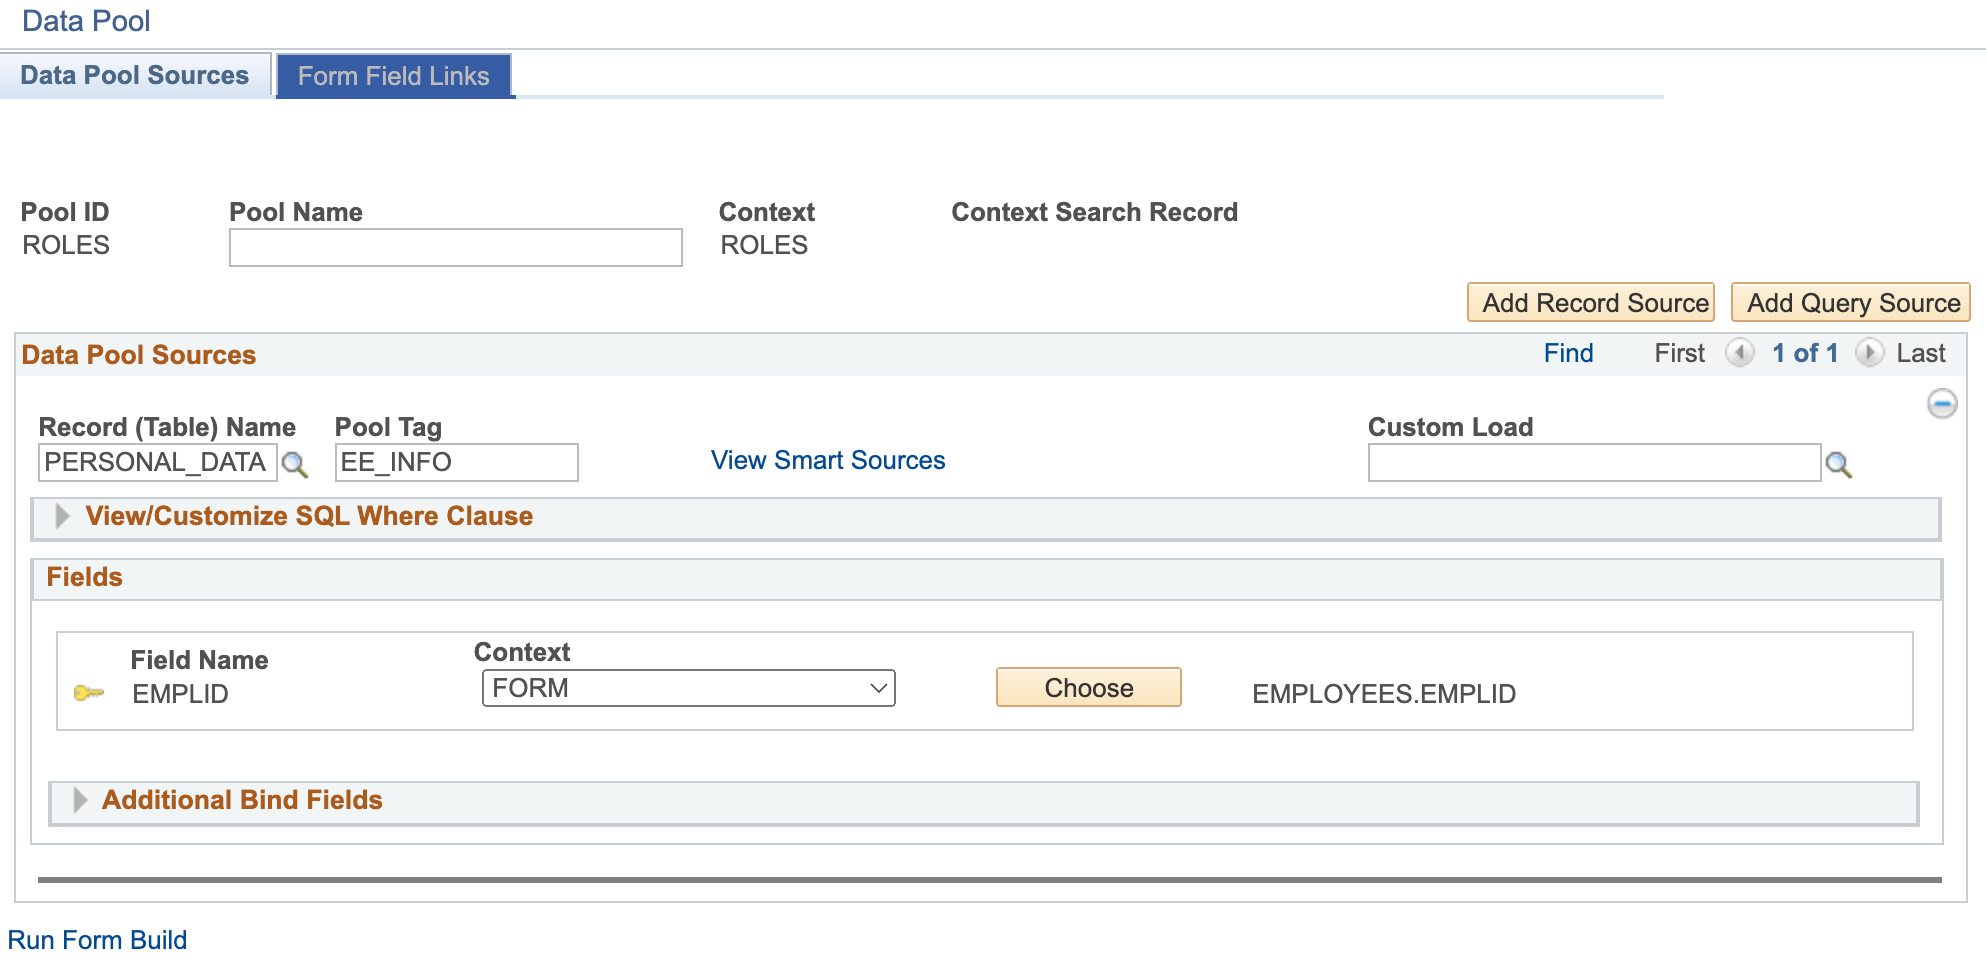
Grid segments are so helpful when a user needs to enter multiple rows of information but have been limited when it comes to functional configuration options. Forms with “Use Helium Performance” checked, now allow a functional user to populate data into a grid via the Data Pool. There are two different features available when it comes to grid population: populating data within a single row on the grid or populating all rows of an entire grid. We refer to these are row-level population and grid-level population.
Row-Level Grid Field Data Population
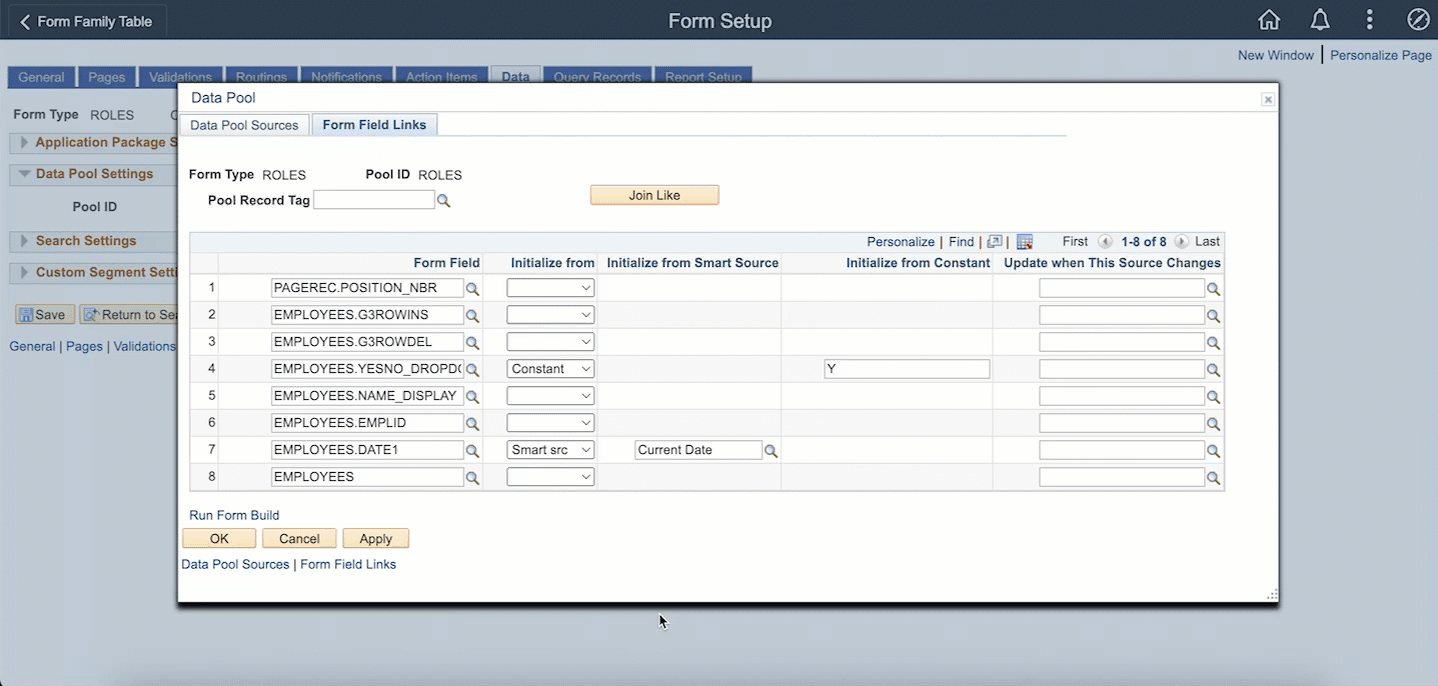
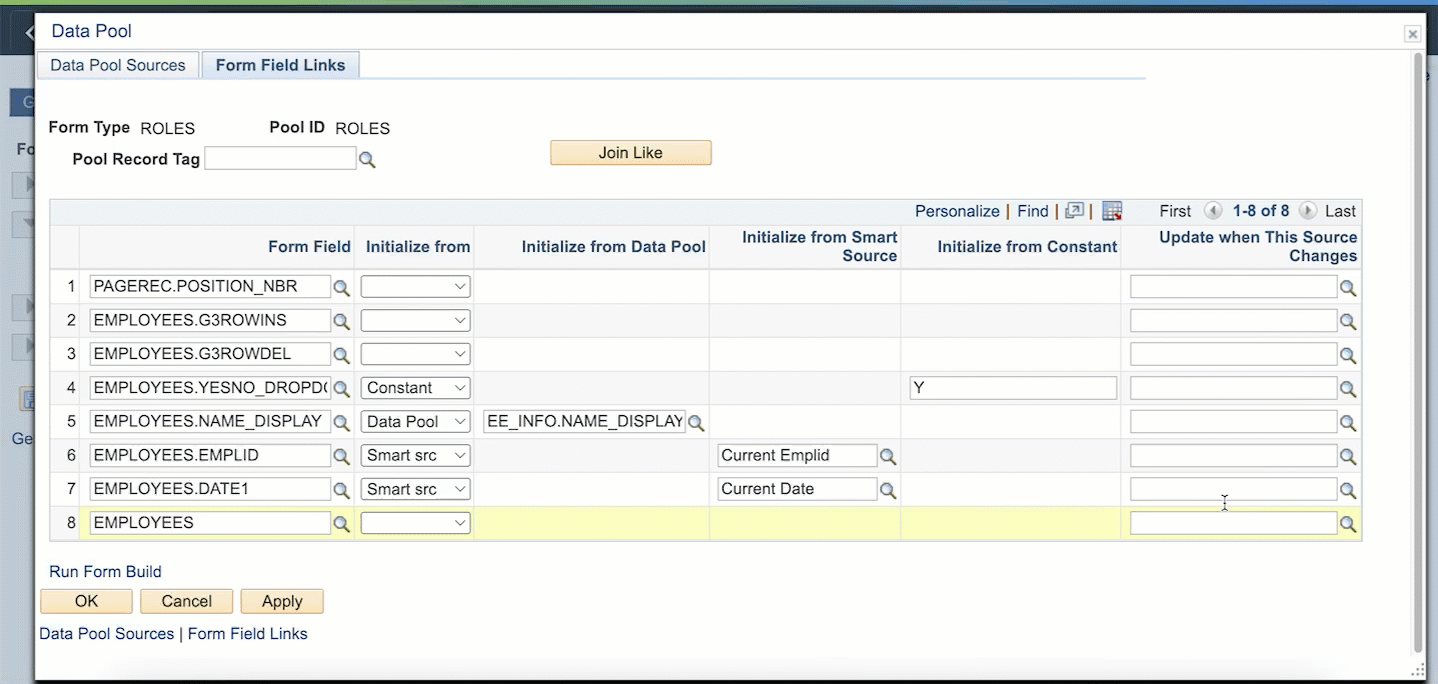
Sometimes you may want to default a field value in every row when the form is initialized, such as defaulting in the Current Date or setting a checkbox to Yes or No. This can now be done by using the Initialize From option, just as you would on a column field.

Let's say you want to prepopulate an Employee ID grid field with the current user's Employee Id and you want another field on the row to show the current user's name. You can configure your data pool as you would for any other column field, as shown in the example below.
Video: Row-Level Setup – Initialize Data Pool SmartSources 👇
Video: Row-Level Form Example – Initialize Data Pool SmartSources👇
The configuration you add to any "Initialize From" field on a grid will be what is populated when a user manually inserts a row on the grid on the form.
Now let's say you want the user to provide the Employee Id and then have the Name field on that row update with the employee's name. This can also be done via the Data Pool and using "Update When the Source Changes".
Video: Row-Level Setup - Update When This Source Changes 👇
Video: Row-Level Form Example - Update When This Source Changes 👇

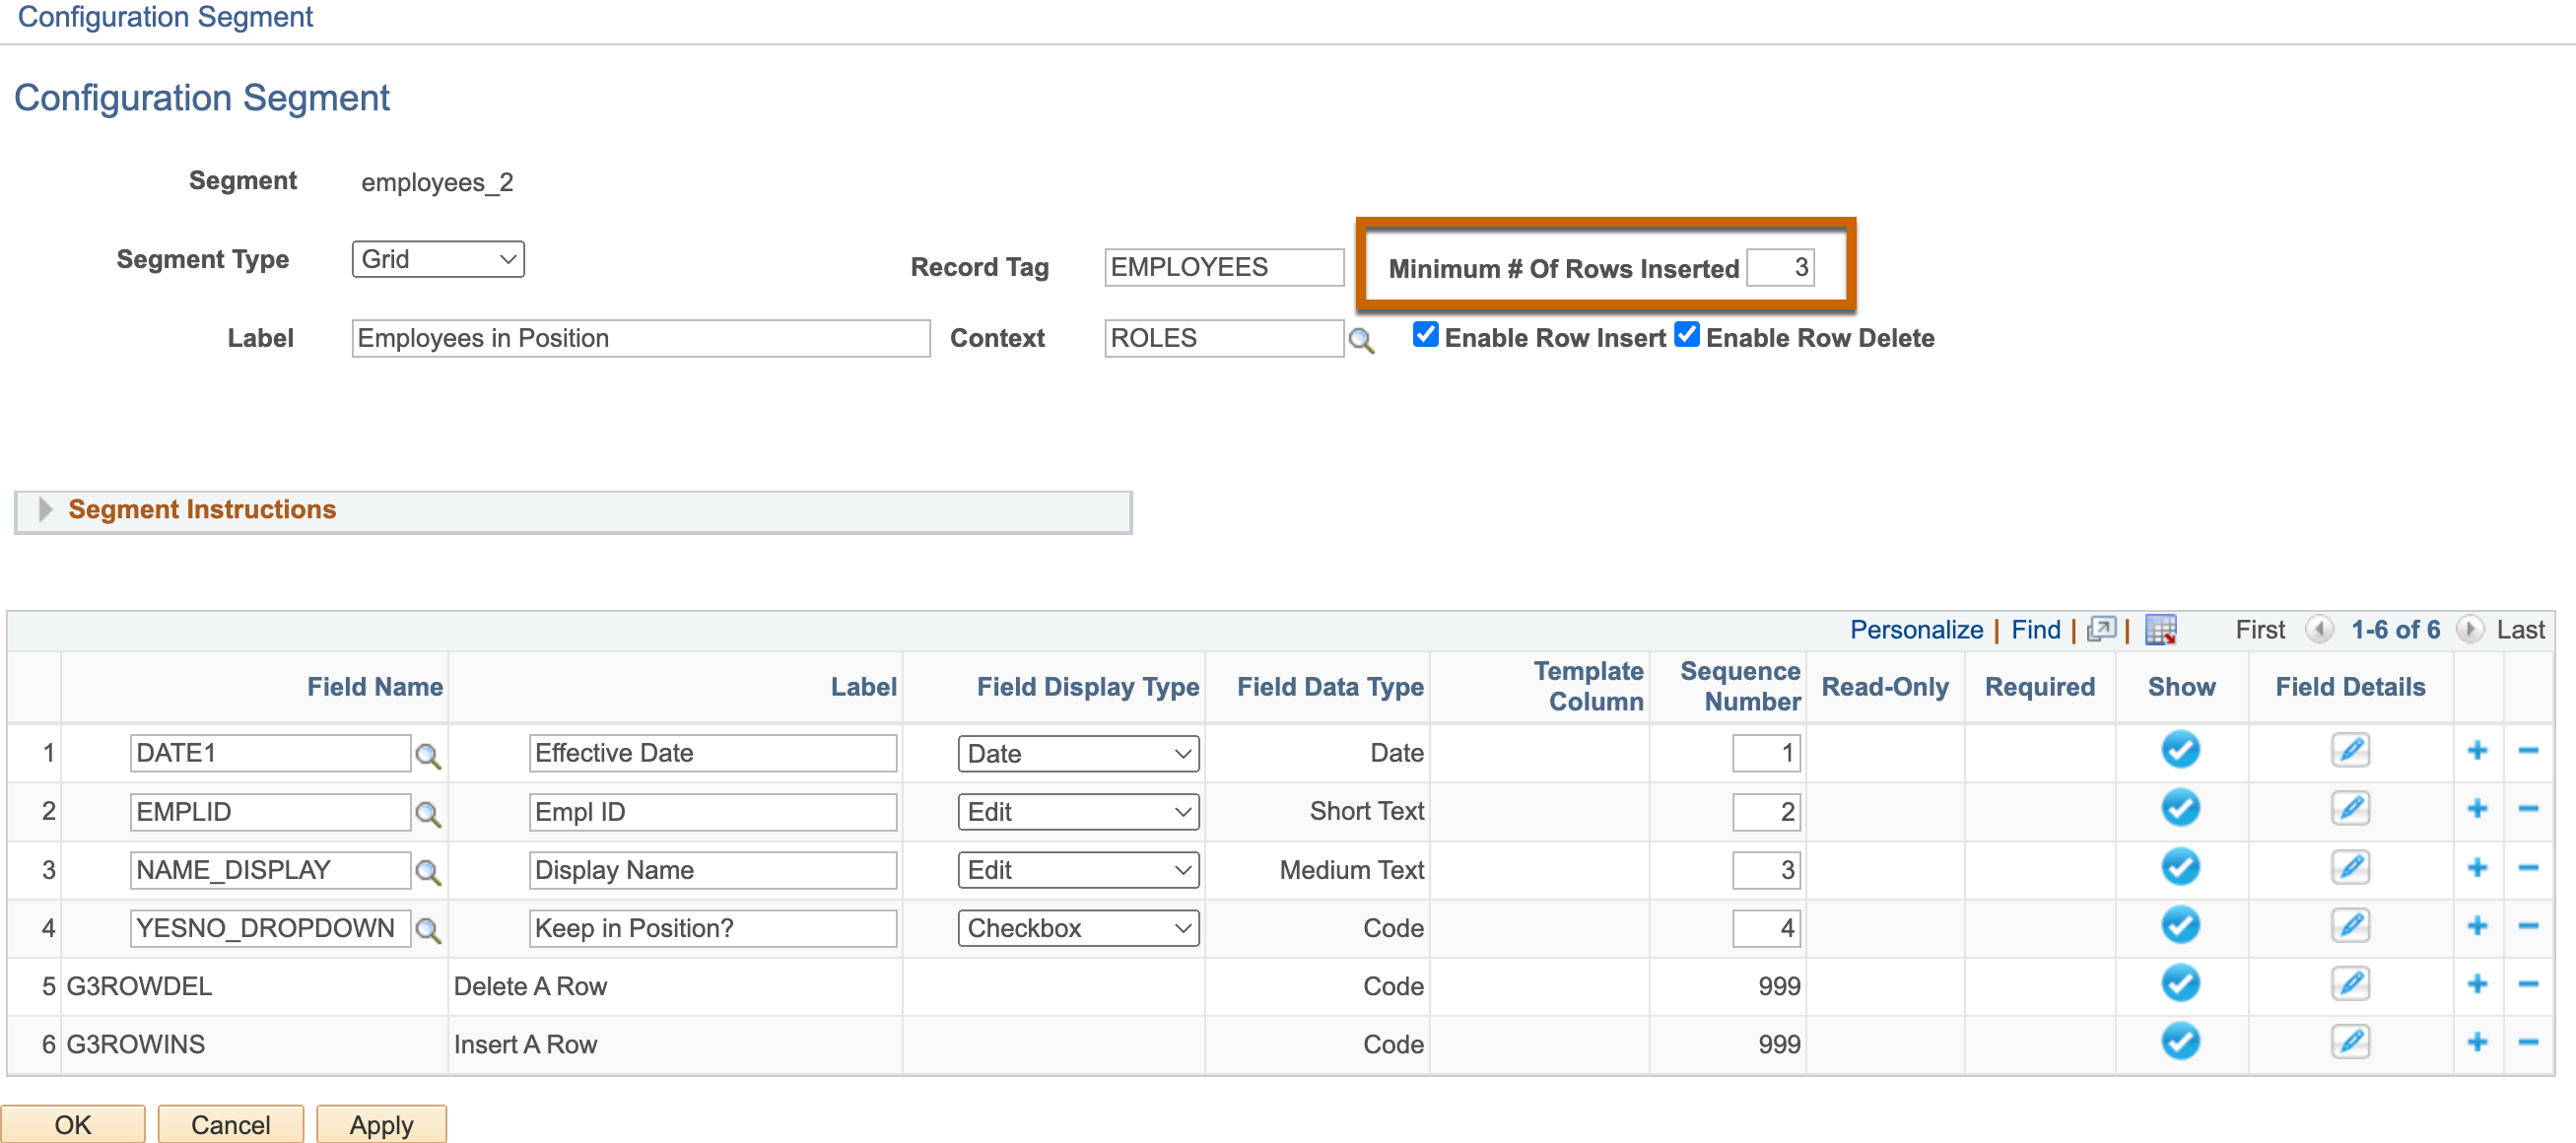
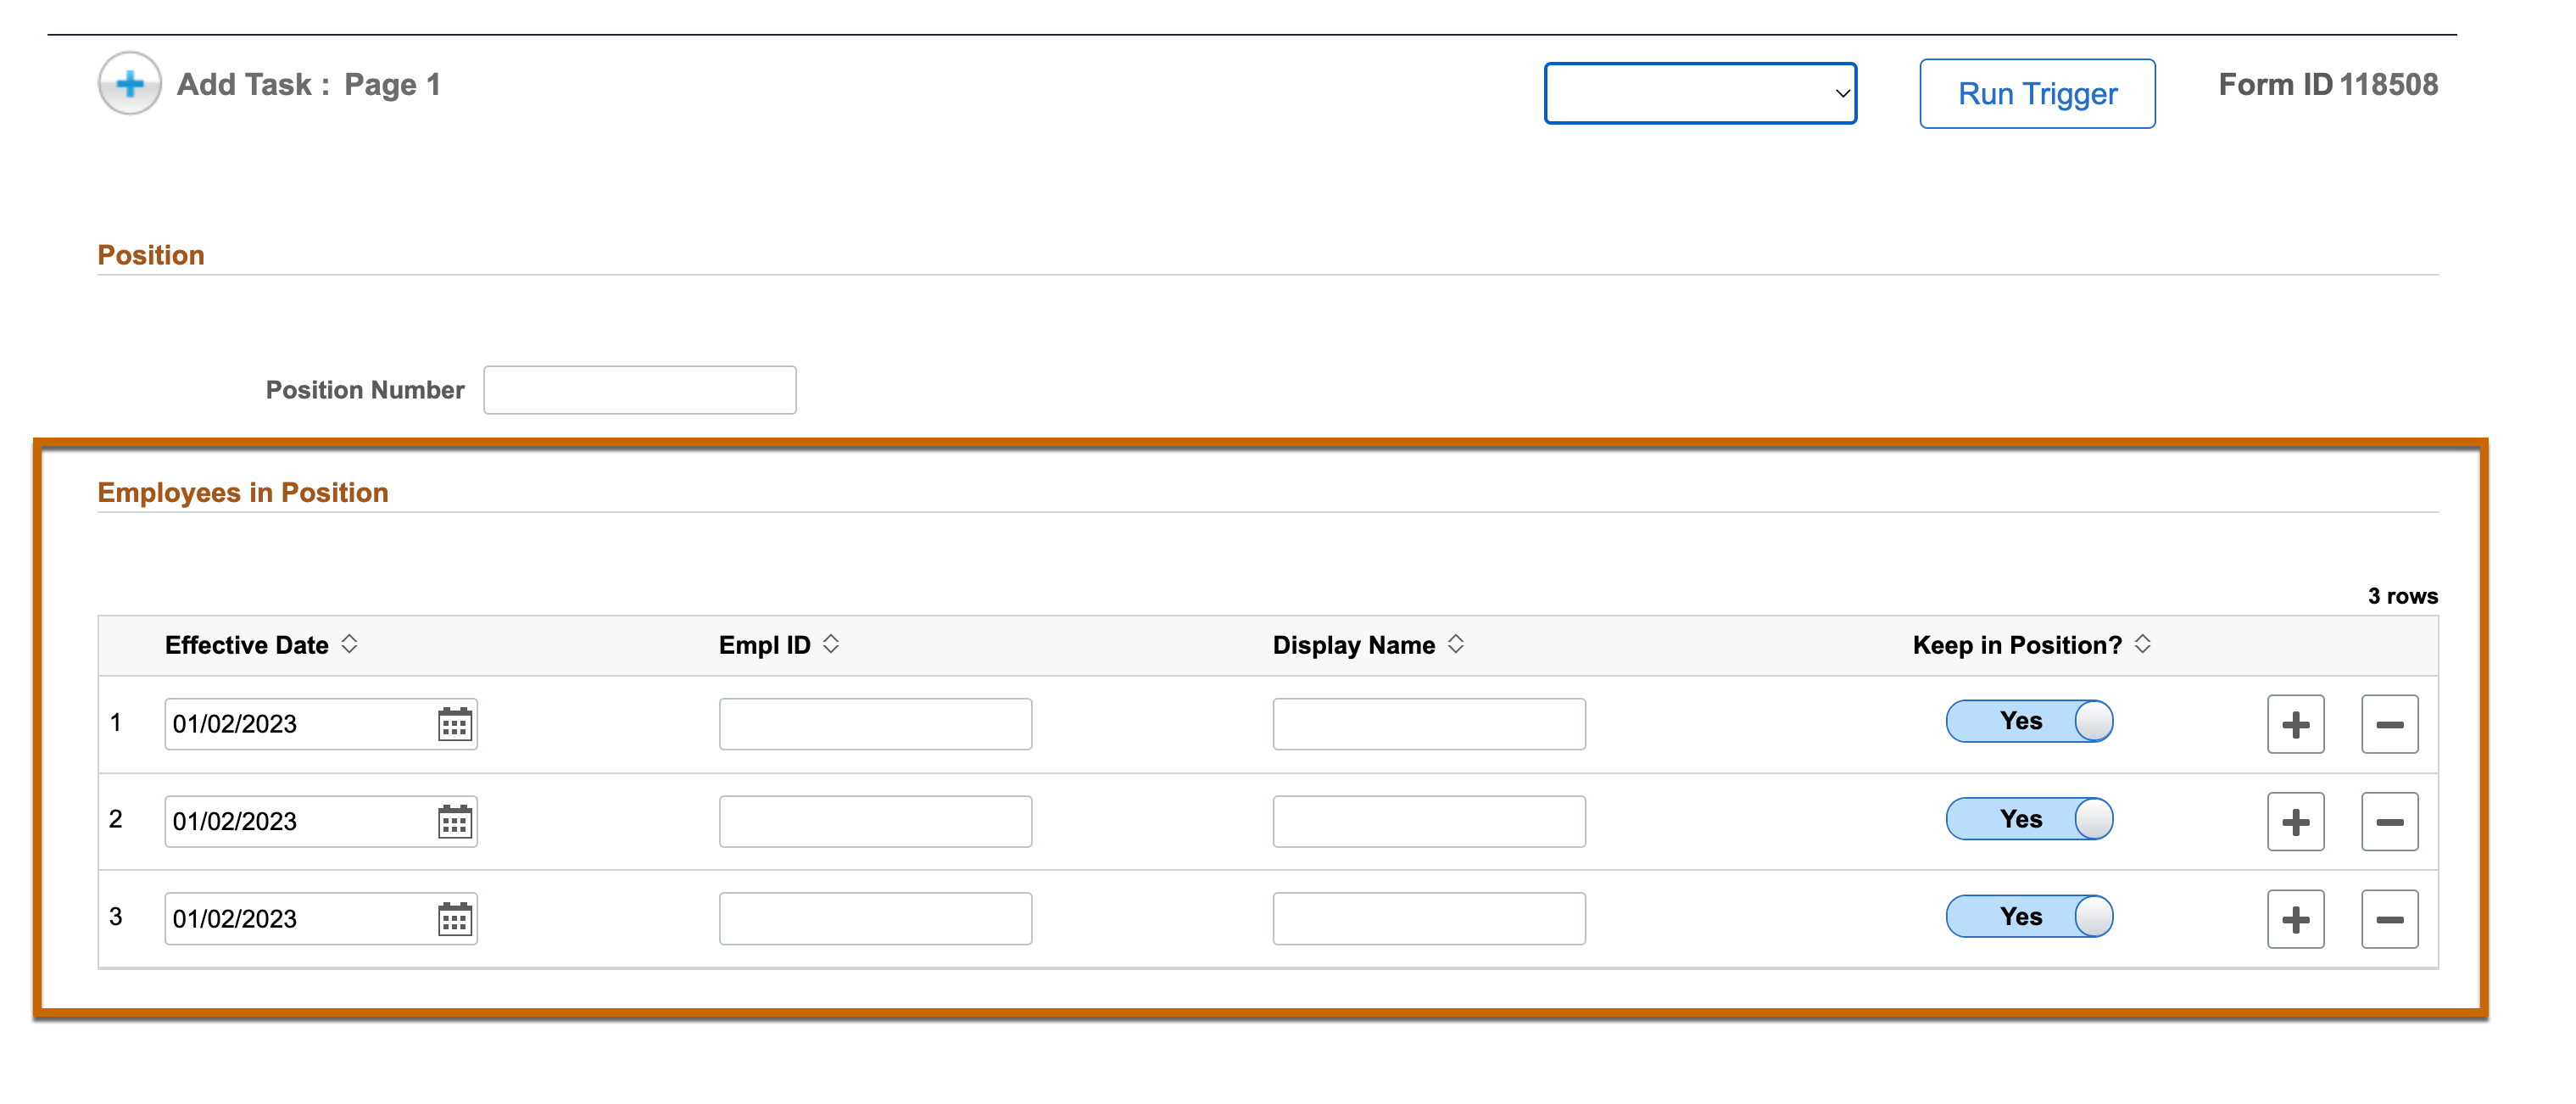
Minimum Number of Rows
An additional feature allows you to specify the minimum number of rows a grid should start with.
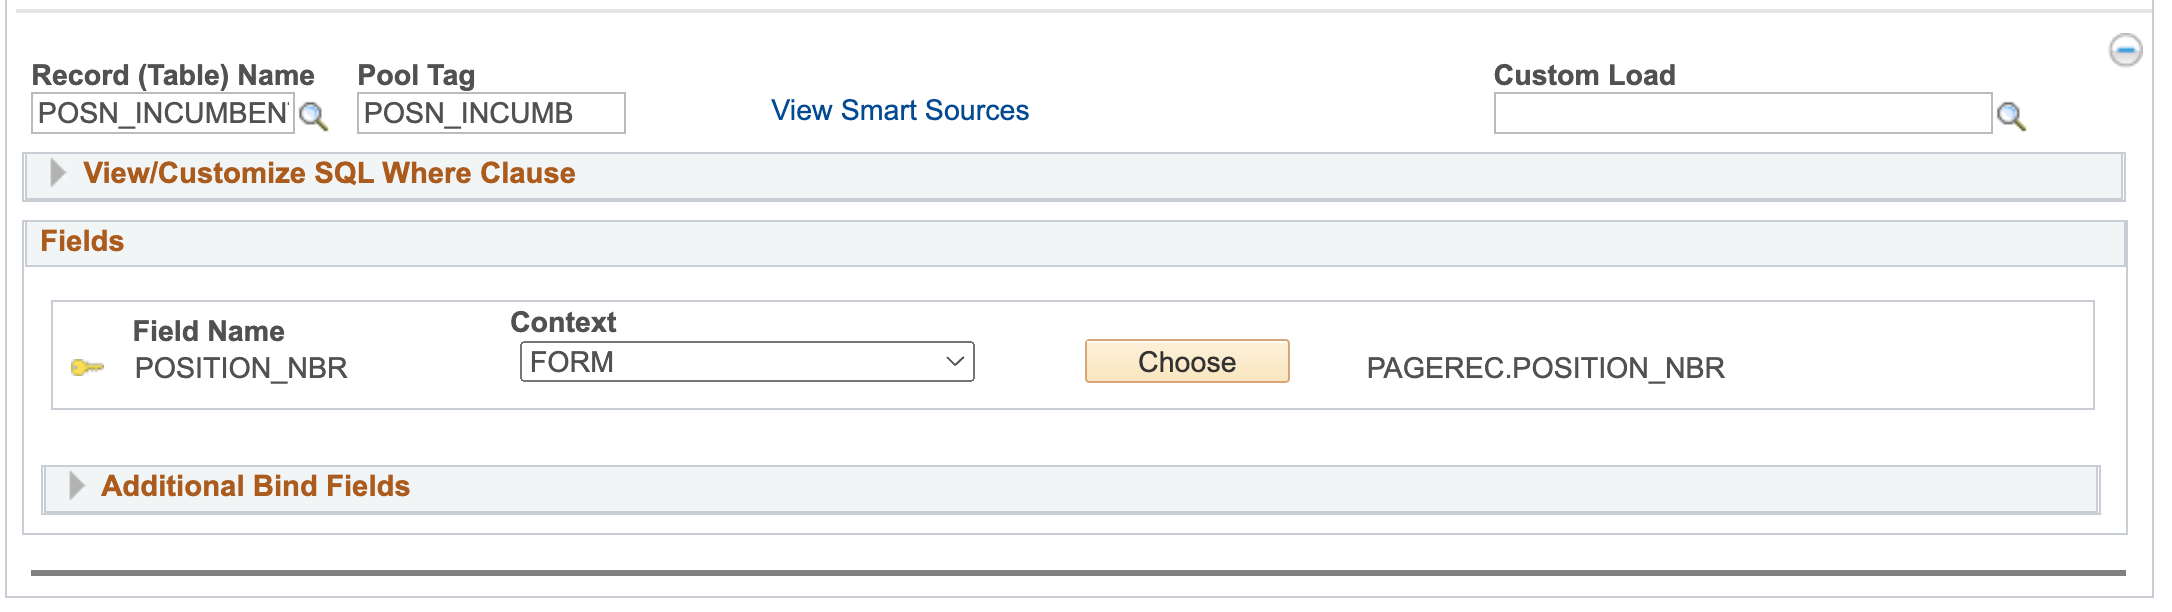
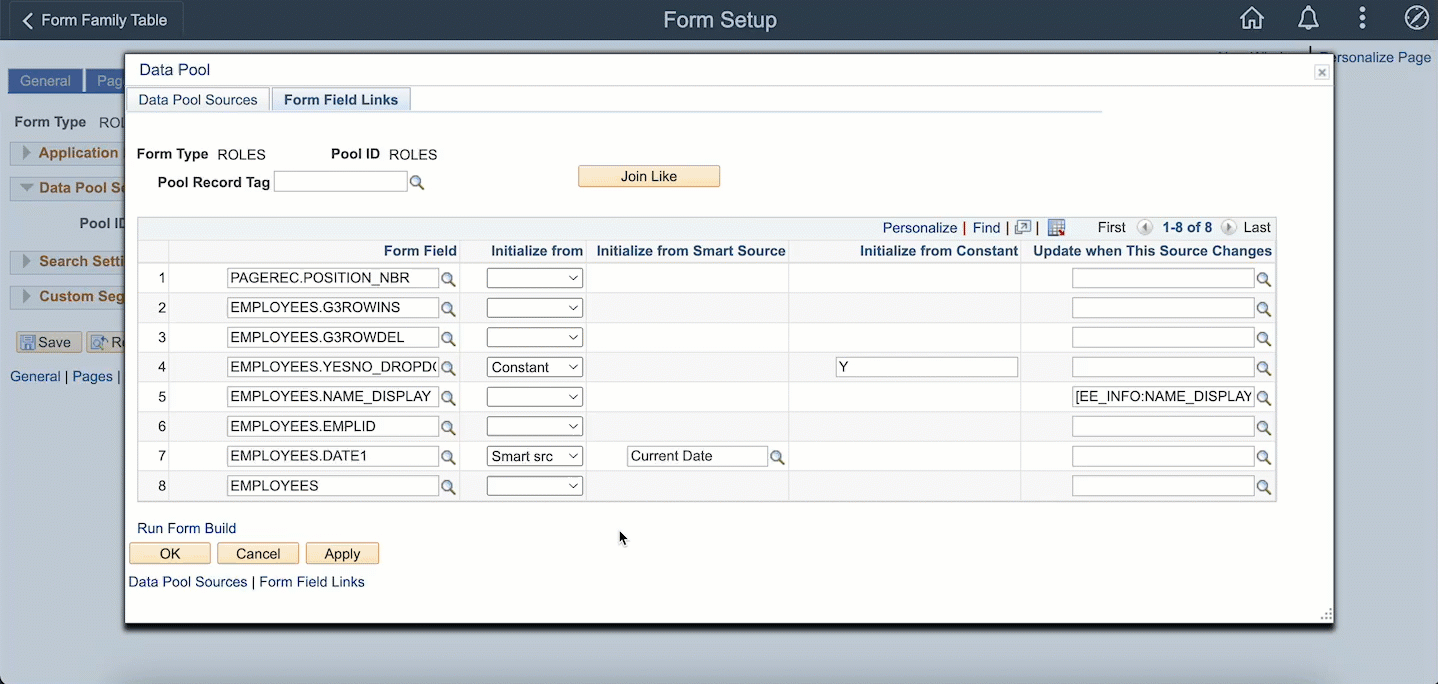
Grid-Level Data Population
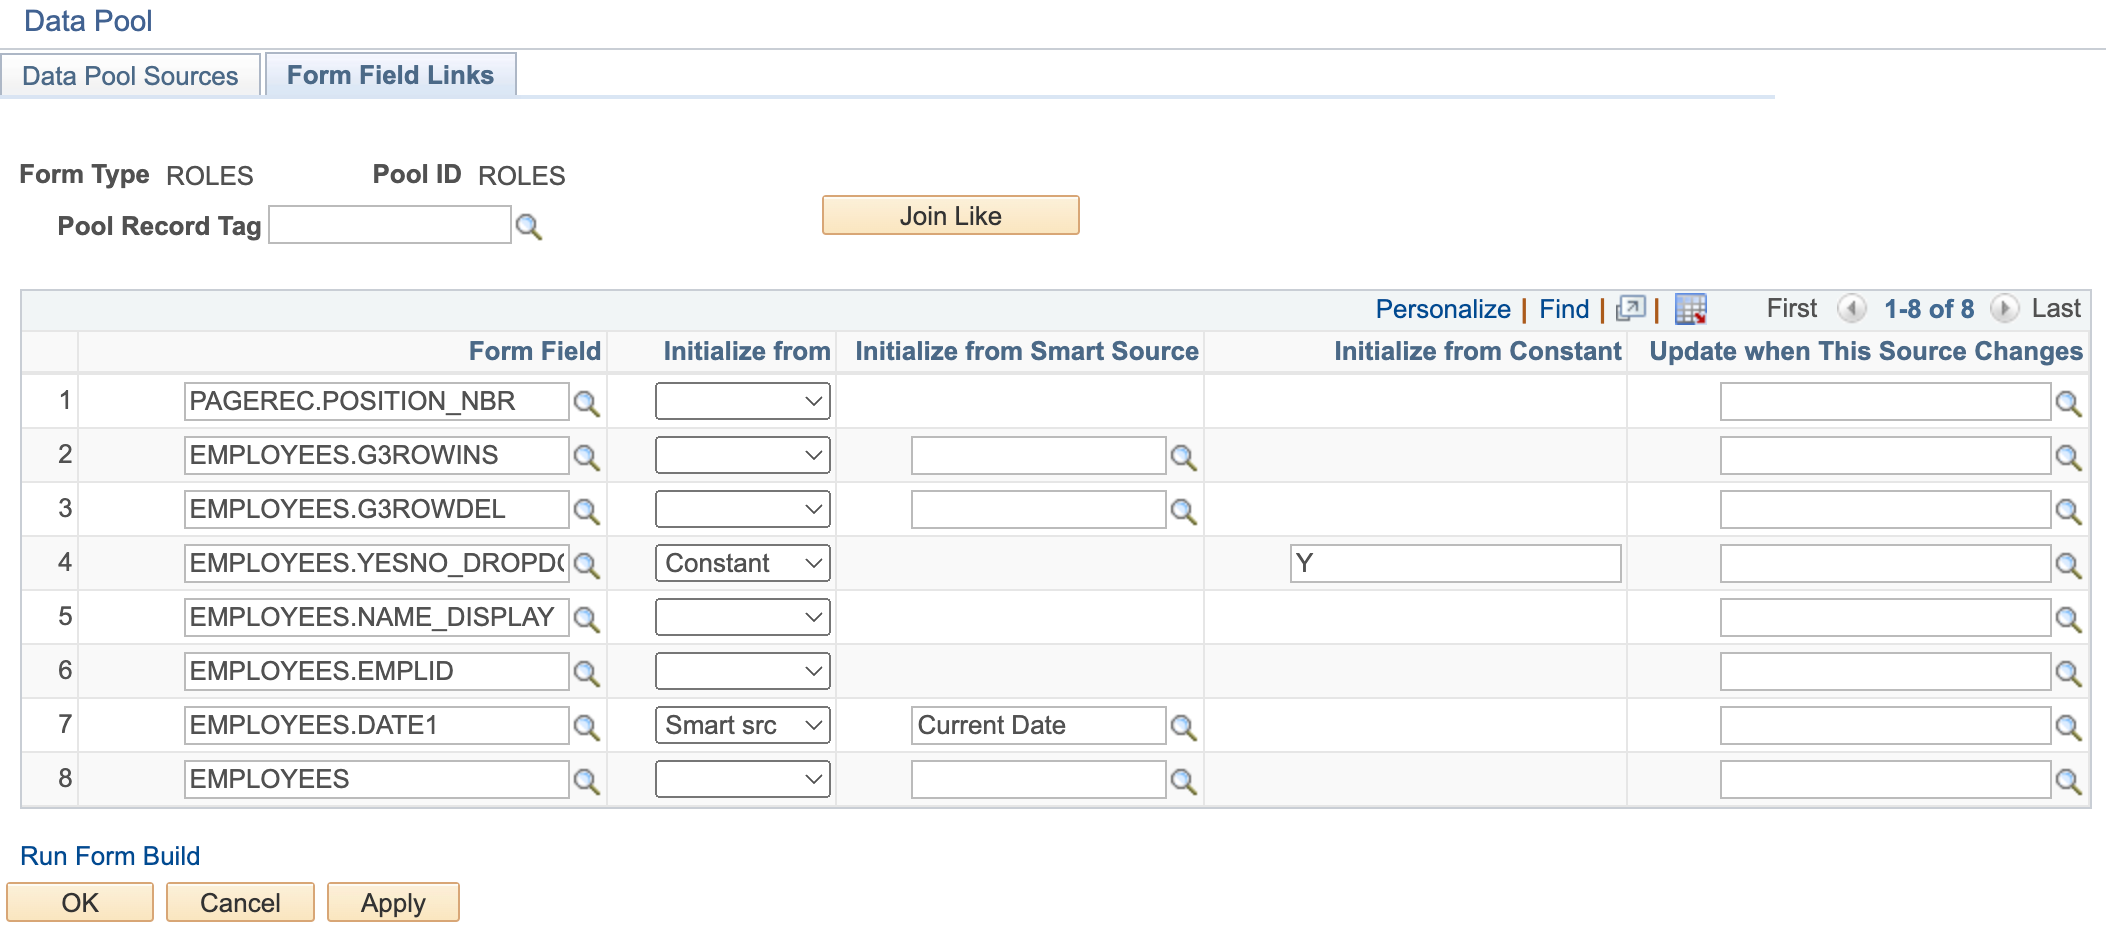
Now let's say you need to load an entire grid with data; for example, to load all the employees (incumbents) in a position. Previously, this was a technical task accomplished with a PeopleCode Custom Load part.
The setup for grid-level population is similar to column and row-level setup but with a few differences:
- On the Form Field Links tab of the Data Pool, map the form grid record tag to a Data Pool source (Pool Tag) on the Initialize or Update columns. This initializes or updates the grid with the number of rows in the Data Pool source. You can then set any grid fields to initialize or update from the Data Pool source fields.
- A new "Ignore" context is available to ignore keys and return all rows without regard for that key field's values.
The following example initializes a grid with incumbents for a position and updates the grid of incumbents if the user changes the position number.
Video: Grid-Level Setup – Initialize and Update When Source Changes👇
Video: Grid-Level Form Example – Initialize and Update When Source Changes👇
A max of 200 rows can be loaded to a grid using configuration. If more than 200 rows are needed, use code to load the data into the grid.
LogicStacks
The ability to use form and database data using SmartSources and conditional logic using Visual Ifs are two of the most wonderful features of GT eForms. With GT eForms 3.58, they can now be combined to create even more flexibility with LogicStacks! With LogicStacks, you gain the ability to apply conditional branching to data in your eForms.
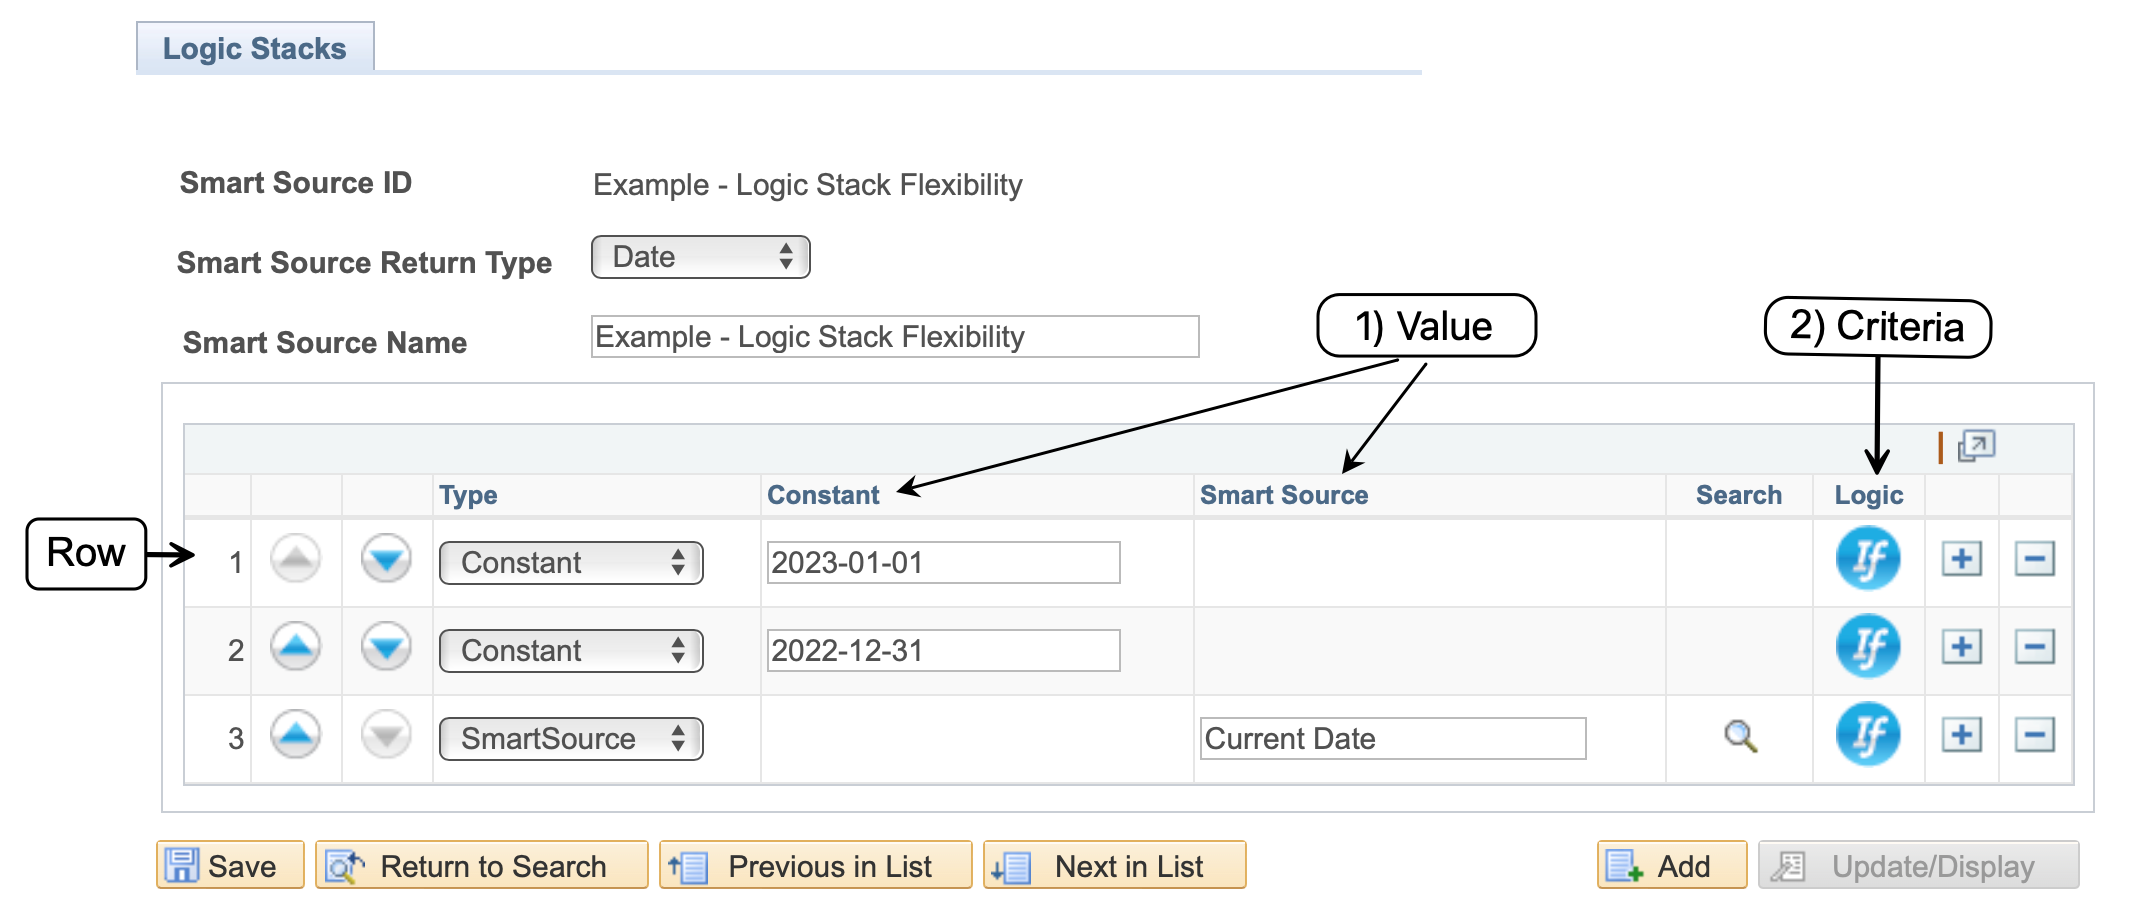
Each row of a LogicStack has 2 parts:
- Value: This can be a fixed constant value such as 25, or a SmartSource (a PeopleCode SmartSource such as Current Date, a form field SmartSource, or a Data Pool field SmartSource).
- Logic (Criteria): This is a VisualIf that returns True/False. E.g. Use this value if the person filling out the form is a manager.
You can add as many rows to your Logic Stack as you would like. Each row is checked in order. The first row with a Visual If that is True has the value the LogicStack will return. These are SmartSources not specific to an individual form, a LogicStack SmartSource can be used throughout our product. You can even use a LogicStack as a SmartSource within another LogicStack!
You can use LogicStacks anywhere you can use SmartSources – dynamically show/hide form elements, initializing or updating form field data, satisfying Data Pool keys, identifying an approver, email templates, etc. – the possibilities are endless!
Tailored Form Navigation Buttons
We often hear requirements around form action buttons like:
- Can I hide the Hold button?
- Can I change the label on the Deny (or Recycle) button?
- Can I add a Save button on Evaluate?
The answer previously was "Yes, but it requires some coding". Not anymore! You can now customize and change the labels on the form buttons on the Pages tab of the Form Setup using a new "Buttons" link next to the "Participation Roster" section on each task.
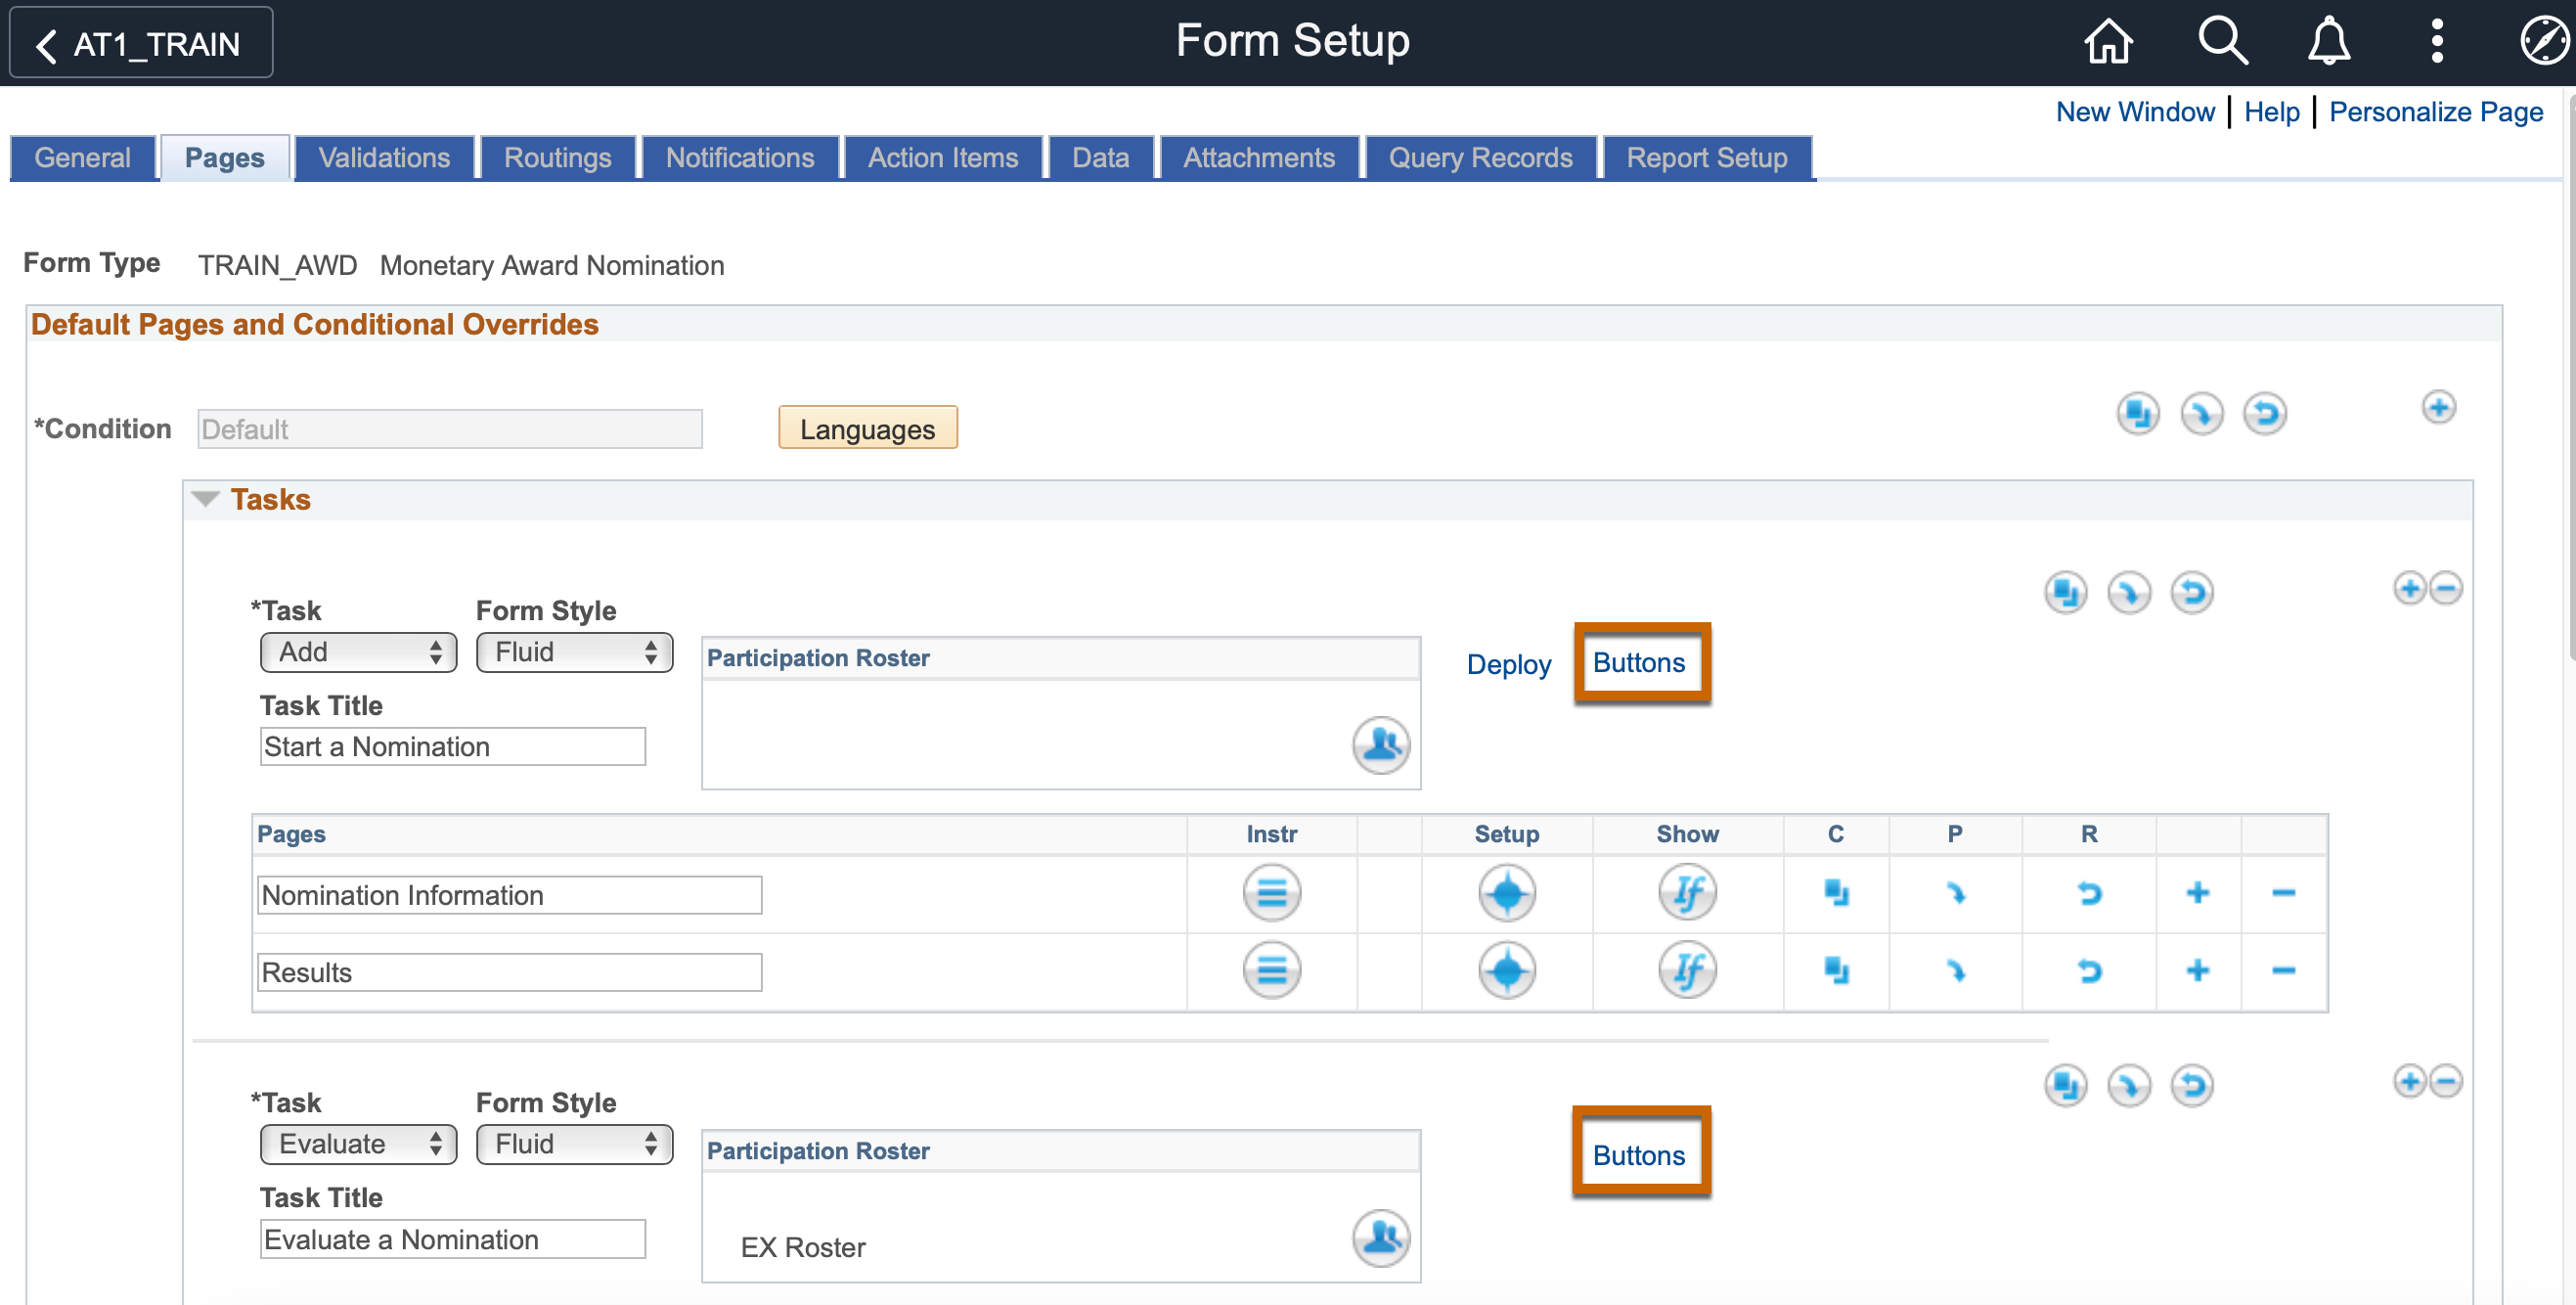
The Navigation Buttons page provides the ability to always show/hide buttons or to conditionally show/hide them based on a VisualIf. You can also always or conditionally disable the buttons (appear greyed out). Last of all you can copy the button configuration from other forms/conditions/tasks.
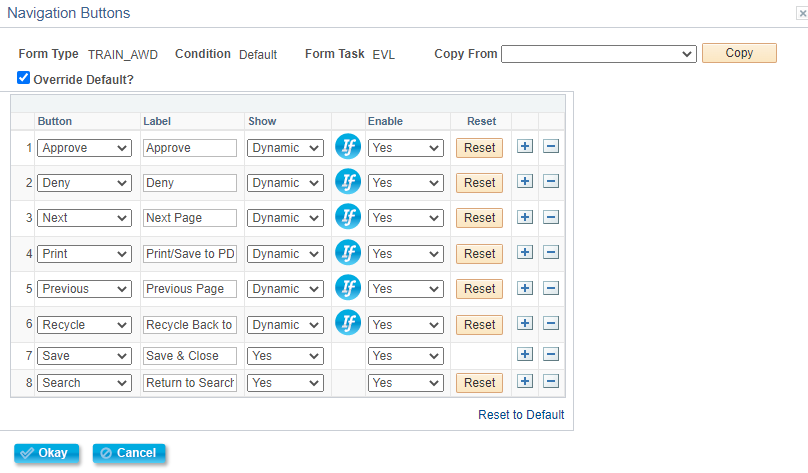
The functionality that is triggered when clicking a button hasn't changed (e.g. Deny still denies the eForm). Coding would be required to override that functionality.
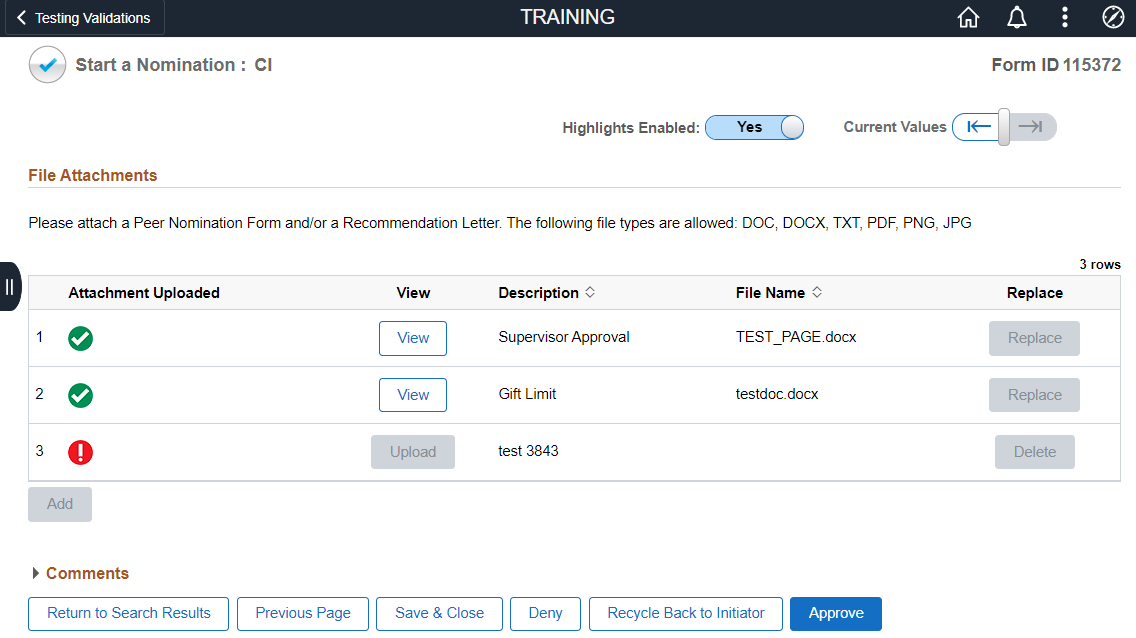
We’ve also created a handful of new delivered PeopleCode Visual If Parts to use like Is Last Page, Has Previous Page, and Is History Mode to use in your Visual Ifs to determine when buttons should show/hide. Be sure to check out of "Delivered Visual If Definitions" document to see all the new Visual If Parts available. Here is just a sample of some customizations we applied to our Training Award form.
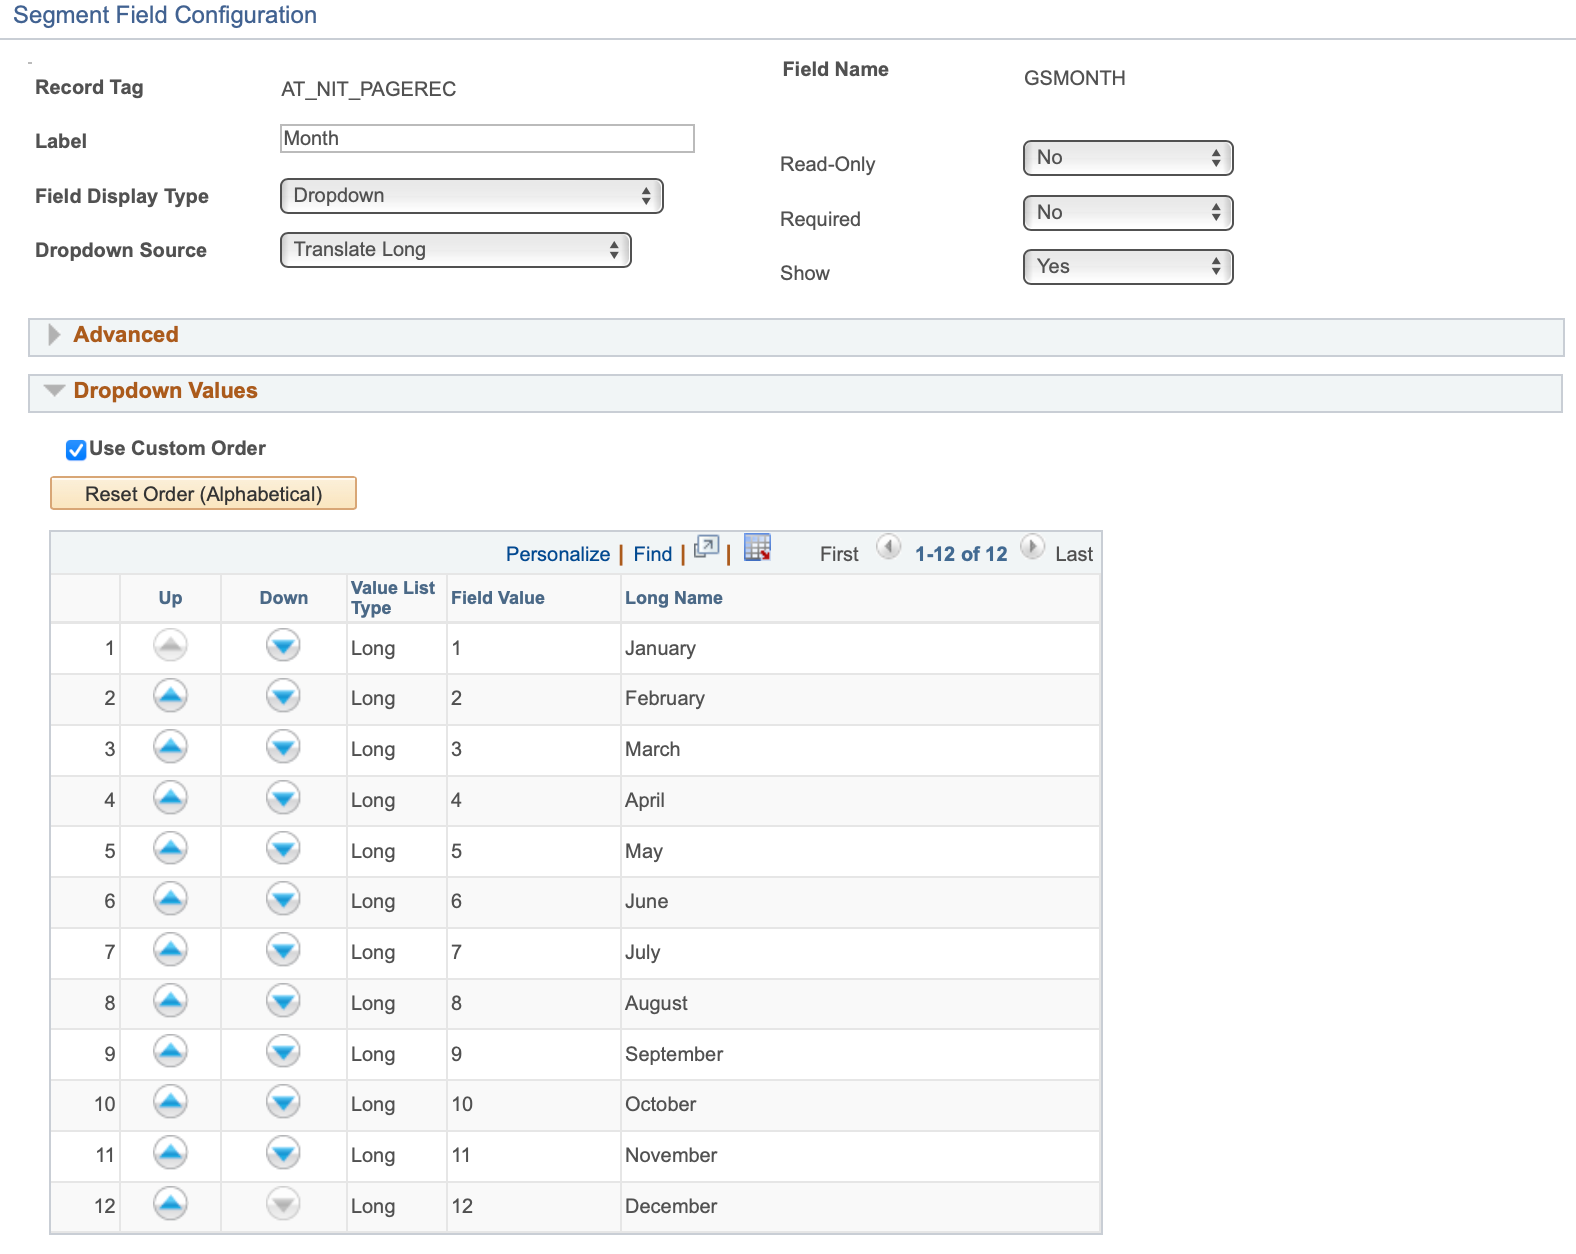
Value Lists
Have you wanted to create a dropdown with a custom list of values without the overhead of creating a new field and translate values? Have you wanted to customize the order of the values in a dropdown but realized PeopleSoft always shows them alphabetically? This release fills both those needs.
The Dropdown Source has a new "Value List" option that allows you to create a list of values and labels. It is not tied to PeopleSoft’s Translate Values.
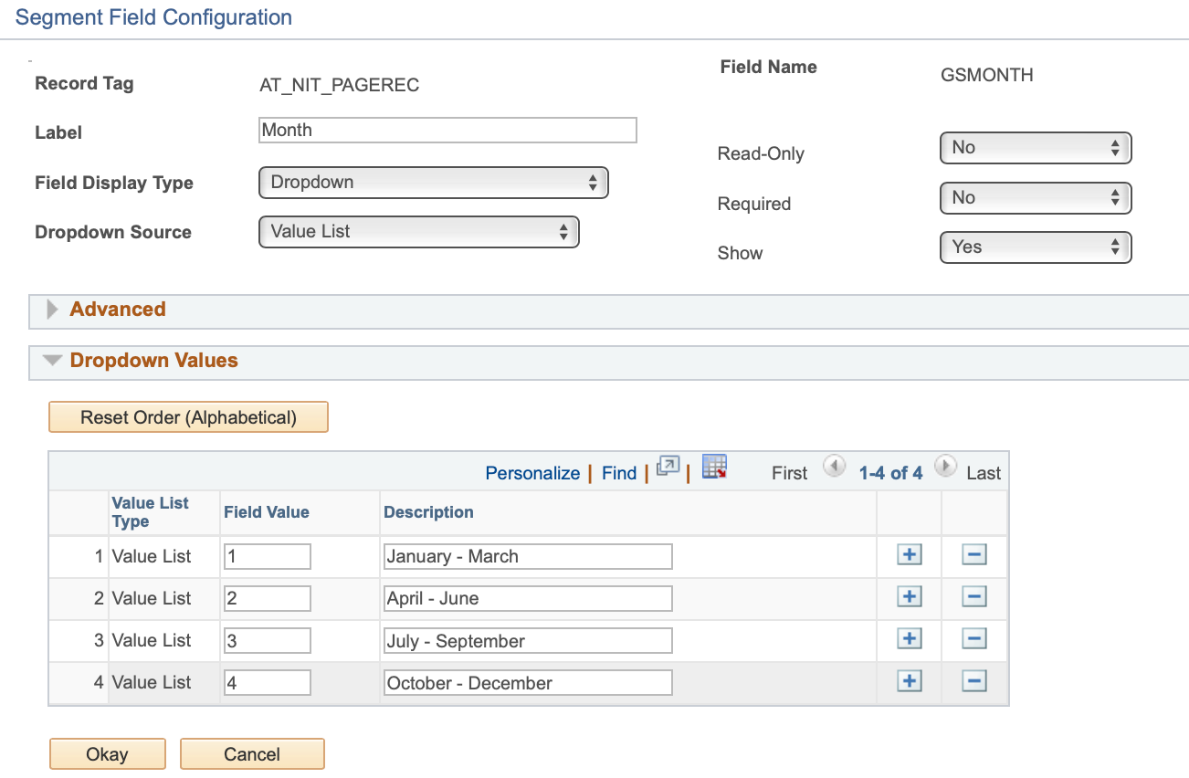
You can also use and sort a field's Translate Values in your dropdown.
Before

After
Please refer to the Pages Tab feature document to get additional information on how you can utilize the power of Value Lists.
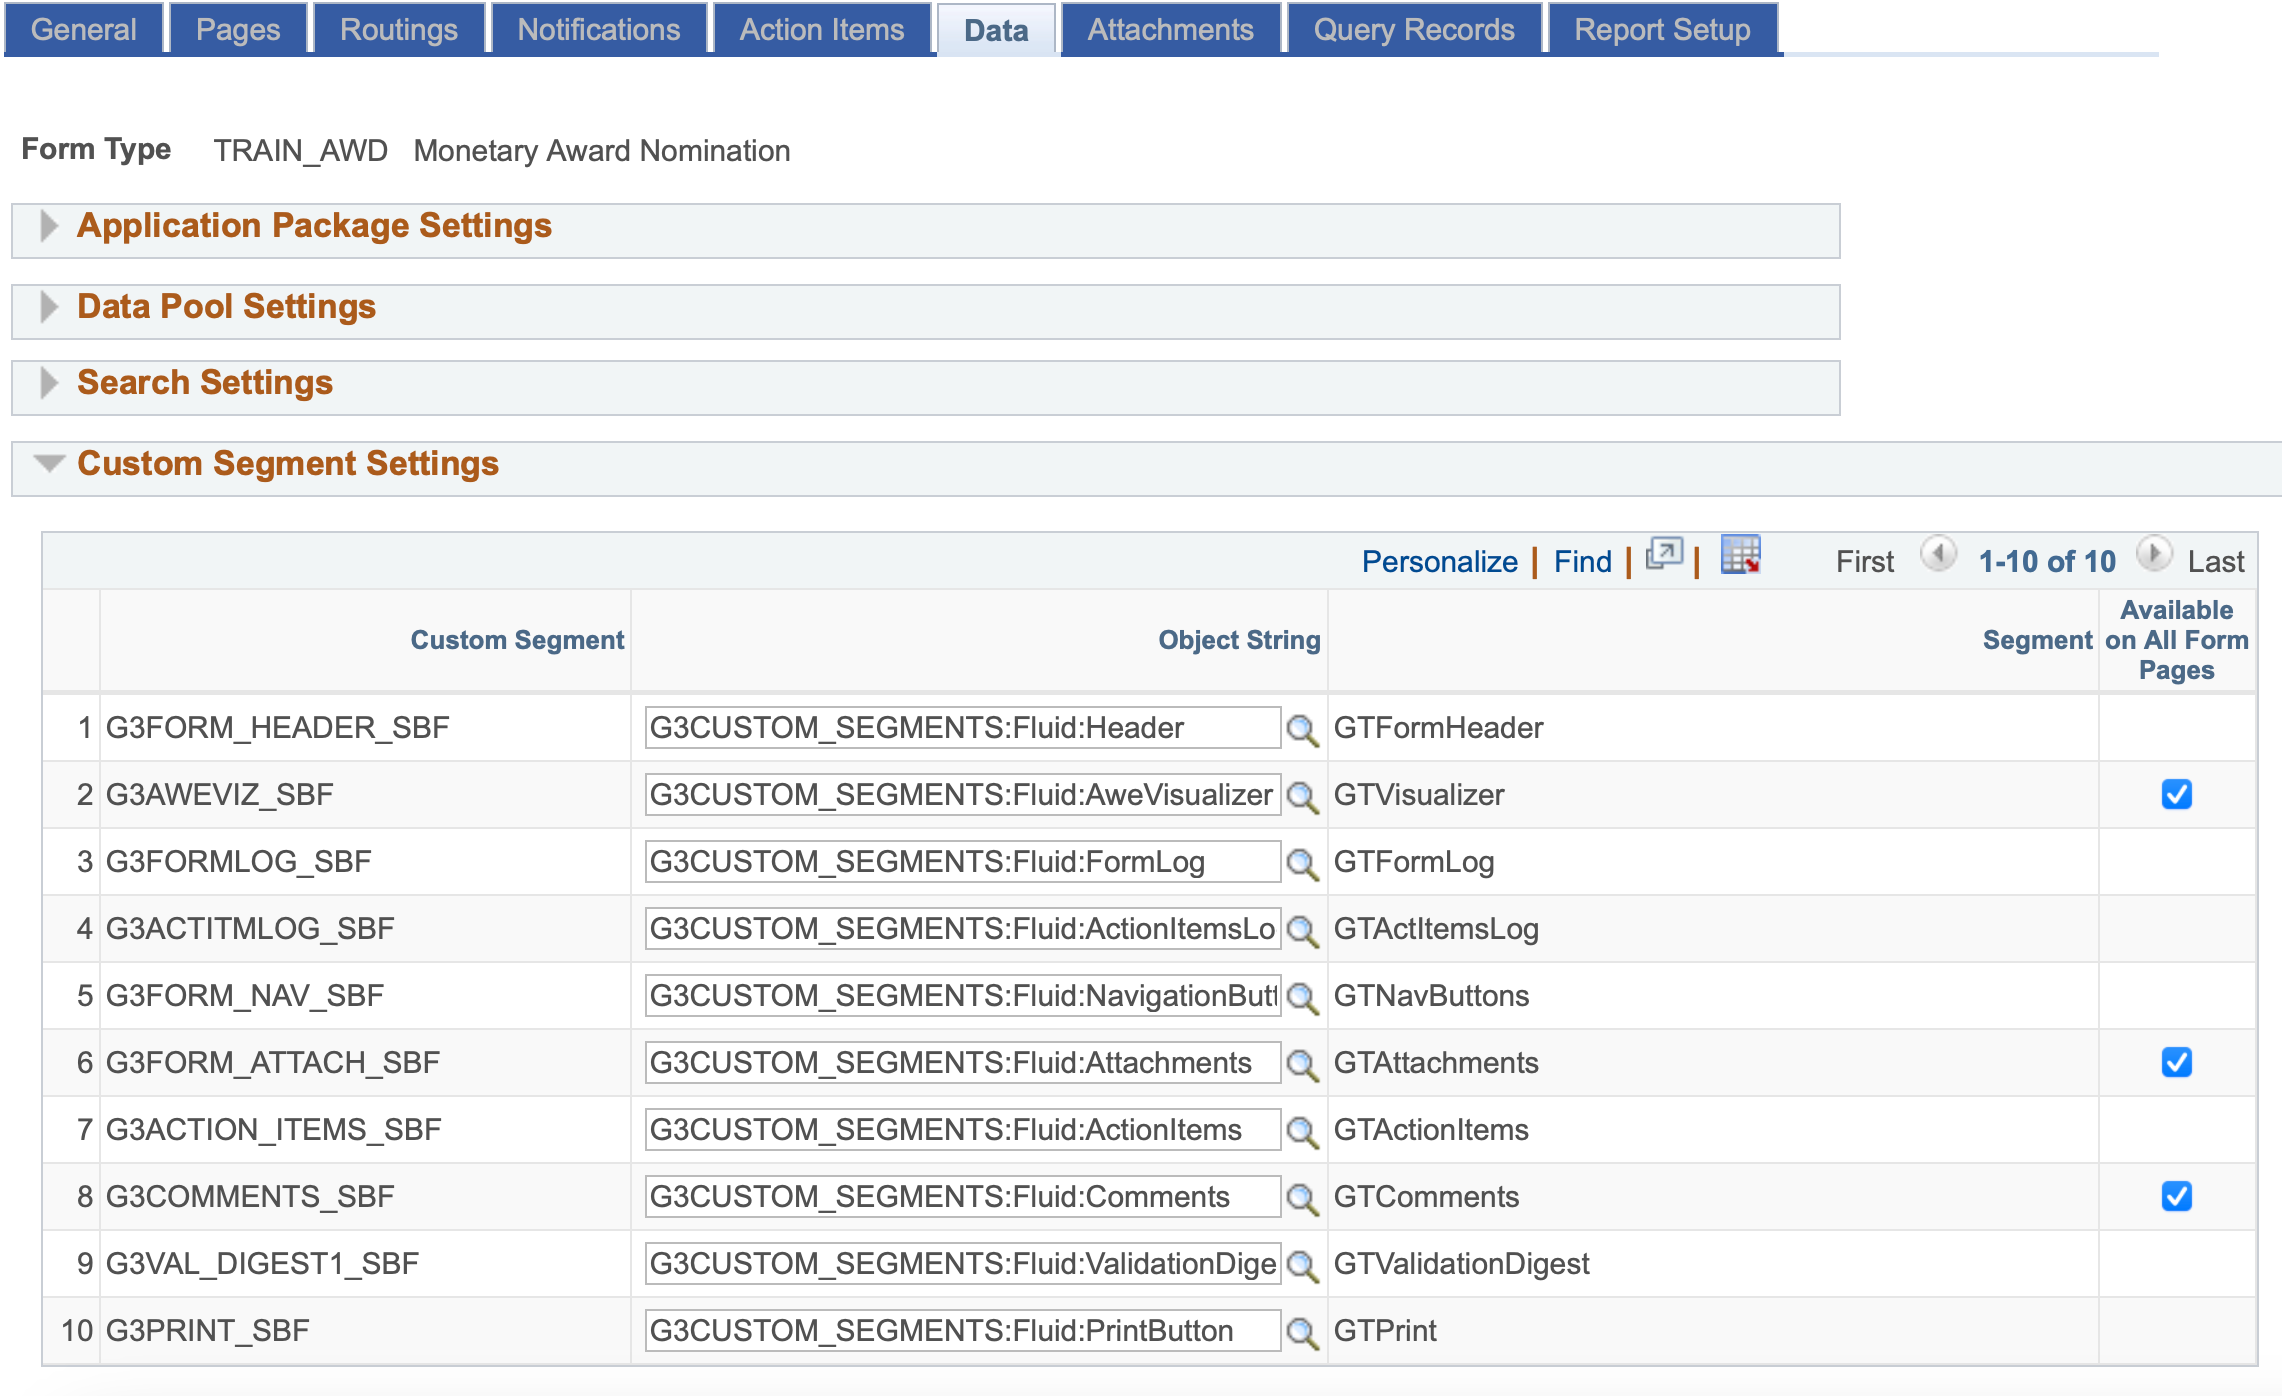
Custom Segments on Multiple Form Pages and New Visual If Options
We have added new flexibility for the Comments, Attachments, and AWE Visualizer segments using Visual Ifs. A few examples of how you might use these Visual Ifs include:
- Don't show the delivered Comments segments on a form
- Show the Comments and Attachments segments on an earlier page
- Require a comment before the user can go the next page
- Show the AWE Visualizer so an approver can see the workflow while reviewing the form
Below is an overview of the new Visual If options and where these segments can show.
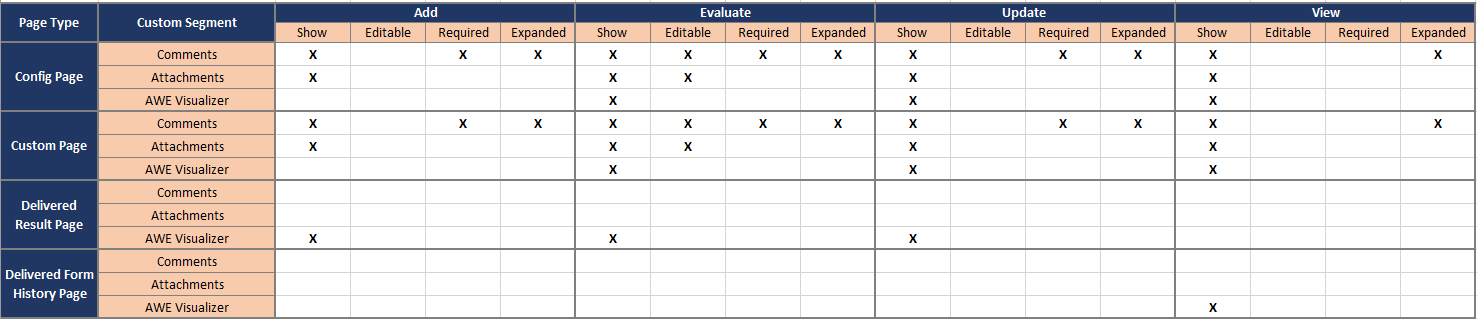
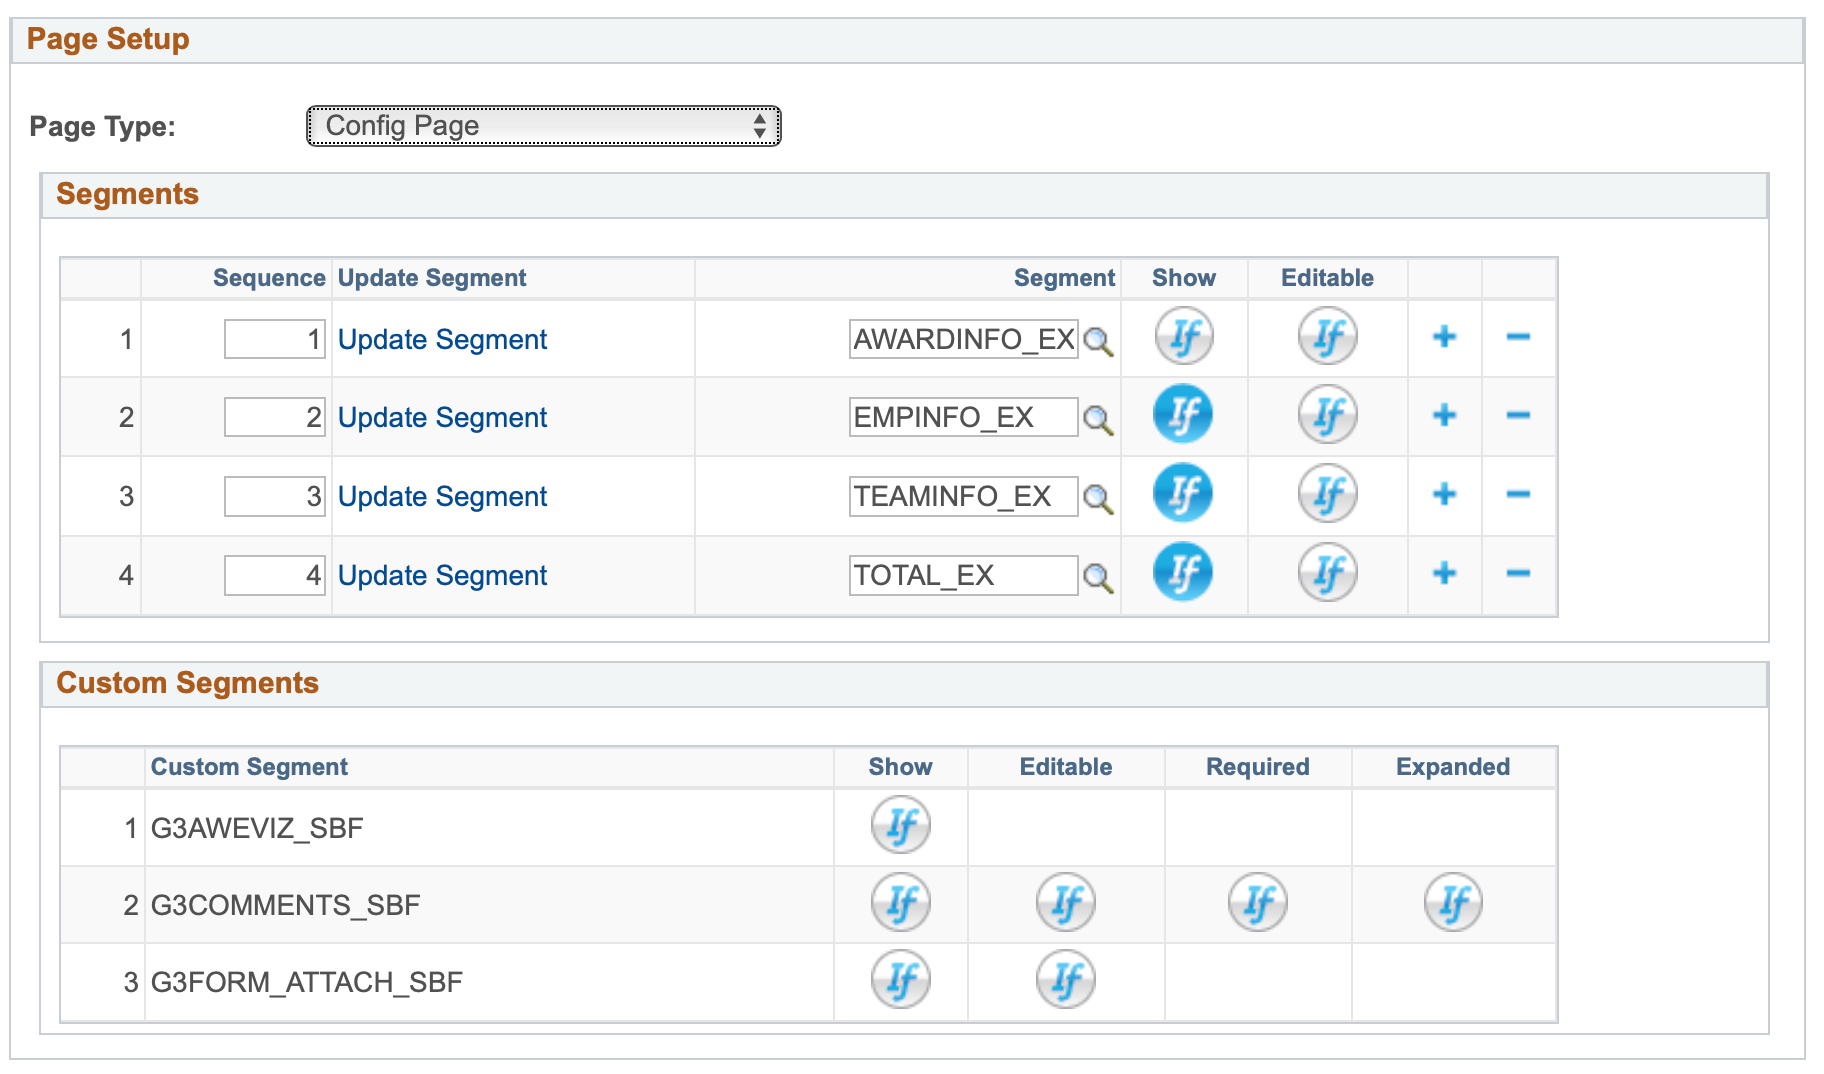
By default, eForms only show segments on the last page of the form. You can allow the segments to show on any page using this new checkbox in the last column of the "Custom Segments Settings" grid.
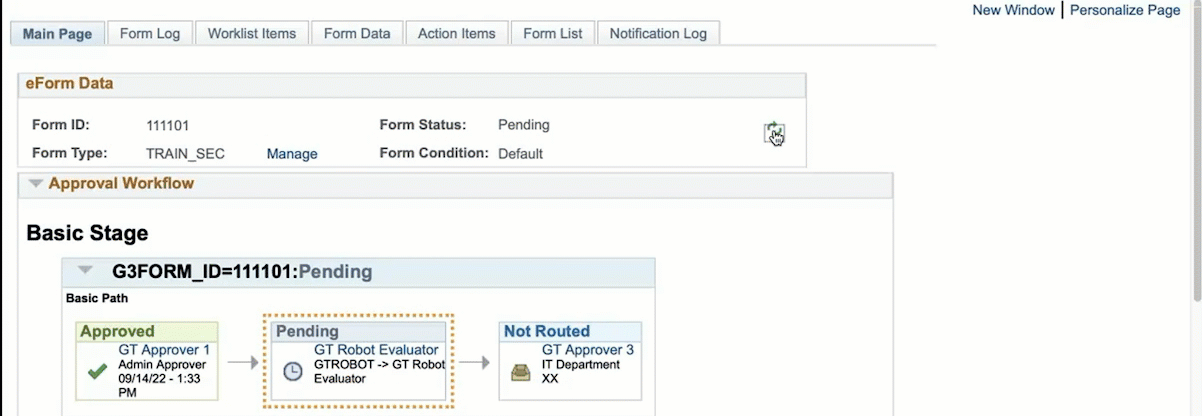
GT Robot
Do you have forms that require a human user to periodically check a queue to see if forms can be acted upon? If so, configuring a robot approver might be an answer! The GT Robot can be configured to act (approve, deny, etc.) on specified form transactions based on conditional logic (Visual If).
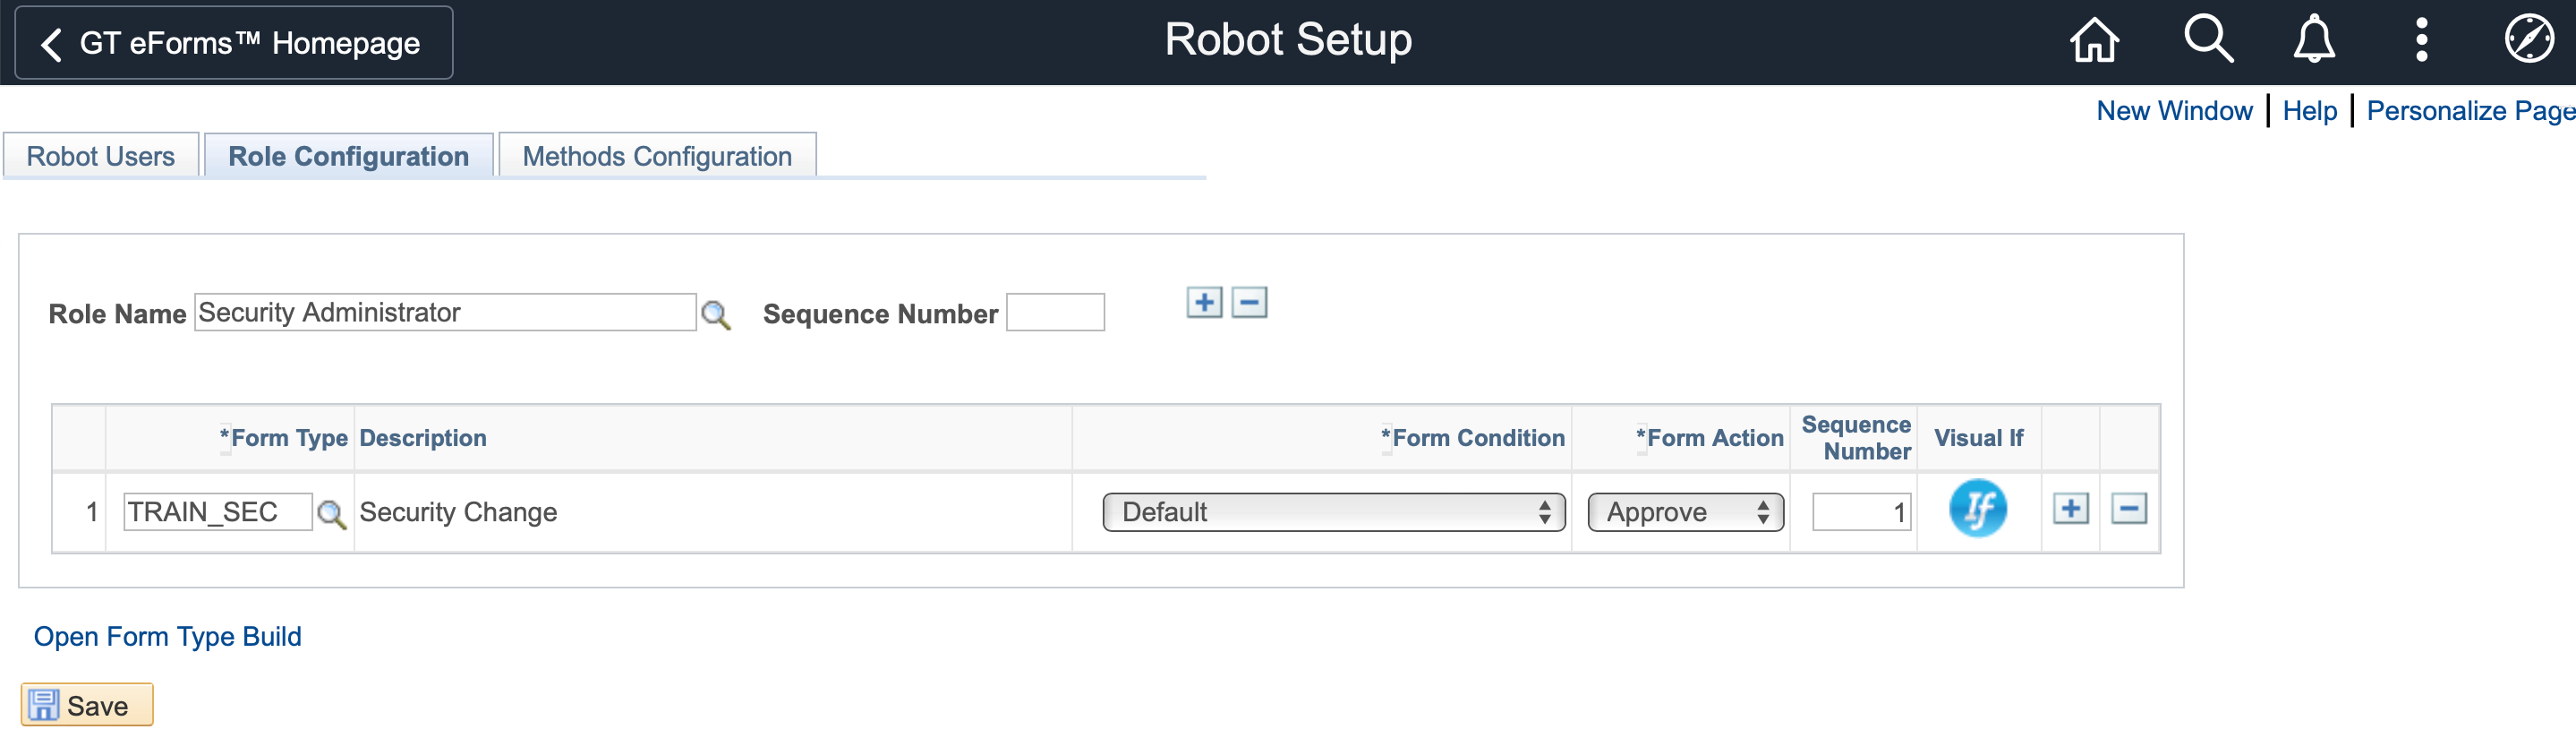
You might want to have forms routed to a robot approver to:
- Approve a referral form transaction once all referrals are complete
- Approve a security form transaction once the user profile is created
- Withdraw a form transaction once it has been sitting for 30 days
Video: Robot Auto-Approval Demonstration in Form Admin Tool👇
For more details on these new Robot features, please see the Robot Setup feature documentation on the GT Customer Self Service site.
Additional Enhancements
GT Admin Tool – Updated Search Criteria
The Form Admin Tool search has been improved. You can now search based on Form Family, Original Oprid (Form Creator), and the first three Form Keys.

Form Keys vary by Form Type
Delivered View for eForm Approval History
Have you ever wished you could query the approval flow history for an eForm? A new view has been added to the framework called G3AWE_FRM_USTEP that will now allow you to query approval history for form transactions. You can use a PS Query to see all the users for a workflow step that the form was routed to. You can also see which users approved, didn’t approve, were skipped, and which steps were admin approved. The view also includes the User IDs, time stamps, and any terminated workflow history when the form has been resubmitted. If using a PS Query, create a Process query type when querying the new view.
Fixes
Forms Engine
Column and Grid Config Segments
- Made a change that prevents more than 20 fields from being added to a grid segment since is the framework maximum.
- Fixed issue where forms with only one grid segment would not open.
- Fixed issue where a visual if on Display Only option of a field in a grid was deleting out the data from the field it references.
Logic
- Fix issue where inactive values were not filtering out of prompts and dropdowns on 3.50 Helium forms.
- Fixed an issue where advanced field details were saved inconsistently after using the Modify Data Pool link. Some changes triggered a save while others did not. Additionally, issues with loading the Data Pool a second time from this page were resolved as well. Changes made while in the Data pool will also now correctly sync back to the field details page.
Query Records
- Made a change where clicking the “Check for Built” button on the Query Records tab of Form Setup will now work regardless of database version. Previously, the button would only check if the query records were built in an Oracle environment. Now, the button should work for any database and will only throw an error if the records are not built.
Other
- Fixed an issue where the roster group name “save as” feature was not saving the roster details.
- Fixed an issue where a newly created roster group was blank and if the roster was cleared out and the original roster group opened, the original roster criteria was duplicated and included the newly added roster criteria.
- Fixed an issue with form keys where the G3KEYNUM field on G3FORMKEY was getting multiple rows with the same value assigned for the same Form ID.
- Made a change that allows more than 999 rows on the Transaction/Form log.
- Fixed issue where Medium Text fields that contained a short value but had a related display would appear with a lot of white space between the end of the value and the description.
- Fixed issue where abandoning a form then opening a different form type would carry over data from the previous form.
- Fixed issue where Attachments and Action Item Log segments were not displayed in the View task for forms submitted prior to upgrading to 3.50 Helium.
Workflow and Notification Engine
- If an approver determines changes to a form transaction are needed, we recommend using the recycle functionality to send the form back to the initiator to make the changes. When the initiator resubmits the GT eForm, it is sent through the workflow again. This approach ensures all workflow participants are aware of and approve the final state of the form transaction. AWE offers an alternative approach with its pushback functionality which pushes the transaction back to the preceding approver. The developer can call a function we deliver in a hook to utilize this pushback functionality. See the “Allow AWE’s Pushback Event on a workflow” section in the “GT 3 API Documentation” for details.
Search
- Fixed issue where fields without a label in App Designer did not pull the label from the Form Setup when generating results fields on Search Set search pages.
- Made changes to search pages to remove fields that were not used and suppressed fields on form factors where they were not relevant to enhance search performance.
GT Utilities
GT Admin Tool
- Fixed an issue where forms with parallel path workflow structures could not be authorized in the Form Admin Tool.
Form Type Build
- Changed label from “Use Process Monitor” to “Use Process Scheduler” on checkbox field.
Other
- Fixed issue in Attachment Population Utility not always save after updating nodes in the form XML.
- A link has been added to the GT eForms Installation page that attributes open source libraries the product uses. These are the libraries in use:
- QuillJS for Rich Text Fields
- VisJS vis-network for Network Visualizer
- The OWASP Java HTML Sanitizer library to mitigate cross-site scripting risk in Rich Text Fields
- Additional Jar java libraries on which OWASP depends
Form Transporter
Setup
- Changed the behavior of the “Don't Load Parts on Import” checkbox on the Transporter Setup tab of Form Transporter Utilities to function more intuitively in this release. The checkbox now affects only the loading of custom parts. “GS” objects (those created by the form building engine from the form setup) are loaded irrespective of this setting whenever the form setup is saved or a form transported via Form Transporter.
Form Transporter Errors
Form Transporter (FT) used to mask some form transporting errors. These silent errors would cause failed or incomplete form setup migrations. As these errors were located in client code, they still occur when using FT, but no longer fail silently to aid the developer with troubleshooting migrations. The most common cause of FT failure is client code that triggers an exception in a class constructor. When the GT eForms Framework ™ migrates form setup, it instantiates client objects. Errors in object constructors during form migration cause a database rollback. Using a try-catch block DOES NOT prevent these rollbacks. The following is a list of common coding problems that cause such errors. GT encourages clients to inspect their PeopleCode object constructors for these issues to prevent migration problems:
- Referencing component variables outside of a form context, such as &G3FRM, which the framework does not instantiate during FT migration. FT also does not provide parameters to the constructor, but these typically don’t cause a rollback.
- Compile errors, including those caused by referencing missing objects.
- Referencing objects that don’t exist such as PeopleTools objects (application packages, records, etc.) that have not yet been migrated to the target environment.
- SQL errors, such as those caused by referencing tables that are not built, data that does not exist in the target environment, statements expecting unprovided parameters, etc.
Security and Message Catalogs
Message Catalog
- Filled or removed several blank message numbers from the framework message catalog (message set number 24842).
Other
- Removed messages related to tiles used for GT’s testing that appeared when editing the GT eForms Homepage in Structure and Content.
- Fixed an issue where an incorrect message was displayed if a user was not included in a form participation roster. Users will now correctly see “You are not authorized to perform this task with this type of form.” if they access a form task they do not have access to via the participation roster.
Technical Fixes
- Made changes to allow
DisplayOnlySegmentOverridemethod to work on 3.50 Helium forms. PromptSQLOverridewas working with just Standard, but now works with both Standard and Helium.- Fixed compile error that was caused by references to
G3FORM:Actions.formwith&G3FRMinstead. - Made a change to increase
G3PPC_IDto 100 characters to fix an issue with multiple custom loads in the same app package with only one appearing in the drop-down in the Data Pool config. - Resolves an issue that was preventing the new 3.50 Field Paint hook from firing on rows >= 2.
- Changed the baritemname from
G3FORM_FLUIDtoG3FORM_FLto resolve issue where this code was returning a blank menu. - Fixed an issue where the
getOutputFieldmethod in the FieldTag class returned the Data Field associated with theFieldTag’sGFieldinstead of the Output Field that is used for styling. A new method,getGFieldField, was added that accomplishes the same purpose as the old code. - Fixed token solution pattern for 3.50 Helium resolve a .NULL error prevented emails from sending.
- Made change to allow custom code to enable a form to save without navigating to the results page.
- Made a change to prevent performance issues where forms that load in grid data can only load up to 200 rows.